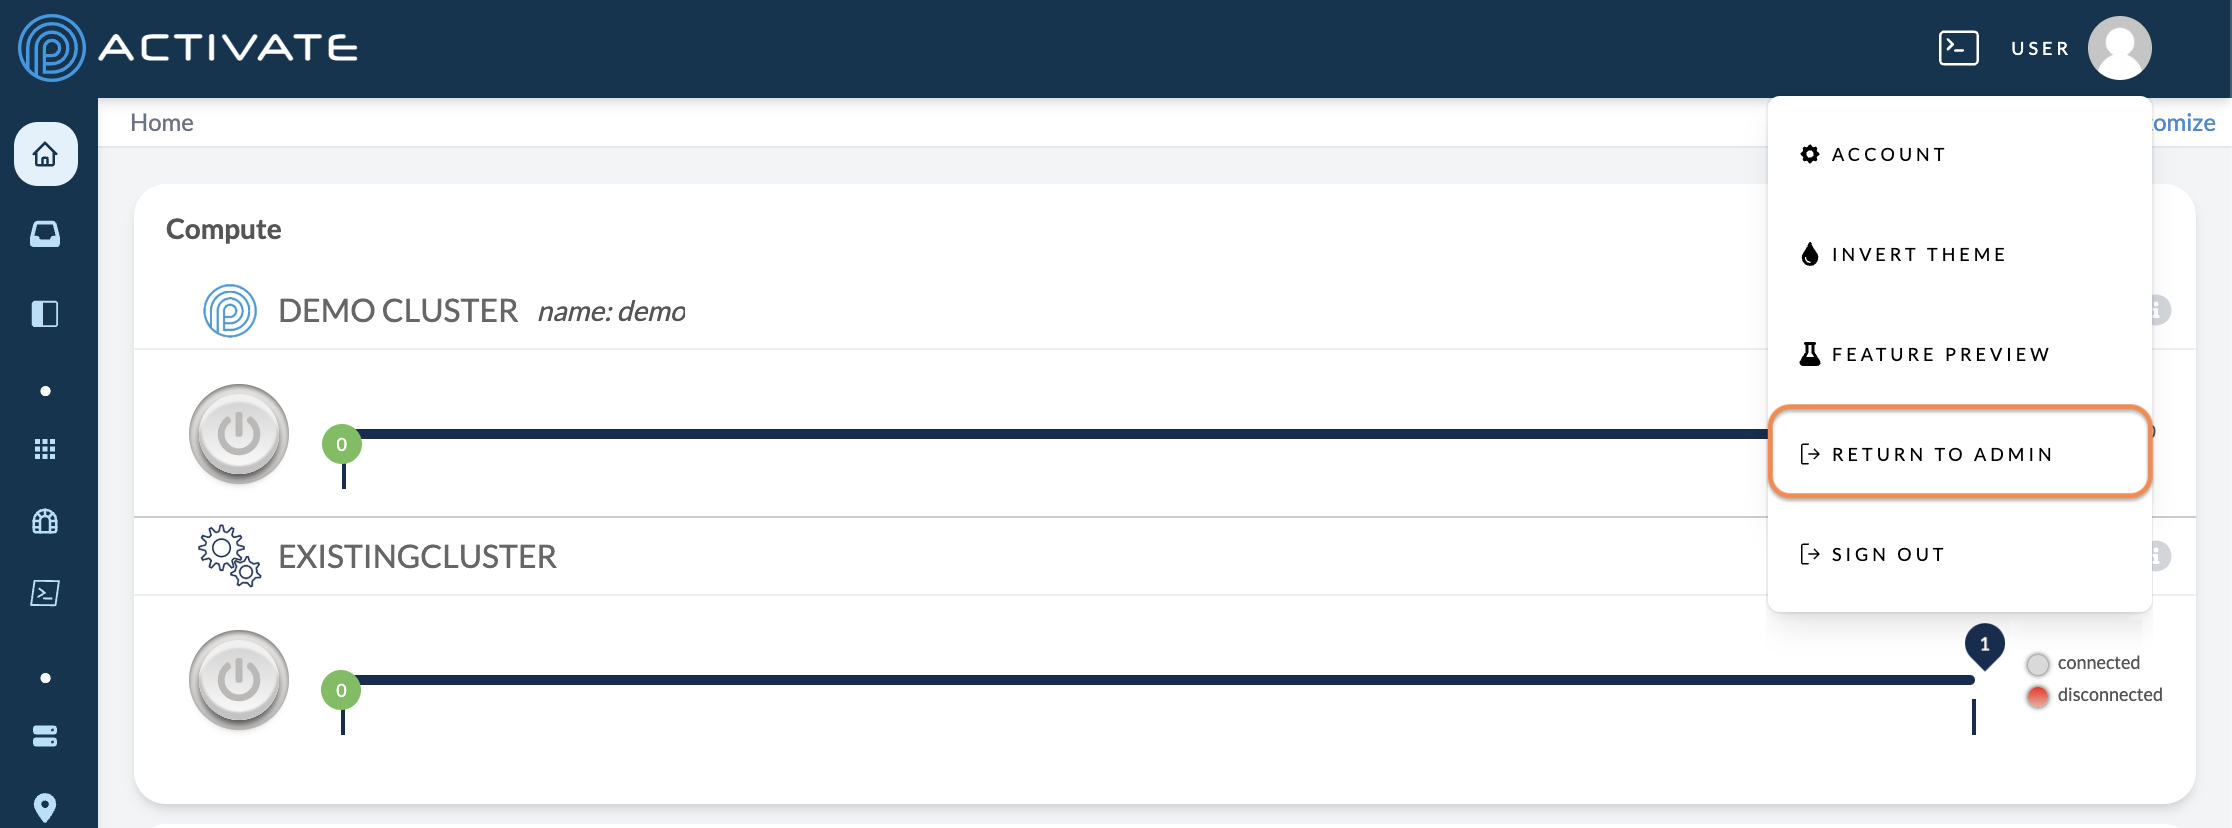
Navigating the Admin Panel
About the Admin Panel
This page explains the features in the Admin Panel, which you can access by clicking your username and selecting Admin.
Persona
You’ll only be able to access these features if you’re an ACTIVATE platform administrator.
About Containers
In much of the user guide, we say “user workspaces” to talk about a user’s account on the ACTIVATE platform. Please note that this term is synonymous with “user container,” which we use on this page.
Platform Settings
When you navigate to the Admin Panel, you’ll see Platform Settings by default. This tab displays essential information about your organization’s version of the platform.
When making changes on this page, click Save Platform Settings. Your changes will be applied immediately.
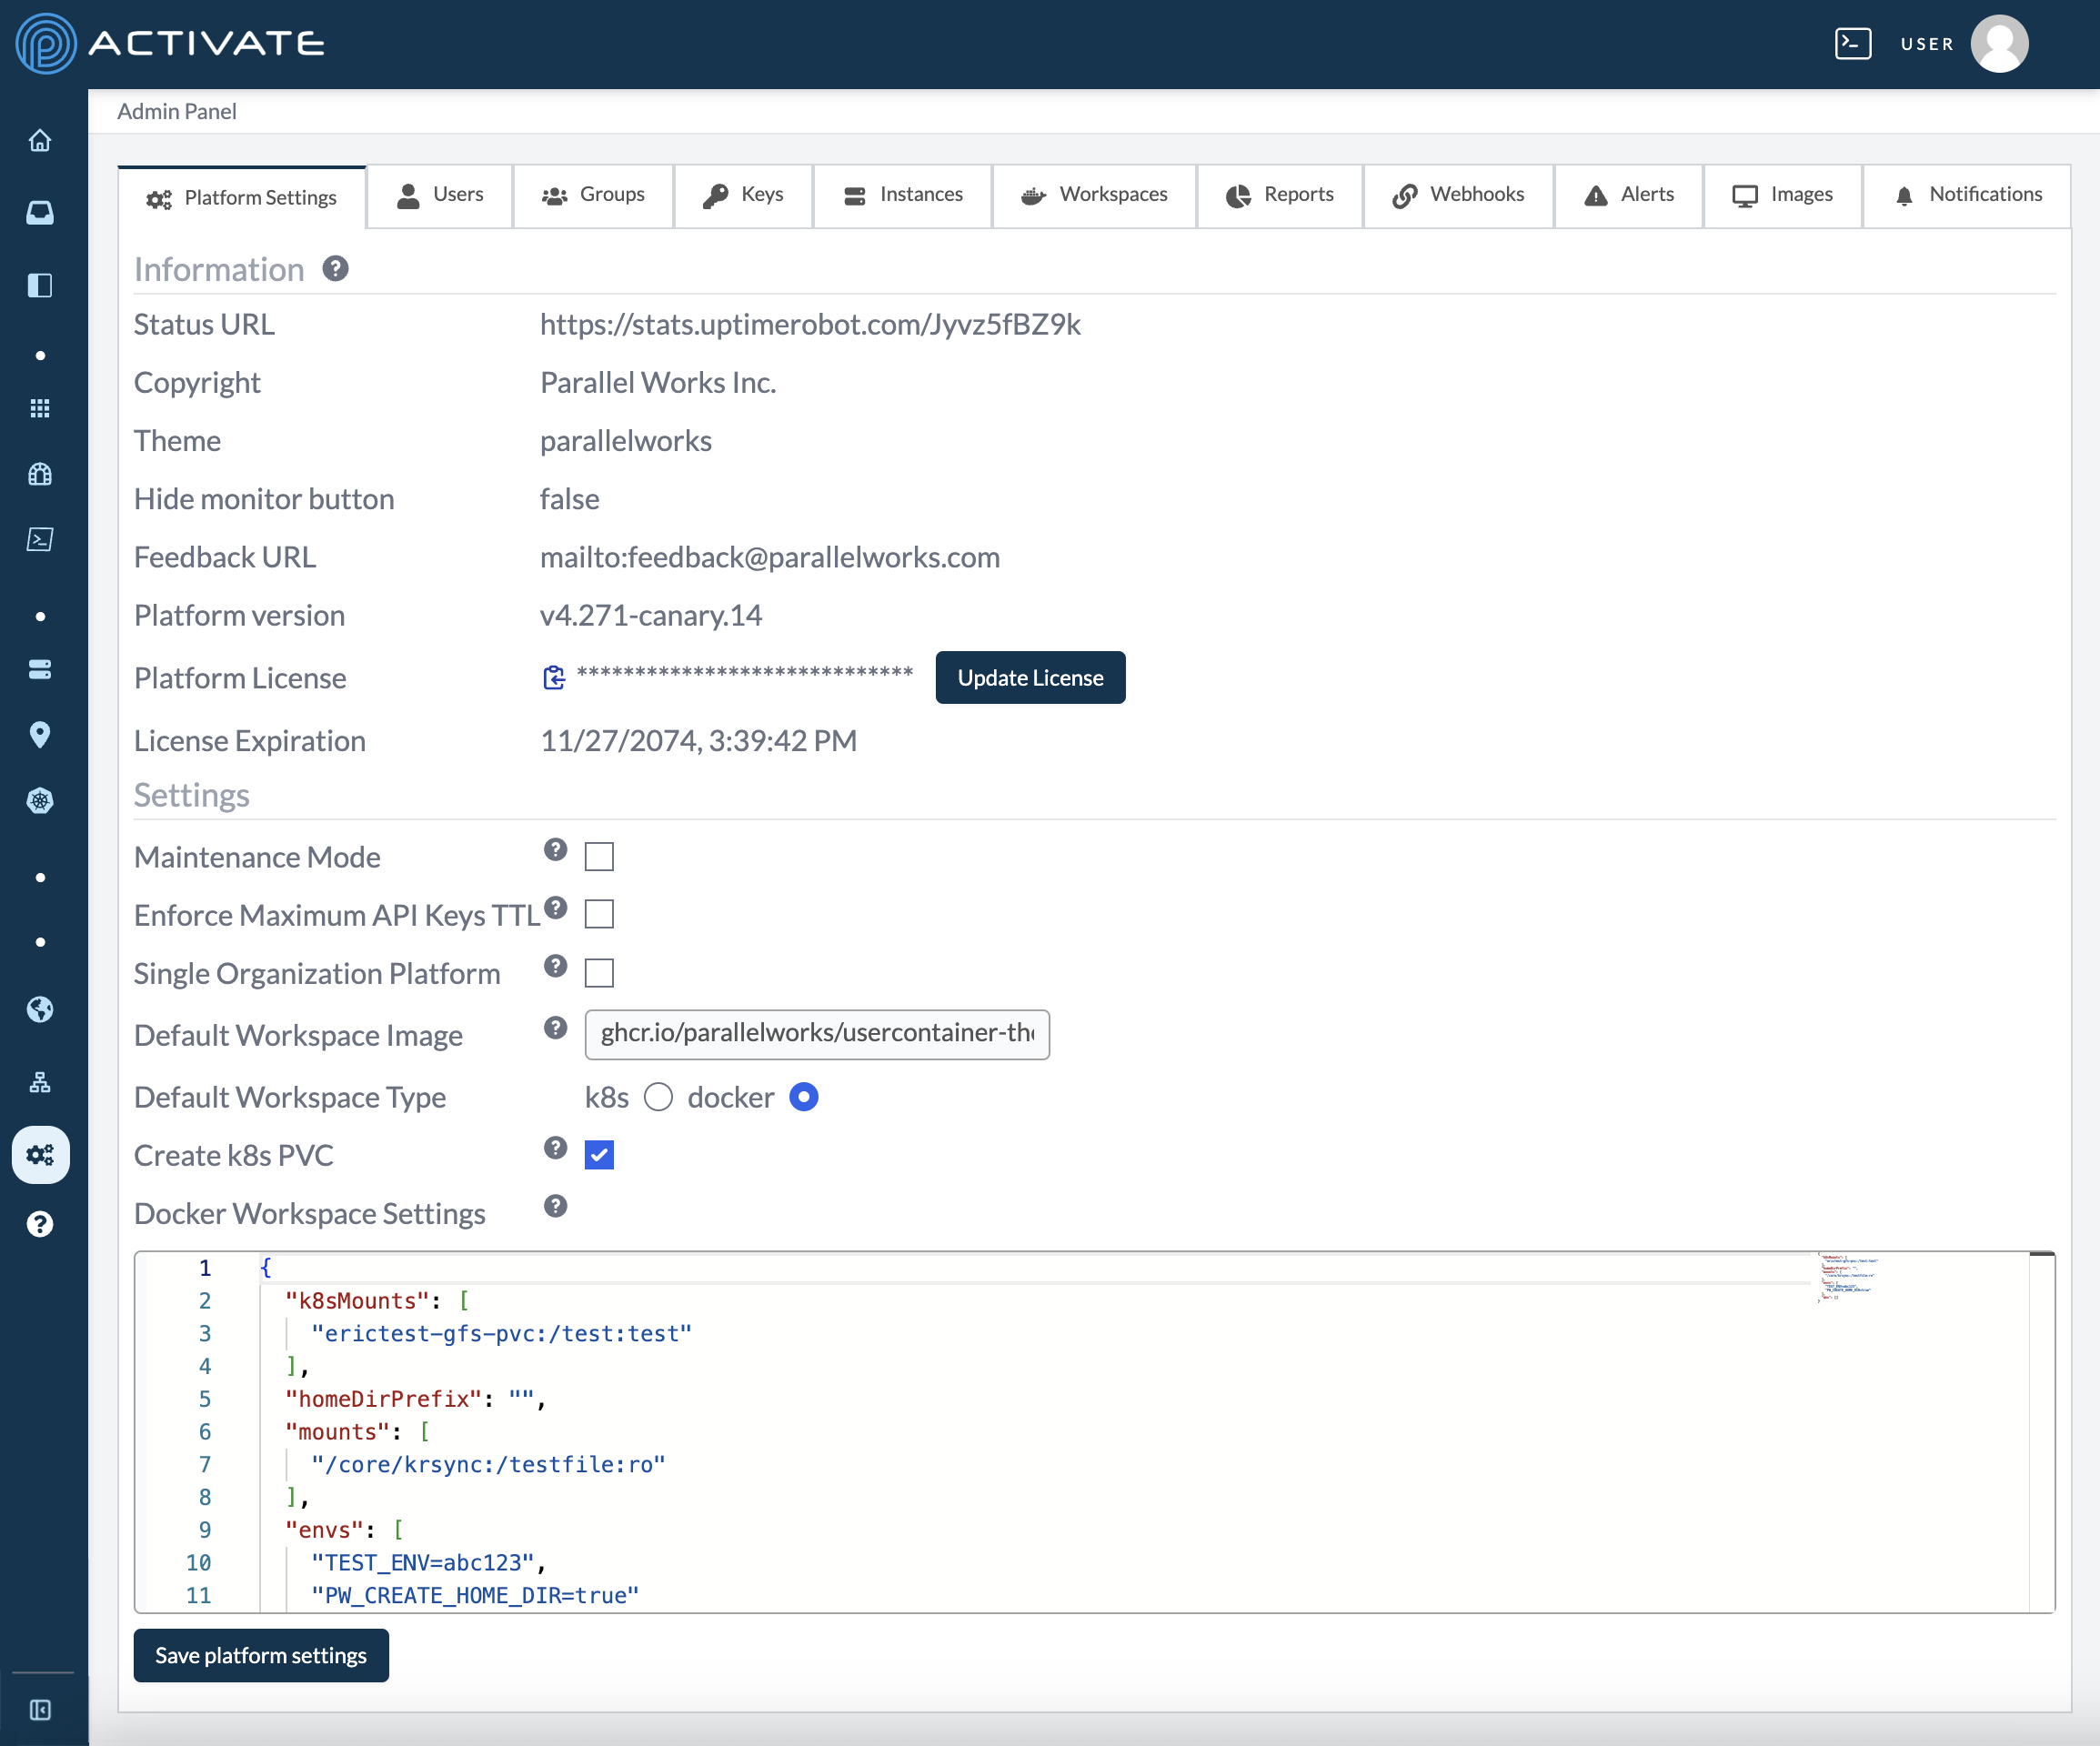
License Information
The Information section at the top of the page displays details that cannot be configured from within the platform: the Status URL, Platform version, and Platform License. If a license expiration date or licensed features are set, they're displayed here as well.
If a license has not been set, resources will not be able to be started until one is added.
To upload a new license, click Update Platform License. In the dialog box that appears, paste the license in the New License field and click Update License.
Platform Name
This field sets the display name shown on the login page. If it's not set, Parallel Works ACTIVATE is used.
Maintenance Message
If you set a maintenance message, it will show as an alert on all pages of the platform. You can use this field to warn users about an upcoming maintenance window before enabling Maintenance Mode.
Maintenance Mode
While Maintenance Mode is enabled, only admins will be able to start and stop resources.
To enable Maintenance Mode, click the checkbox next to it.
The platform will remain in maintenance mode until you deactivate it.
Forgot Password Enabled
While this option is enabled, the forgot password feature is available on the platform, and users can request a password reset from the login page.
API Key Expiration
By default, users can customize the expiration date for their created API keys with no expiration or a date in 7, 30, 60, or 90 days.
You can change the maximum number of days for API keys to expire. For example, if you set this date to 30 days, users may not create a key that expires after 60 days.
To make this change, check the box for Enforce Maximum API Keys TTL (Time to Live) and enter a number in the Days field that appears.
Single Organization Platform
If you check this box, other users will only see login options for the organization your account belong to.
Enable Onboarding
When this option is enabled, new users will be guided through an onboarding flow on first login. During onboarding, users can add the compute resources and workflows recommended by their organization. For more information, please see Onboarding.
Create k8s PVC
This option creates a PersistentVolumeClaim (PVC) in users' home directories. For more information about PVCs, please see this page of Kubernetes's documentation.
Delete User Files on Deletion
When this option is enabled, user files and SSH keys will be deleted from their workspace when their account is deleted.
Minimum Agent Version
Use this field to reject agent tunnel connections below a minimum version (e.g., v7.45.2). Already-connected agents below the minimum are disconnected on the next sweep. Leave the field empty to disable enforcement.
Docker Workspace Settings
Use this field to change Docker workspace settings, such as additional mounts, variables, and Domain Name System (DNS) settings.
Workspace Defaults
The Workspace Defaults section sets the default workspace configuration for the platform. These defaults are applied to user workspaces unless an organization or user has set their own. Leave a numeric field blank to use the built-in default.
- Workspace Type: the container runtime new users will be provisioned on (docker or k8s)
- Workspace Image: the container image for user workspaces; leave blank to use the upstream image
- Default User Host: the host new Docker workspaces are provisioned on
- Default CPU Request and Default CPU Limit: measured in cores
- Default Memory Request and Default Memory Limit: measured in GB
- Default Ephemeral Storage Limit: measured in GiB
When making changes in this section, click Save Workspace Defaults. Your changes will be applied immediately.
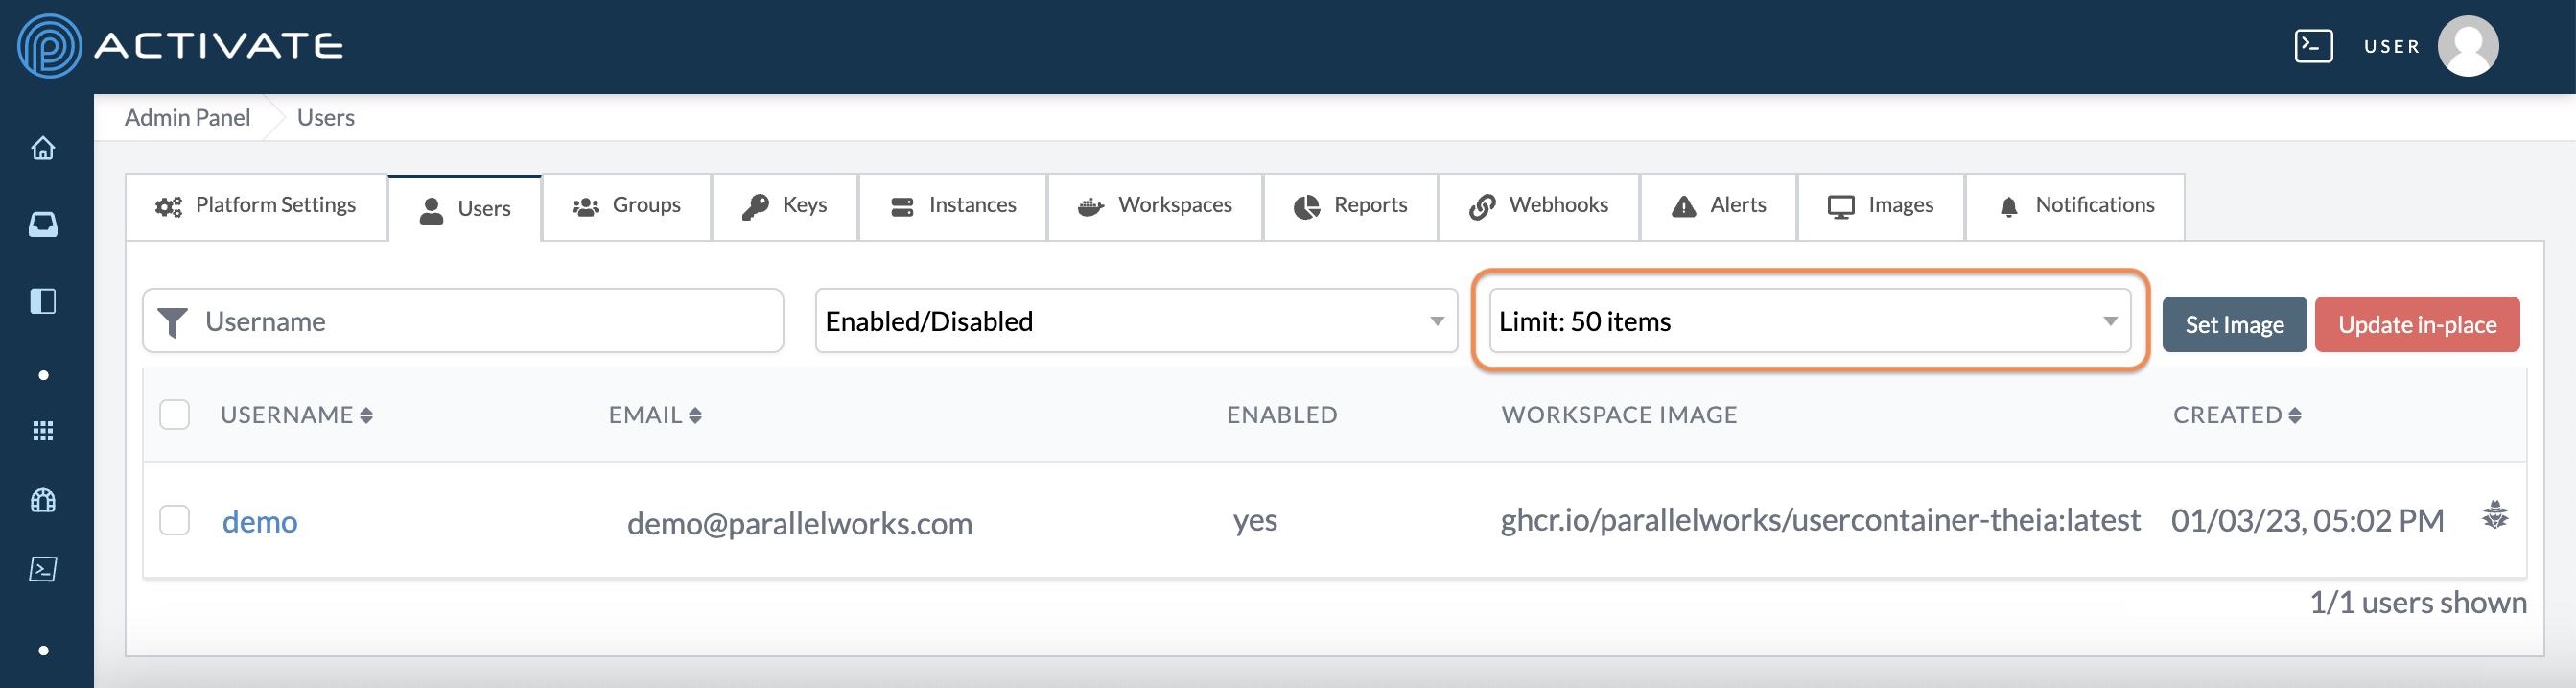
Users
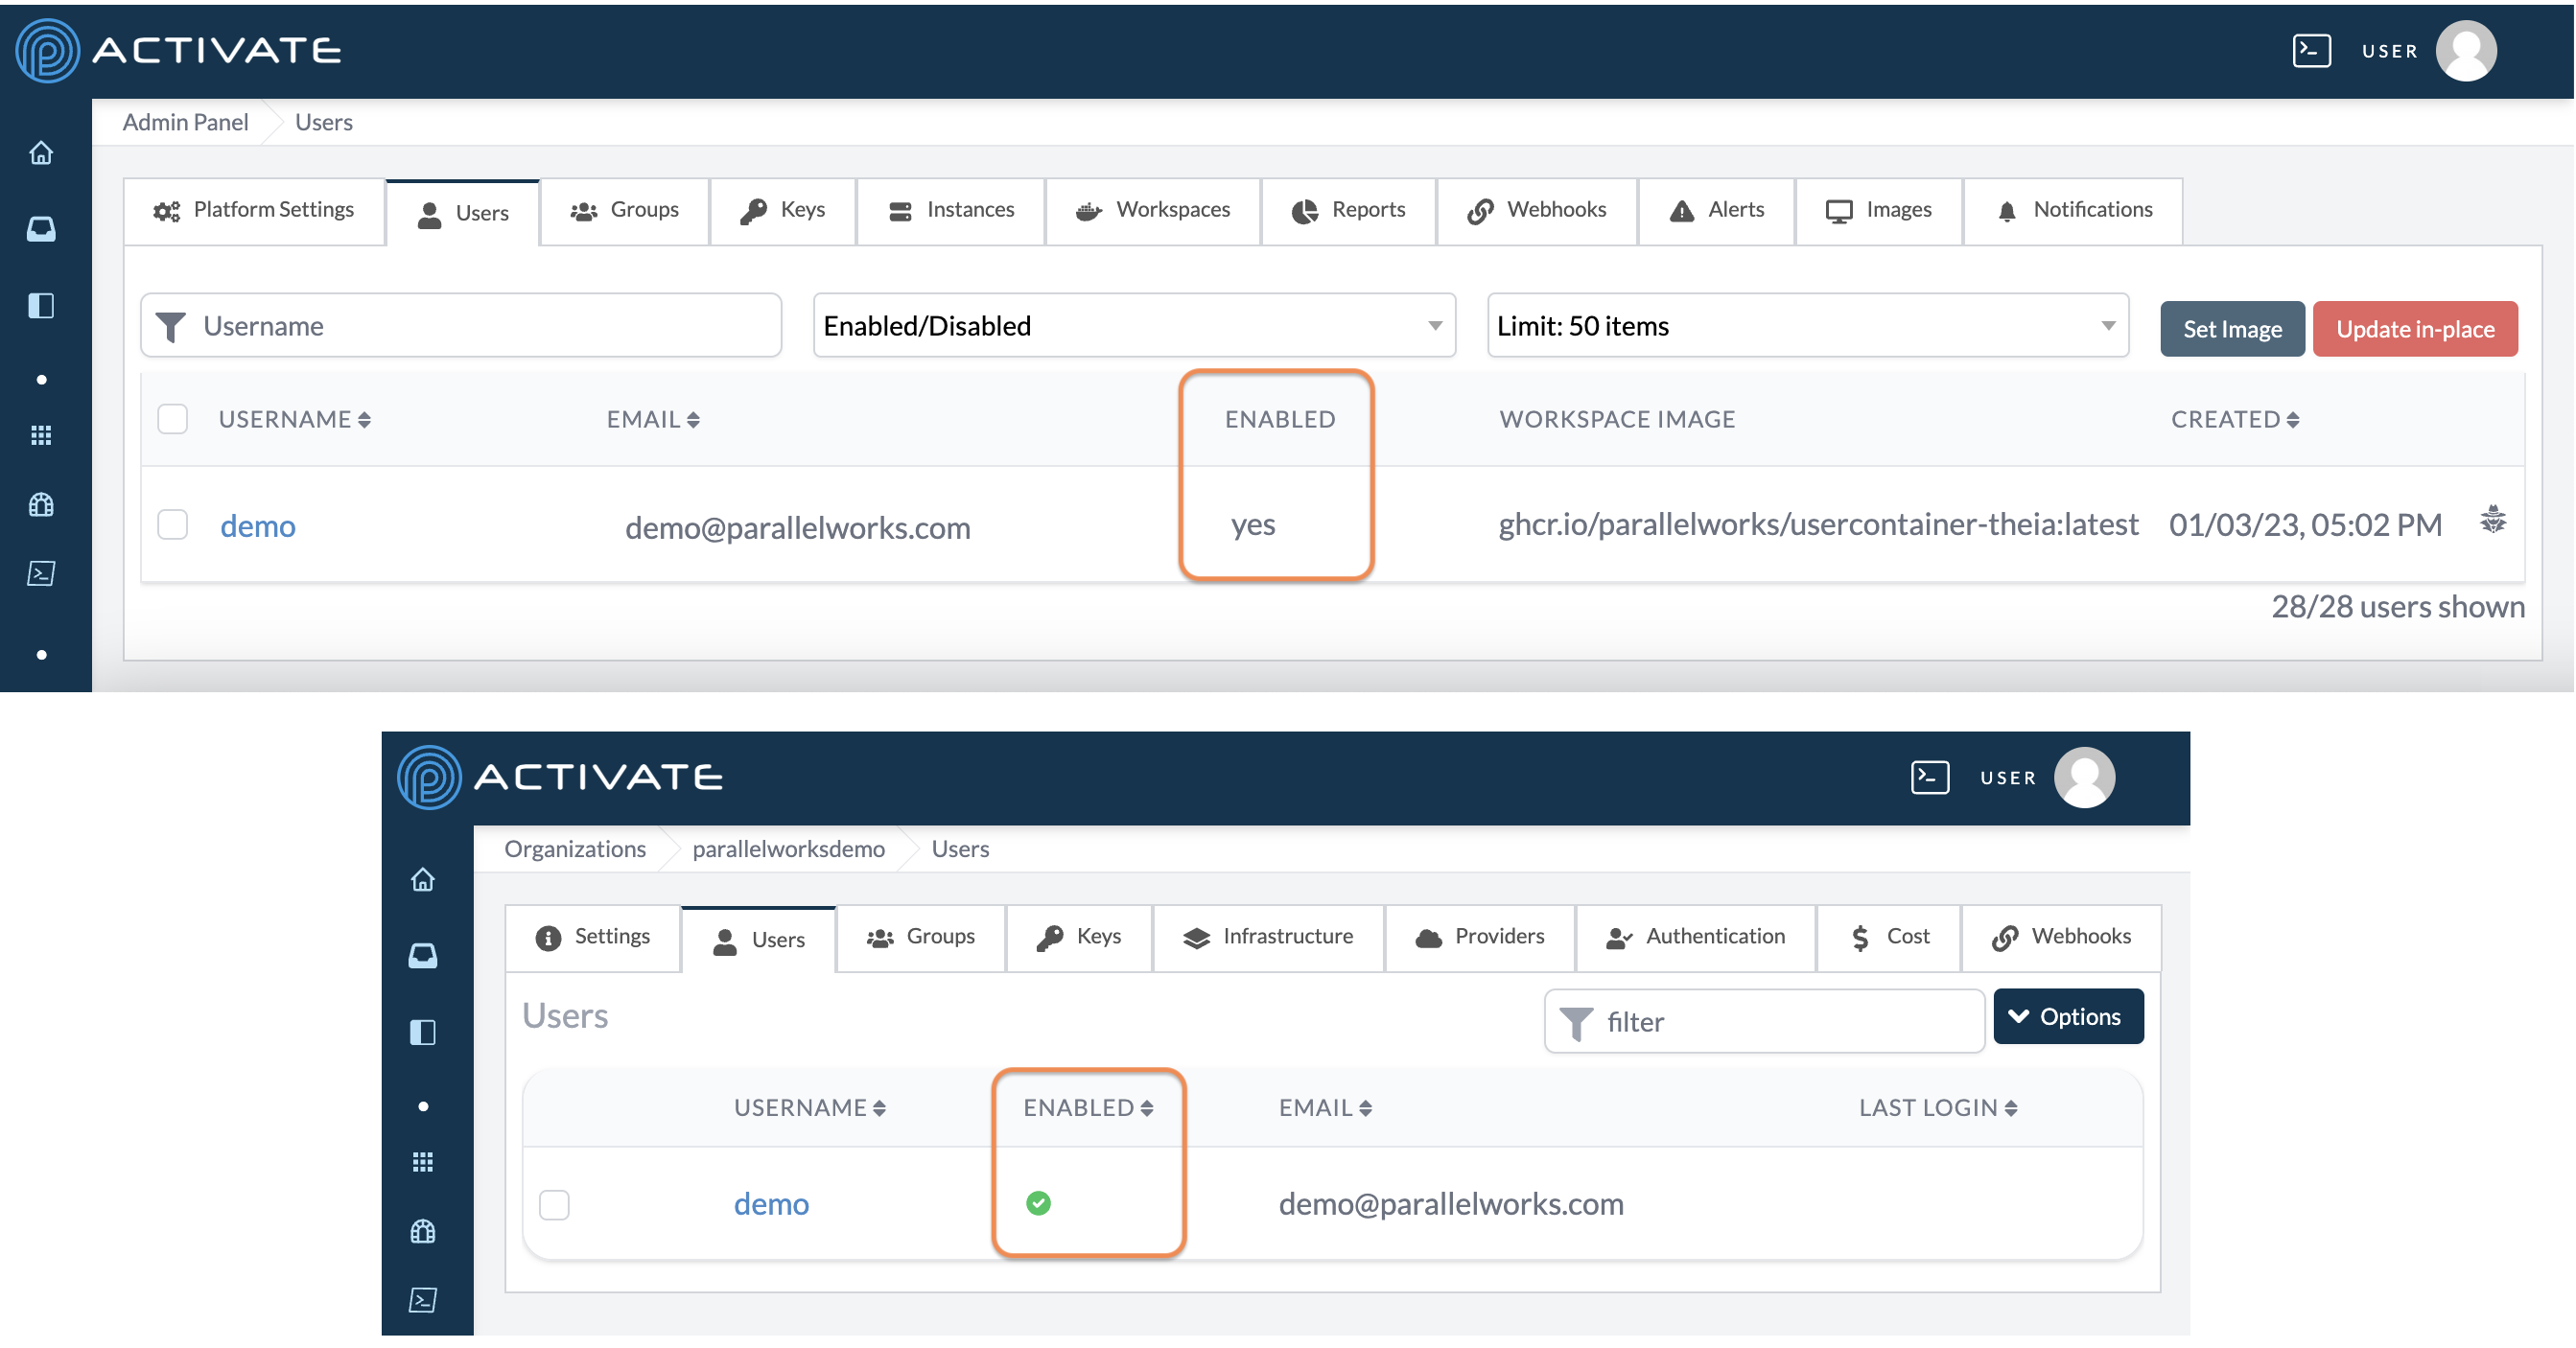
This tab displays all of your users’ information, including:
- username
- email address
- enabled status
- workspace image
- account creation date

Use the Username field to search for users.
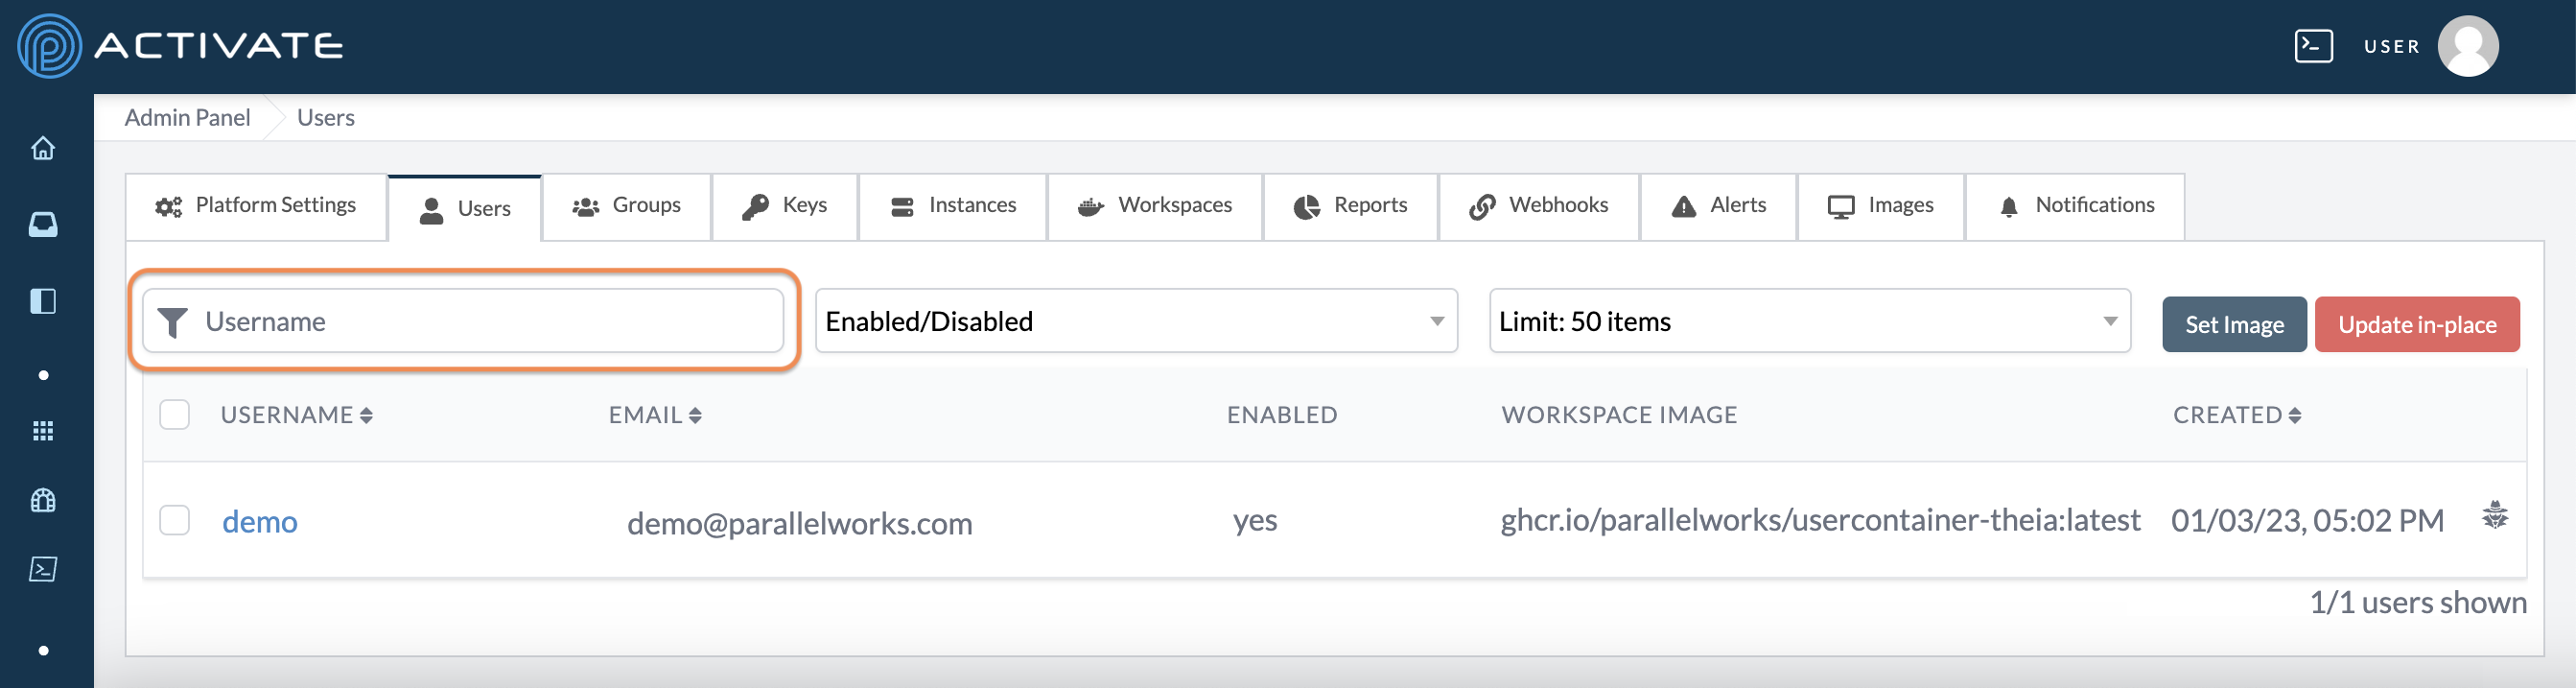
Use the Enabled/Disabled dropdown menu to display users that are enabled, disabled, or either. This option is set to Enabled/Disabled by default.
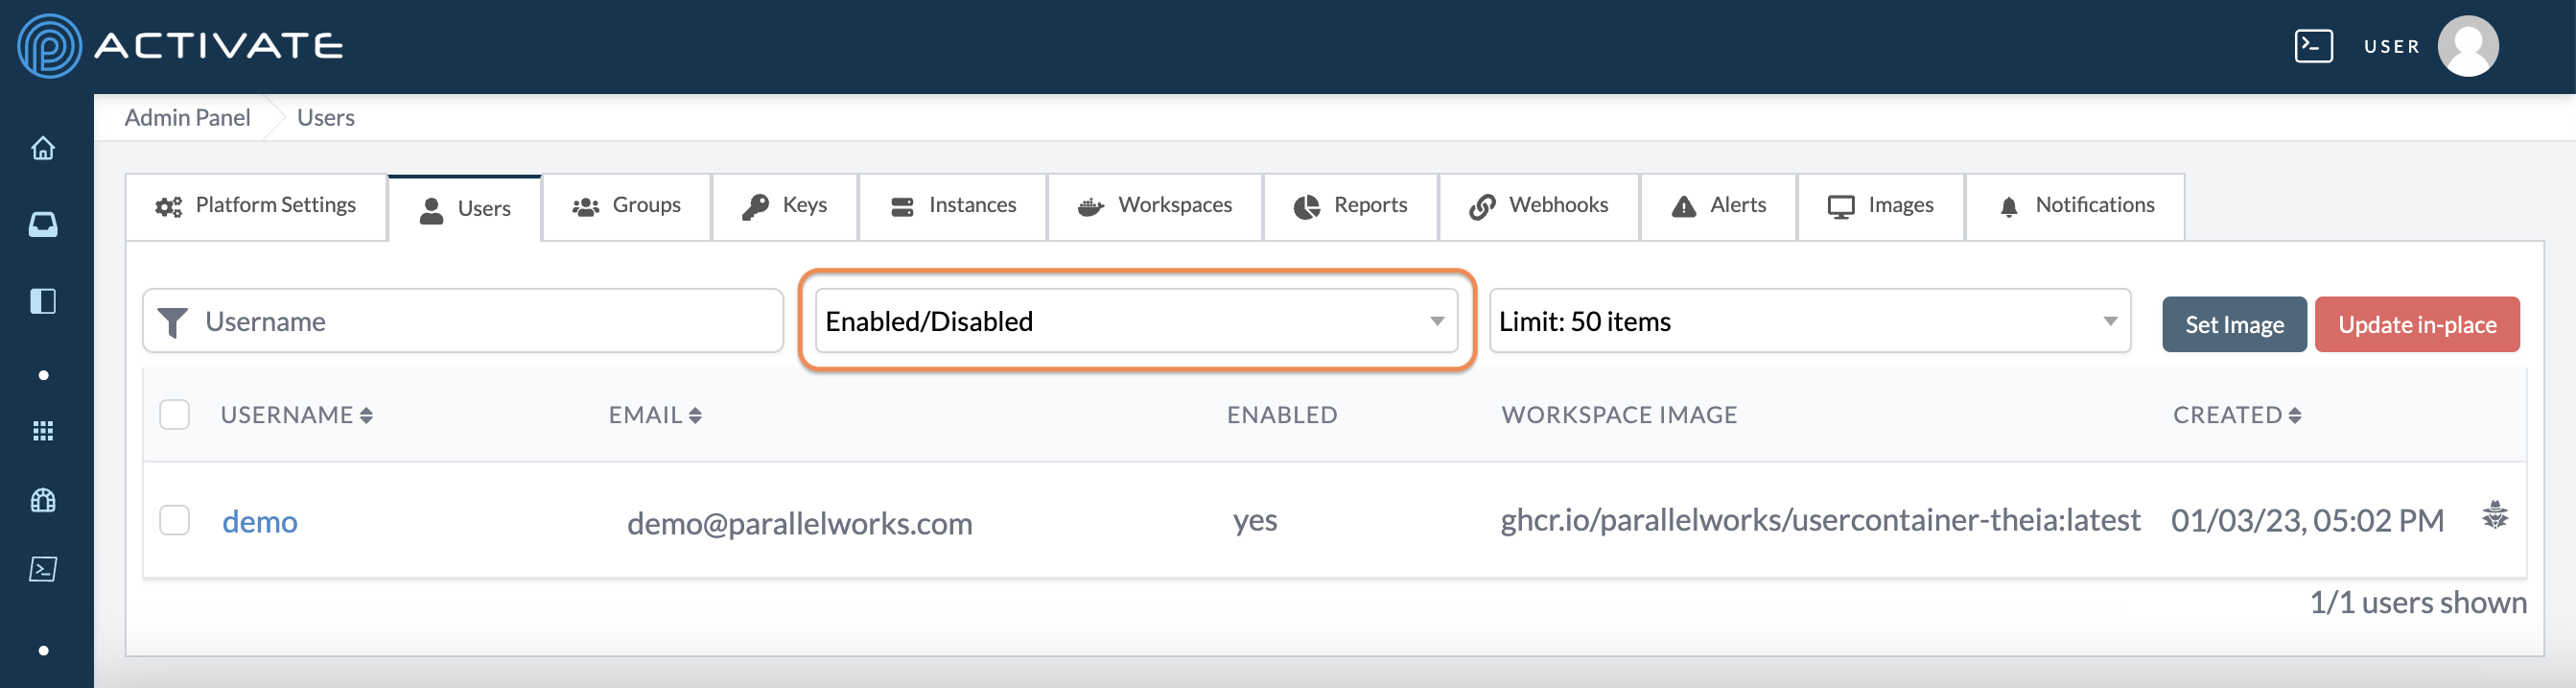
Use the Limit dropdown menu to narrow the listed users to 10, 20, 50, 100, or All. This option is set to 50 by default.
Editing User Information
In the Users tab, click on the username you’d like to edit.

On the next page, you can edit several of the user’s parameters.
The first section contains information about the user’s account, container, and access to the platform.
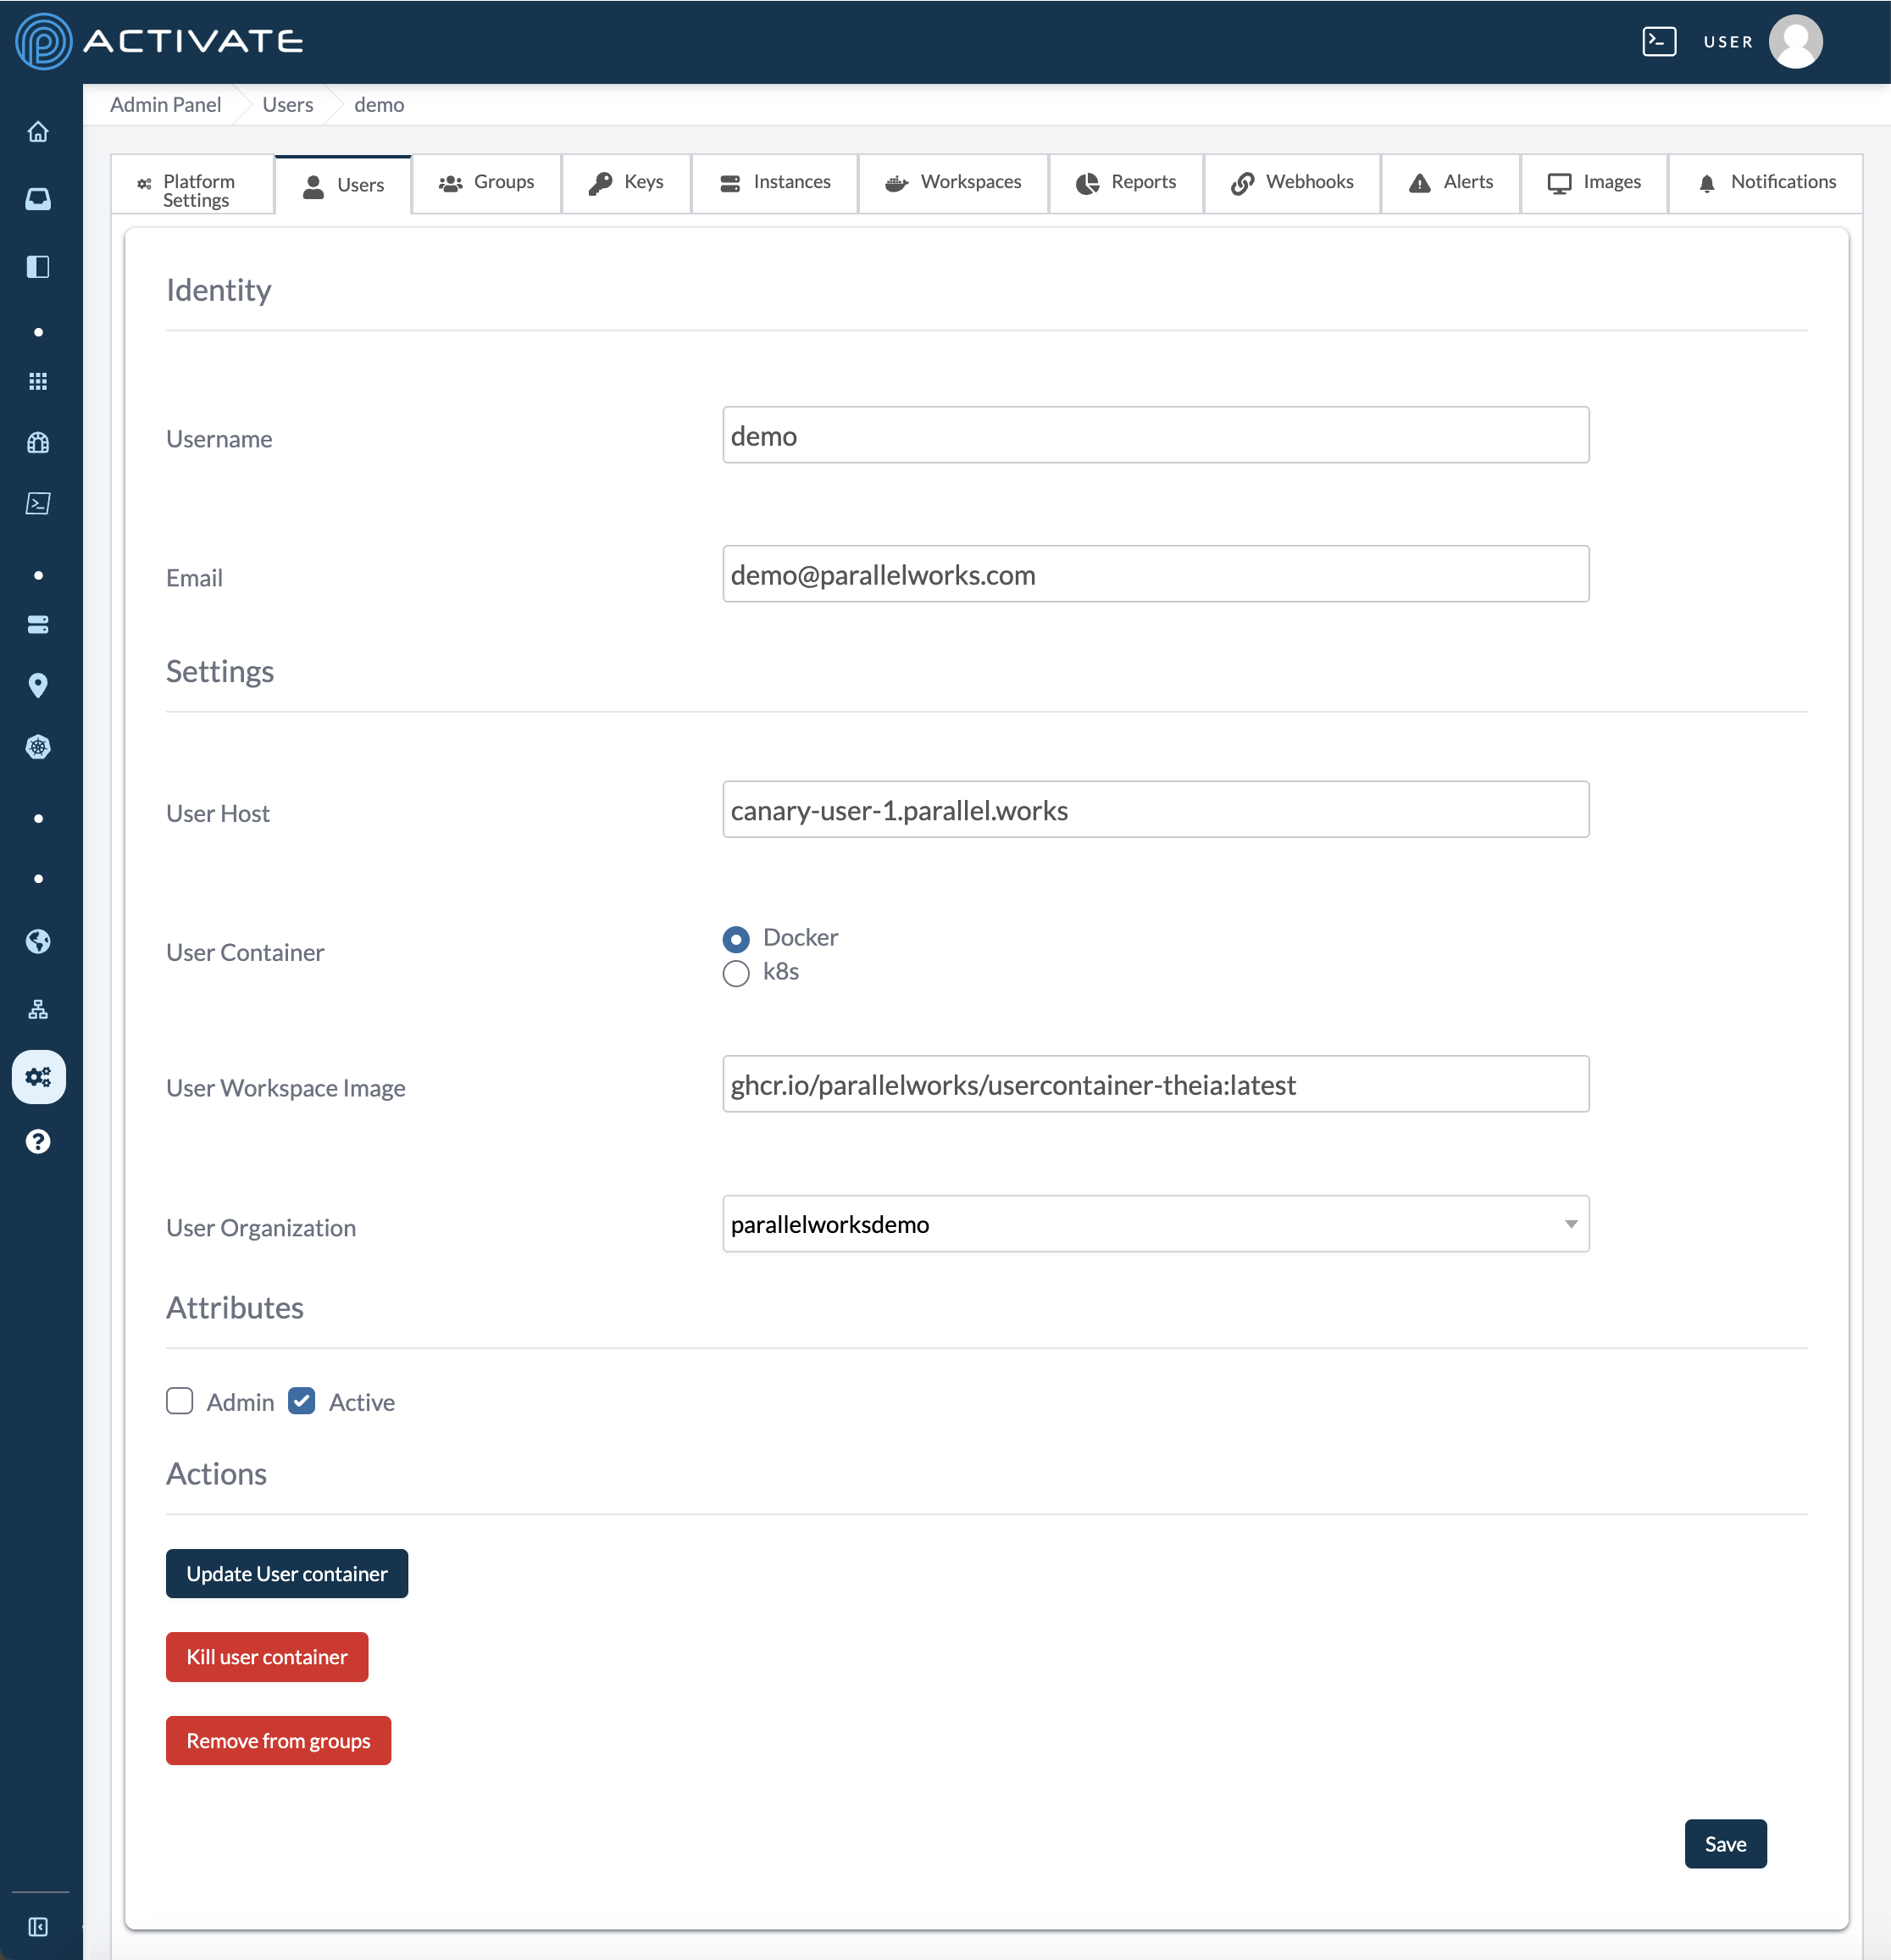
Identity
Here, you can edit a user’s Username or Email. Altering either of these parameters will change the user’s login credentials.
Settings
Here, you can control a user’s access to the platform.
User Host
This field identifies the user host, which is the part of the platform where account resources are provisioned.
We recommend contacting us before you make changes to this parameter.
User Container
This option identifies which service will be used to deploy a user’s container.
Use the bubbles to select Docker or k8s (Kubernetes).
We recommend contacting us before you make changes to this parameter.
MFA Enabled
Use the bubbles to select whether the user will use multi-factor authentication.
Select No if a user doesn’t need multi-factor authentication.
Select Duo if you work with a company or organization that is not affiliated with the government. Duo is a Cisco service that is more popular with other types of institutions.
Select MyProxy if you work with a governmental agency, such as a public university or a research organization. Generally, MyProxy is preferred for these types of institutions.
We recommend contacting us before you make changes to this parameter.
User Workspace Image
This field identifies which image version a user’s workspace is running.
User Organization
Use this dropdown menu to assign the user to an organization.
Attributes
Here, you can control whether a user is an Admin or Active by selecting their respective checkboxes.
A user with Admin enabled will be able to access the Admin Panel and all of its settings. This option does not affect the group setting org:admin. For more information, please see About Roles.
A user with Active enabled will be able to log in to the platform with their username and password. Unchecking Active will disable a user’s access to the platform.
Users who are Active are marked as Enabled in Admin > Users and Organization > Users.
Actions
Click the Update User container button to migrate a user’s container to the latest image.
Click the Kill user container button to restart a user’s container.
Click the Remove from teams button to remove a user from all of their assigned groups.
Note
If you change any of the parameters above, click Save before leaving the page. Your changes will be applied immediately.
Set Password
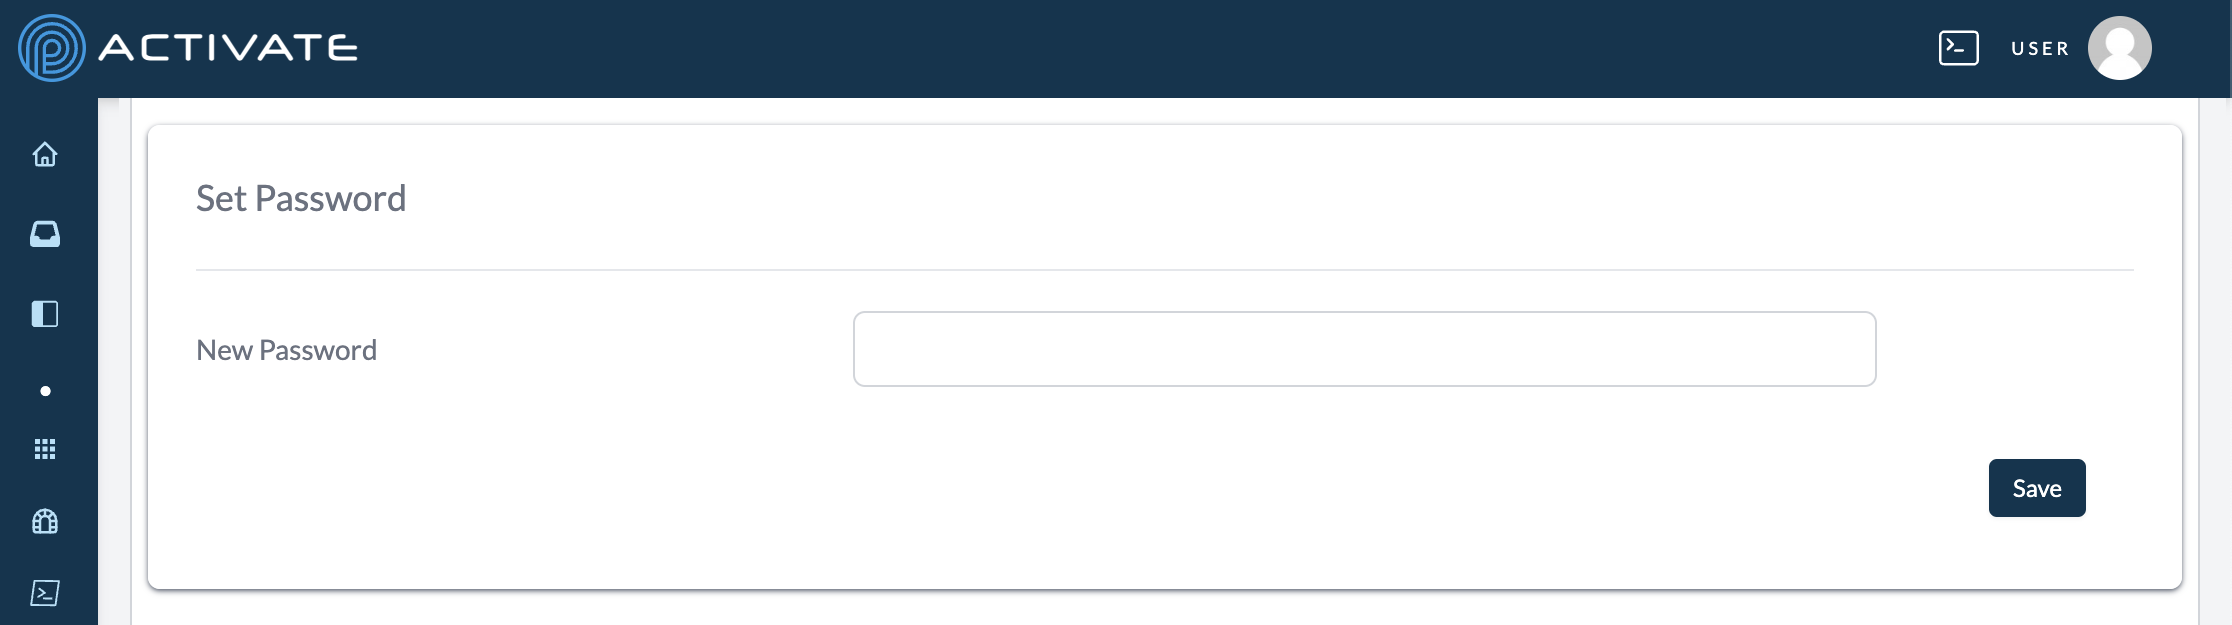
Here, you can reset a user's login credentials.
If you change this parameter, click Save before leaving the page. Your change will be applied immediately.
Contact Info
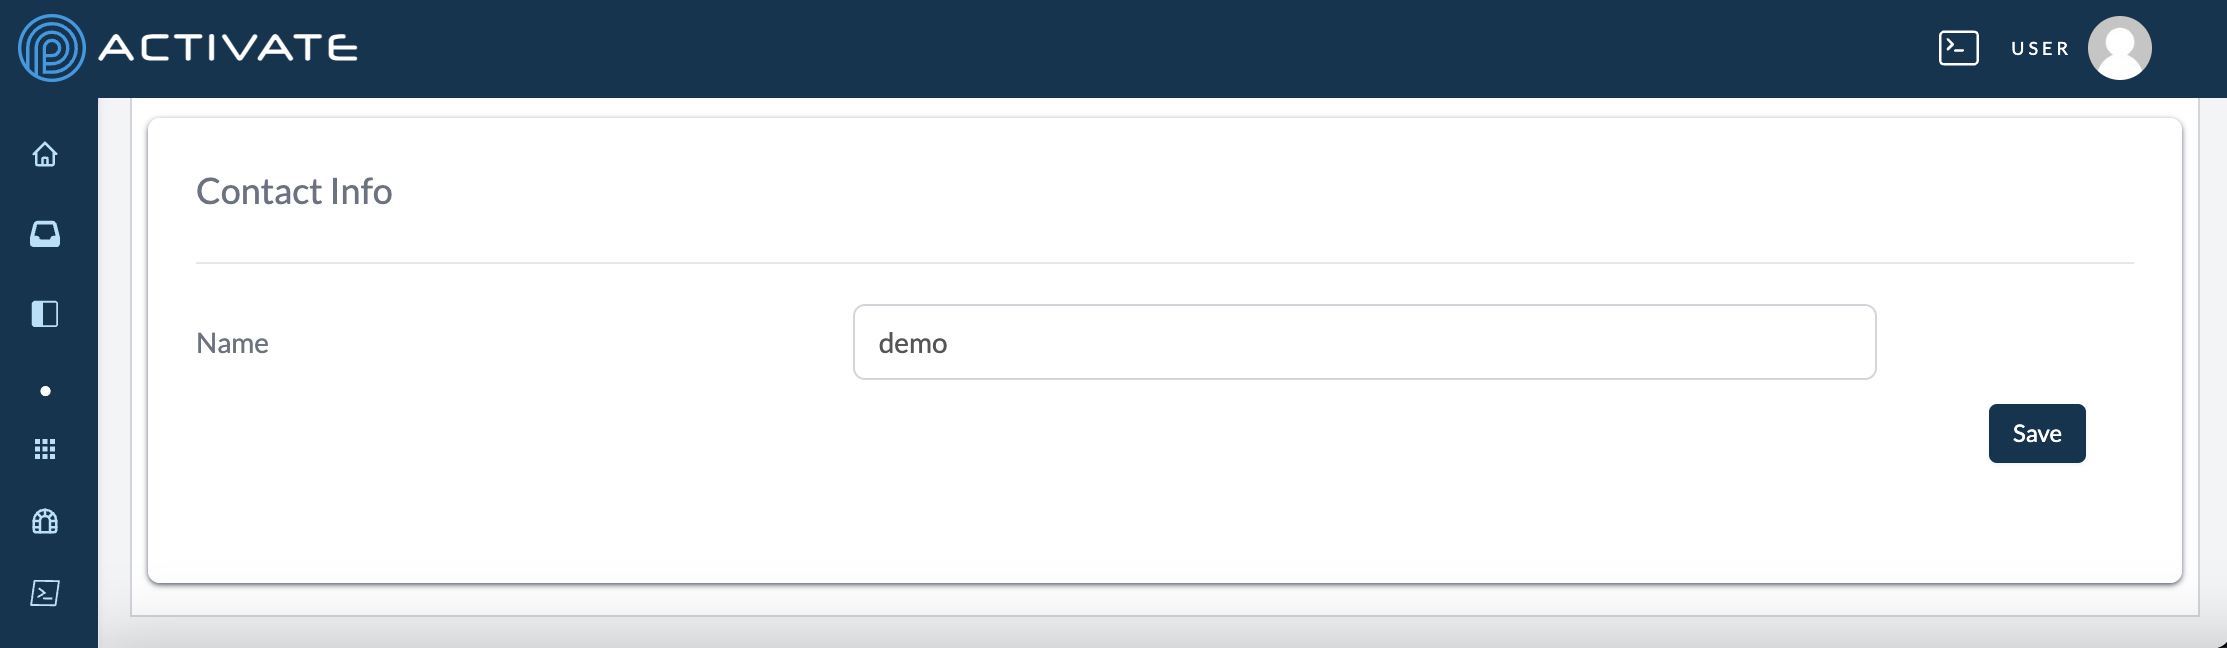
Here, you can change a user’s contact information, including their display name, platform URL, and geographical location.
This information is only visible to platform admins and does not affect a user’s login credentials.
If you change these parameters, click Save before leaving the page. Your changes will be applied immediately.
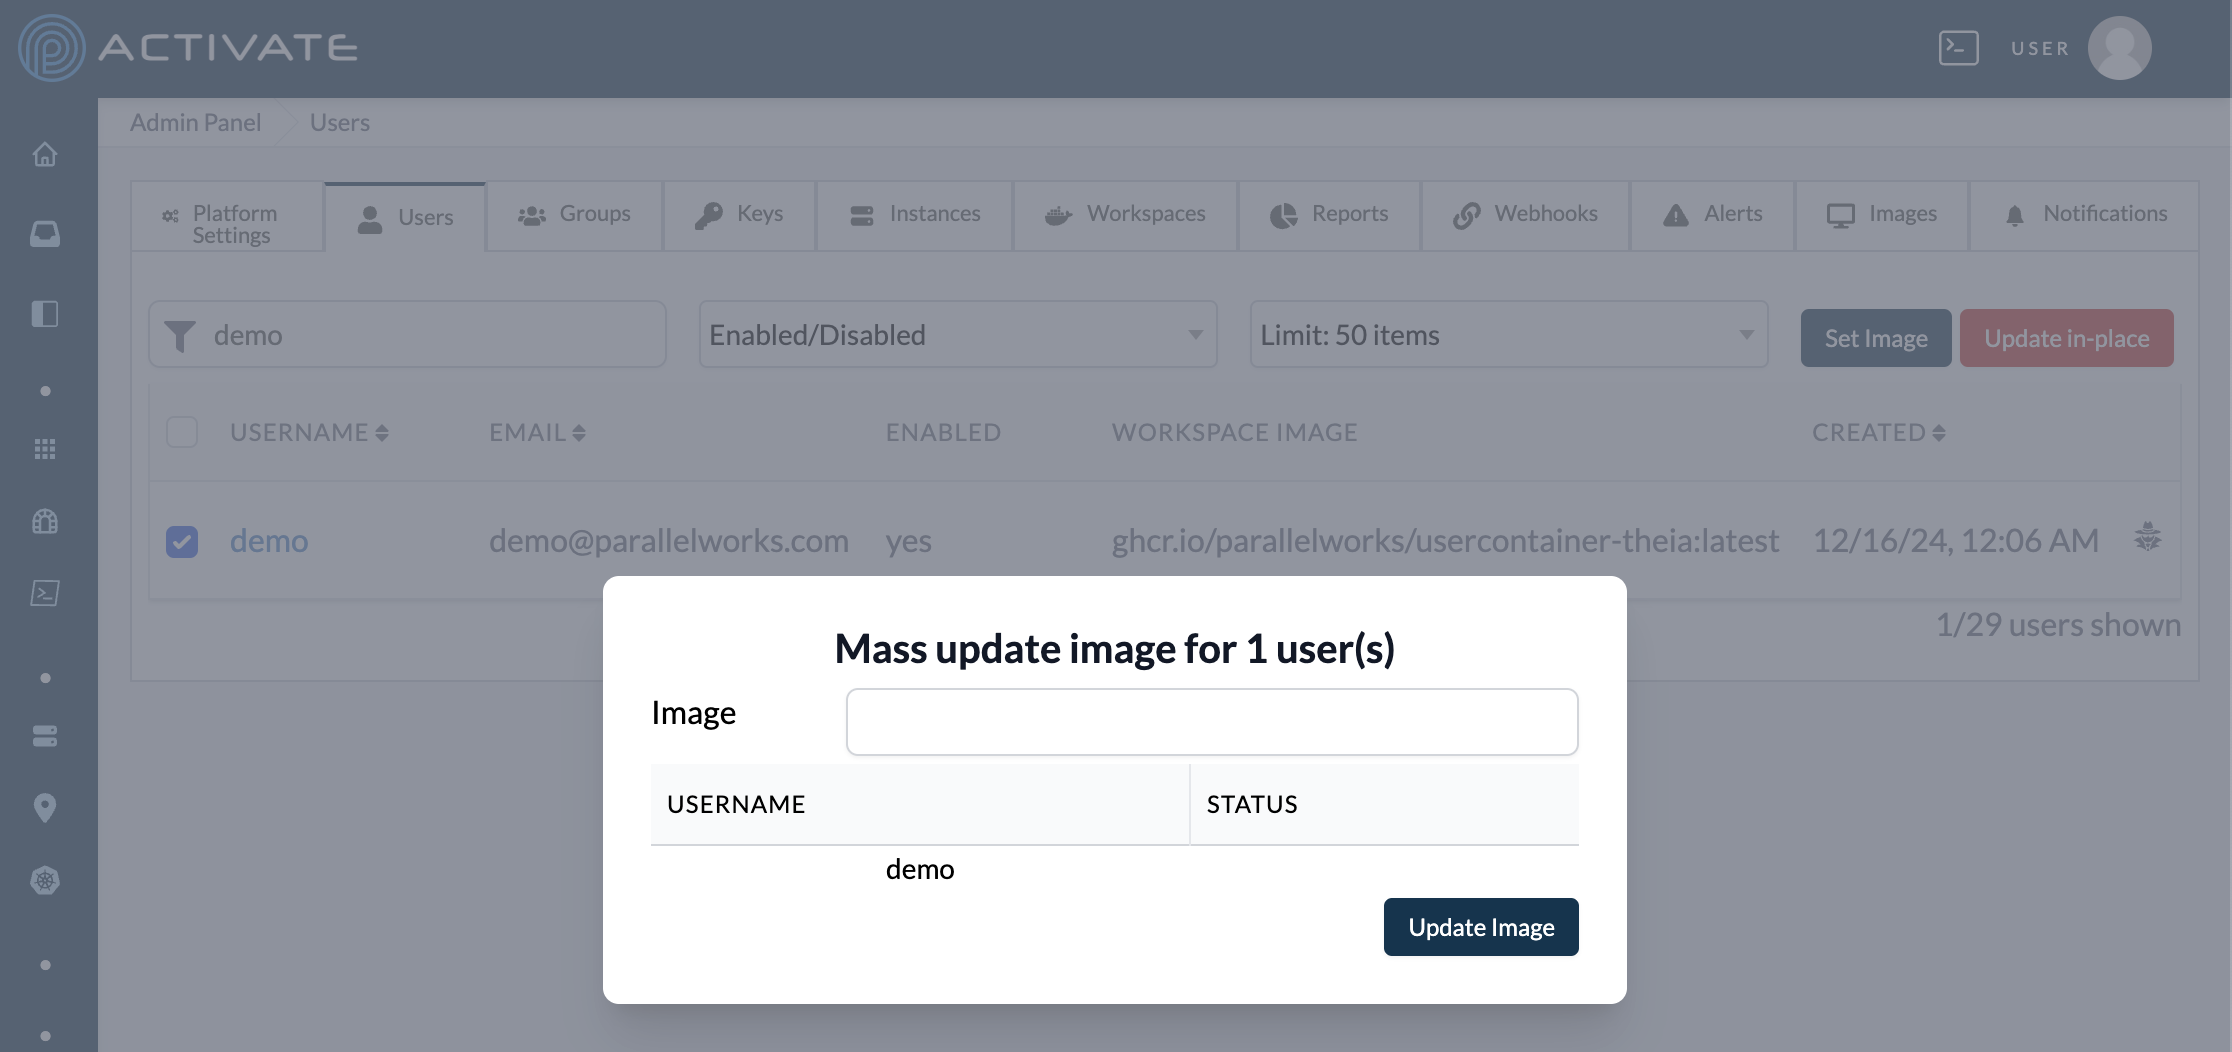
Setting User Images
In the Users tab, select users with their checkboxes. Click Set Image.
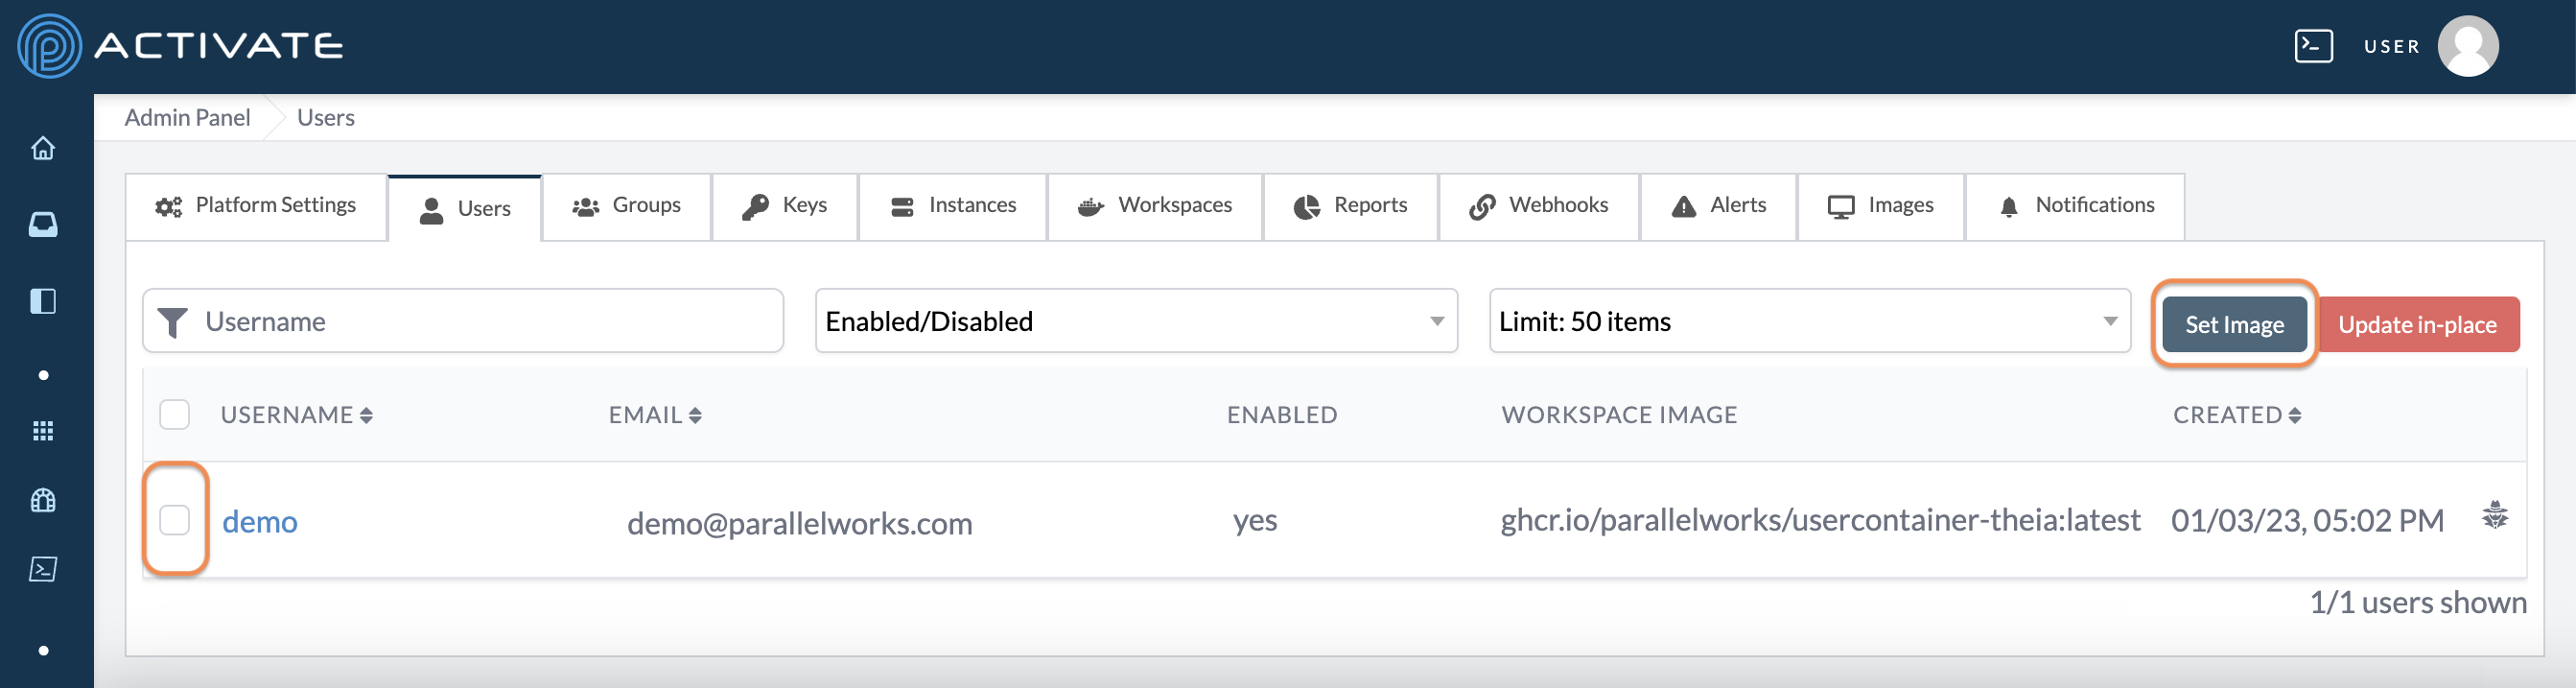
A dialog box will appear. Enter the Image Name and the image Version.
Click Update Image. Your changes will be applied immediately.
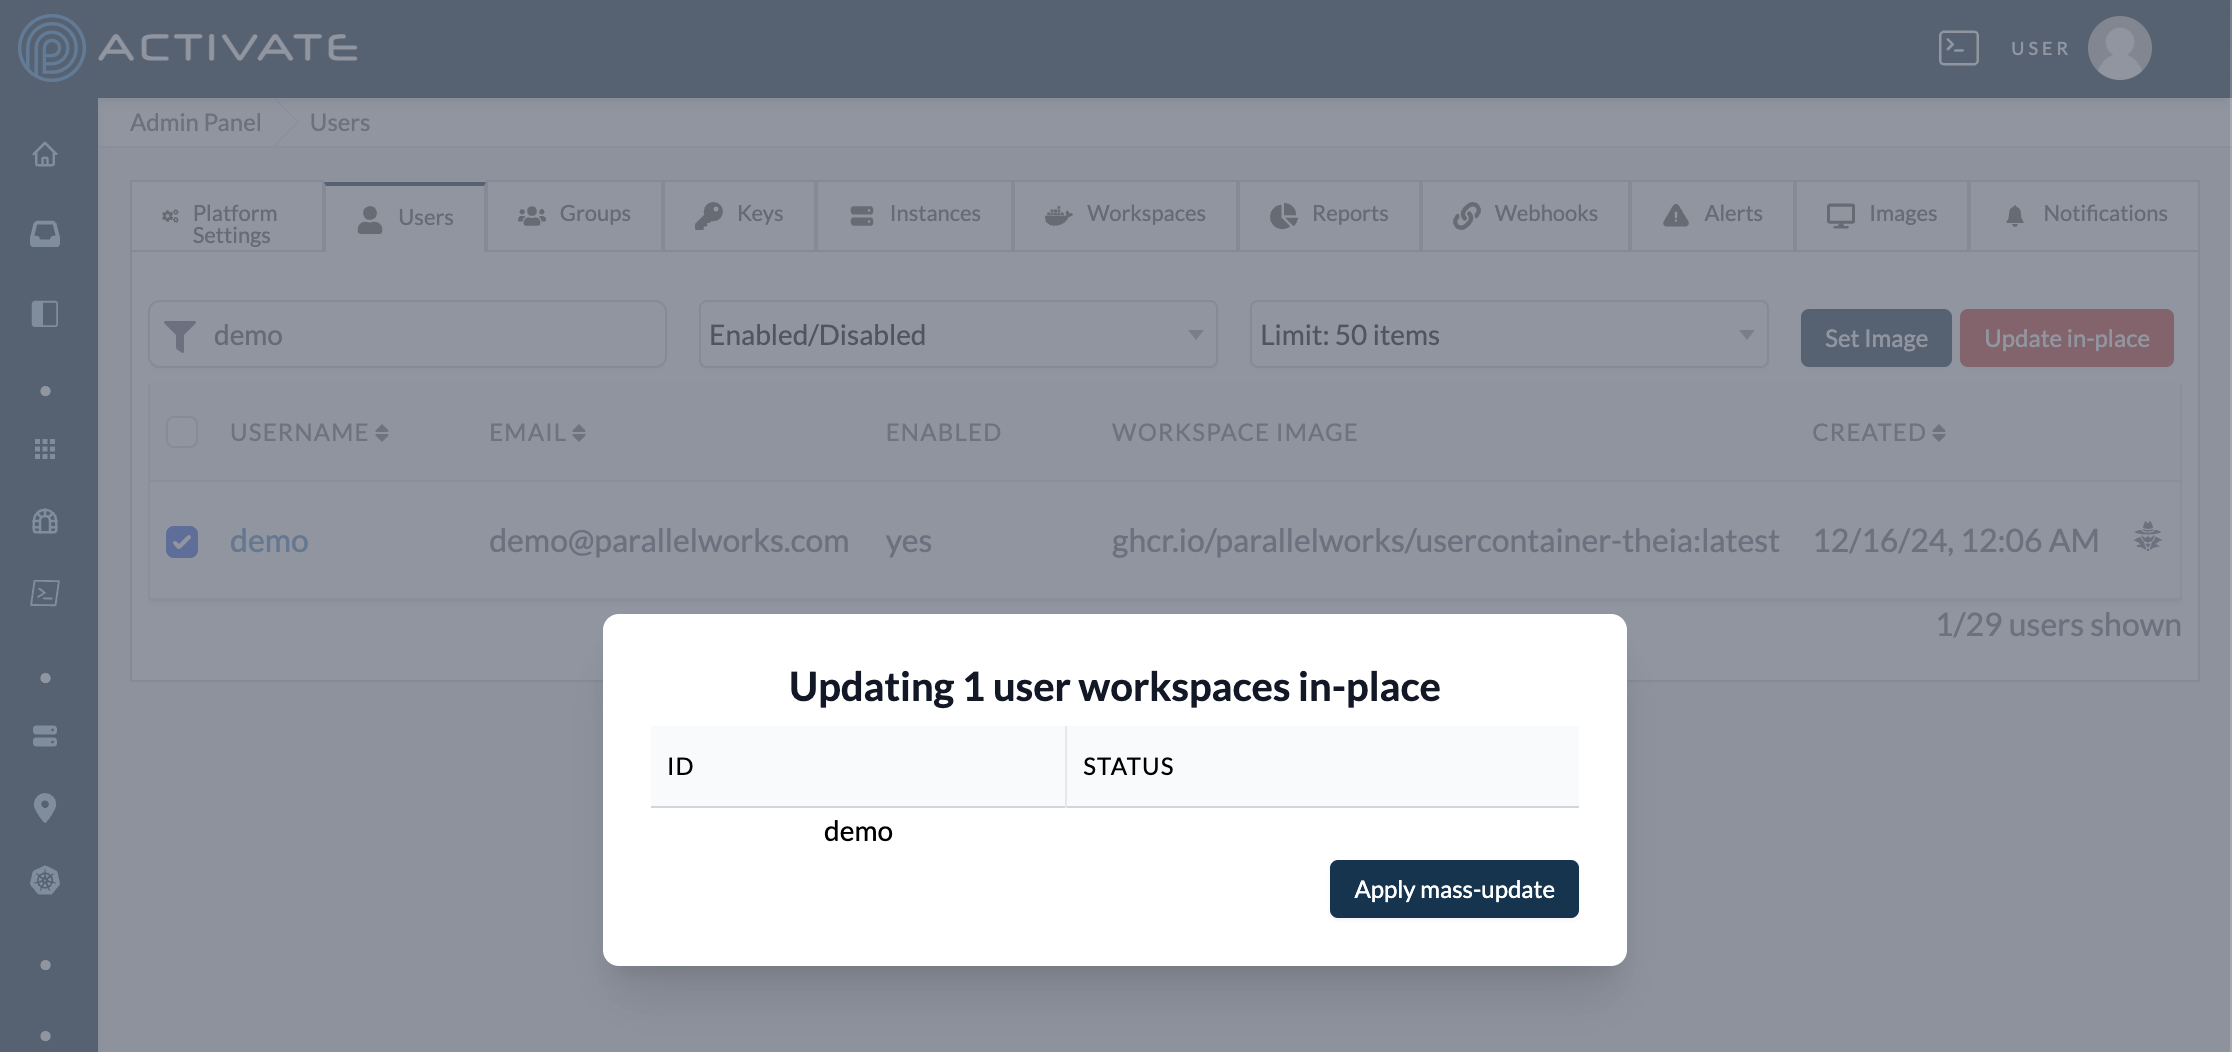
Updating User Images
In the Users tab, select users with their checkboxes. Click Update in-place.
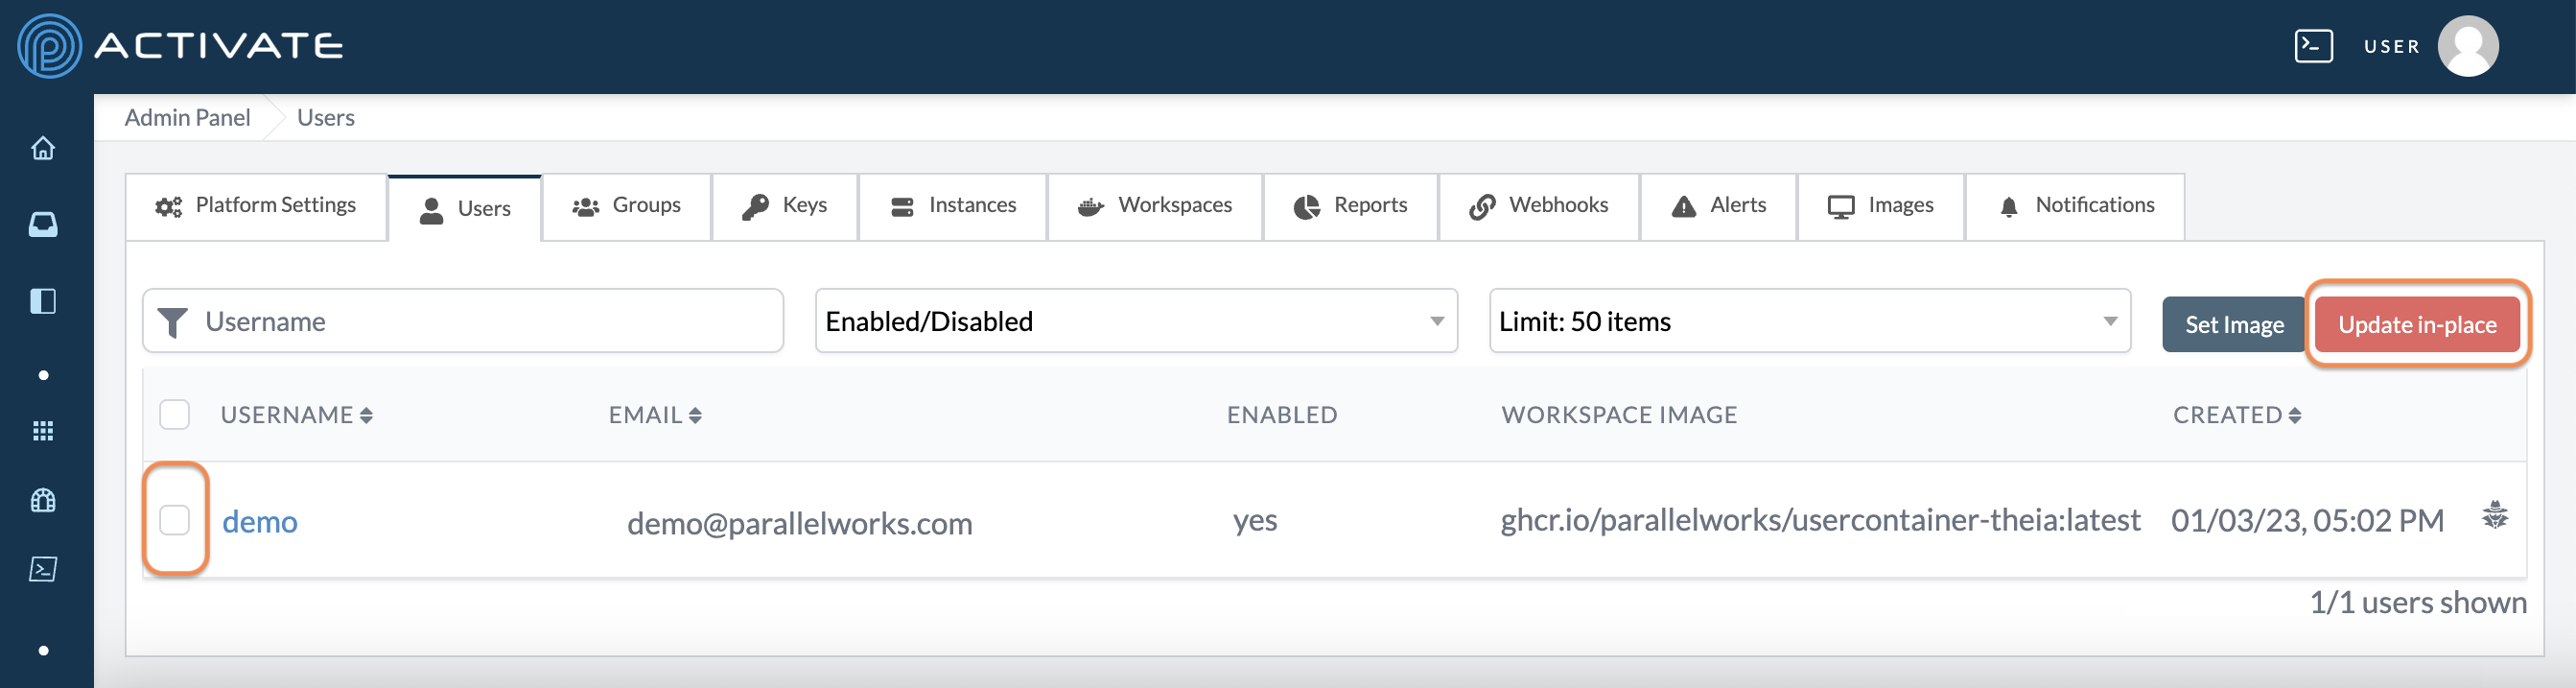
A dialog box will appear. Confirm that you’ve selected the users you want to update.
Click Apply mass-update. Your changes will be applied immediately.
Using Impersonate
If you want to quickly access another user's account, you can use the impersonate feature to bypass the login/logout process.
In the Users tab, click the impersonate icon for the account you want to access.
You'll be redirected to the user's Home page. You can navigate and control resources, storage resources, and workflows as if you were logged in to the user's account.
When you're done, click the user's name, then Return to [Your Account].
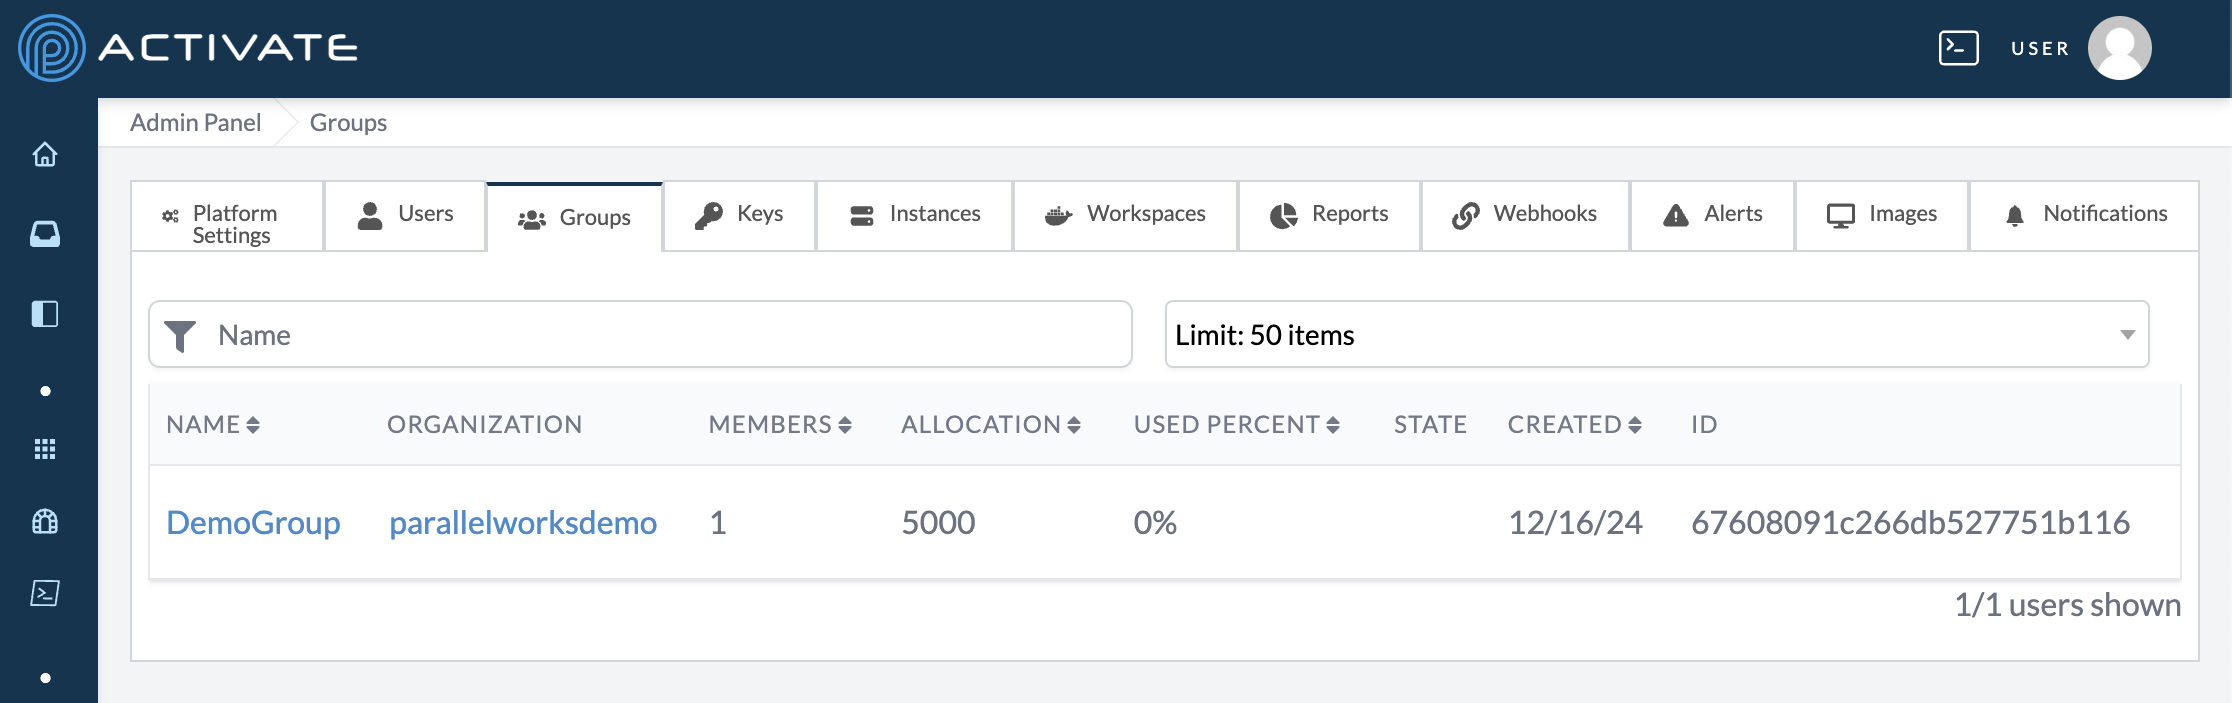
Groups
This tab displays information for all of your groups, including:
- name
- organization
- number of members
- allocation amount
- percentage of allocation used
- state
- creation date
- ID number
All the functions in Managing Groups can be completed from this tab as well.
Instances
This tab displays information for both running instances and other instances, including:
- CSP
- organization that owns the key
- region
- instance ID
- creation date
- instance name, if any
- instance type
- private IP
- public IP
- cloud state
- estimated cloud state time
- ACTIVATE state
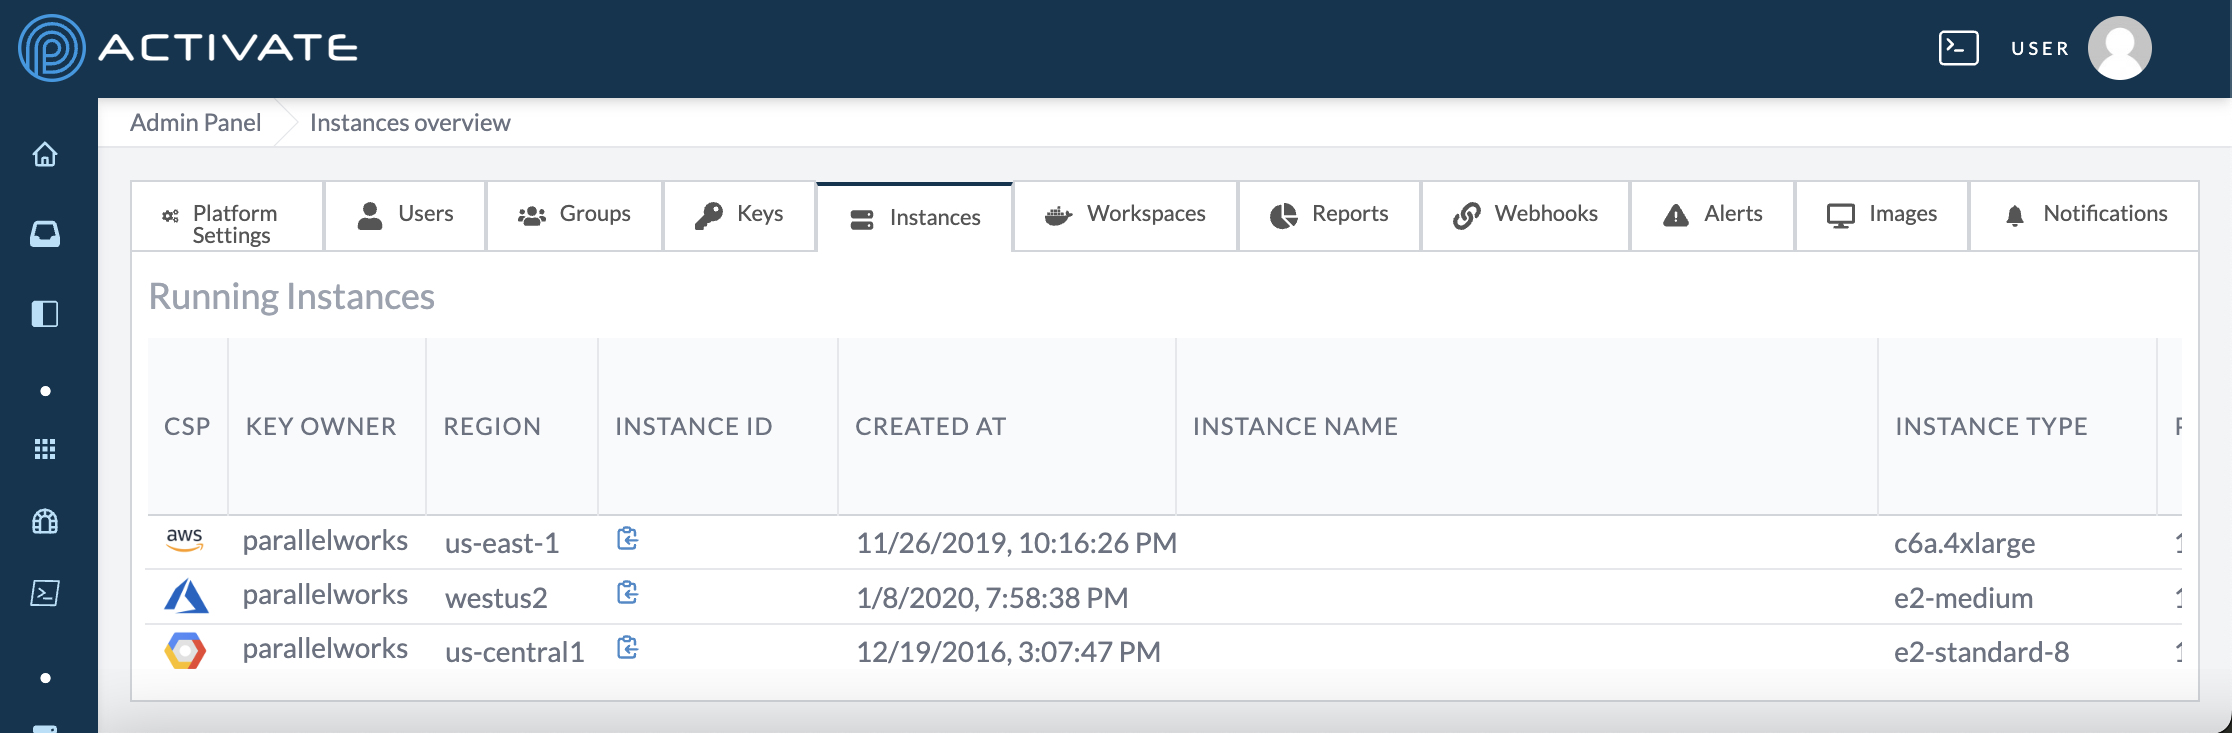
Please note that the instance list is wider than most monitors, so the included screenshot does not show all of the fields listed above. To see more information about your instances, scroll to the bottom of the page and use the horizontal scroll bar to show more columns.
You can configure your instance types on the platform by organization. For more information, please see Configuring Instance Types.
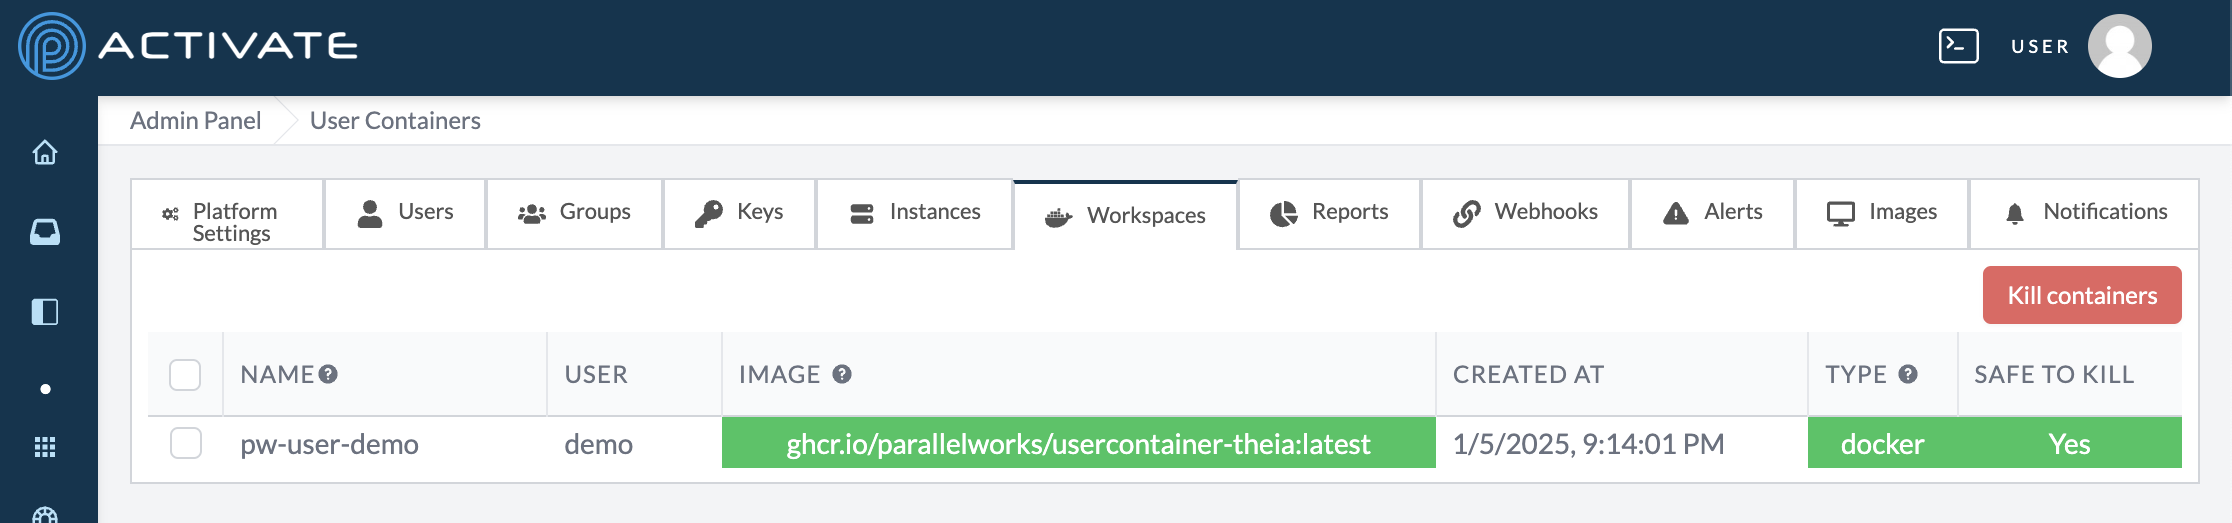
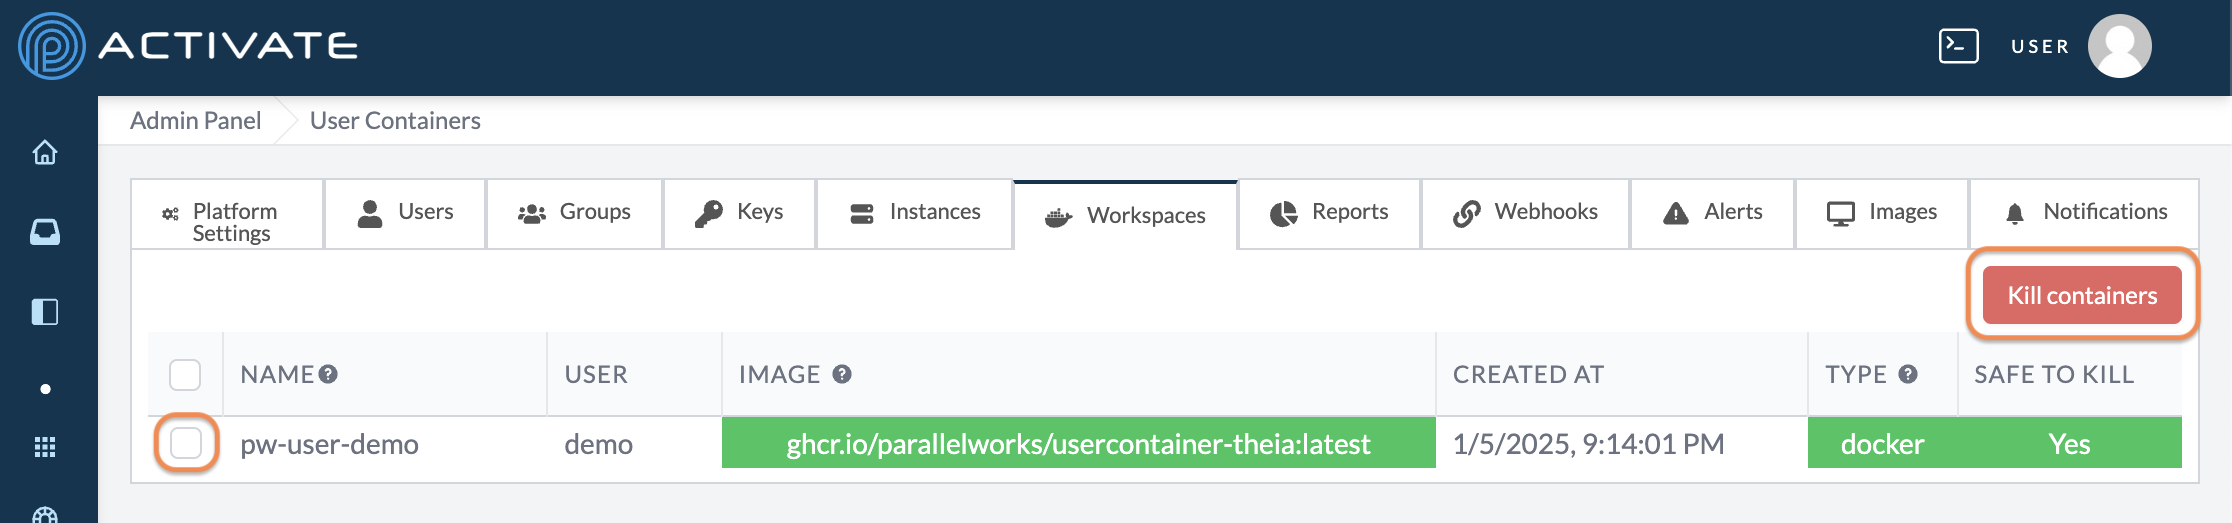
Workspaces
This tab displays information for all of your user containers, including:
- container name
- user
- container image
- creation date
- type (Docker or Kubernetes)
- safe to kill
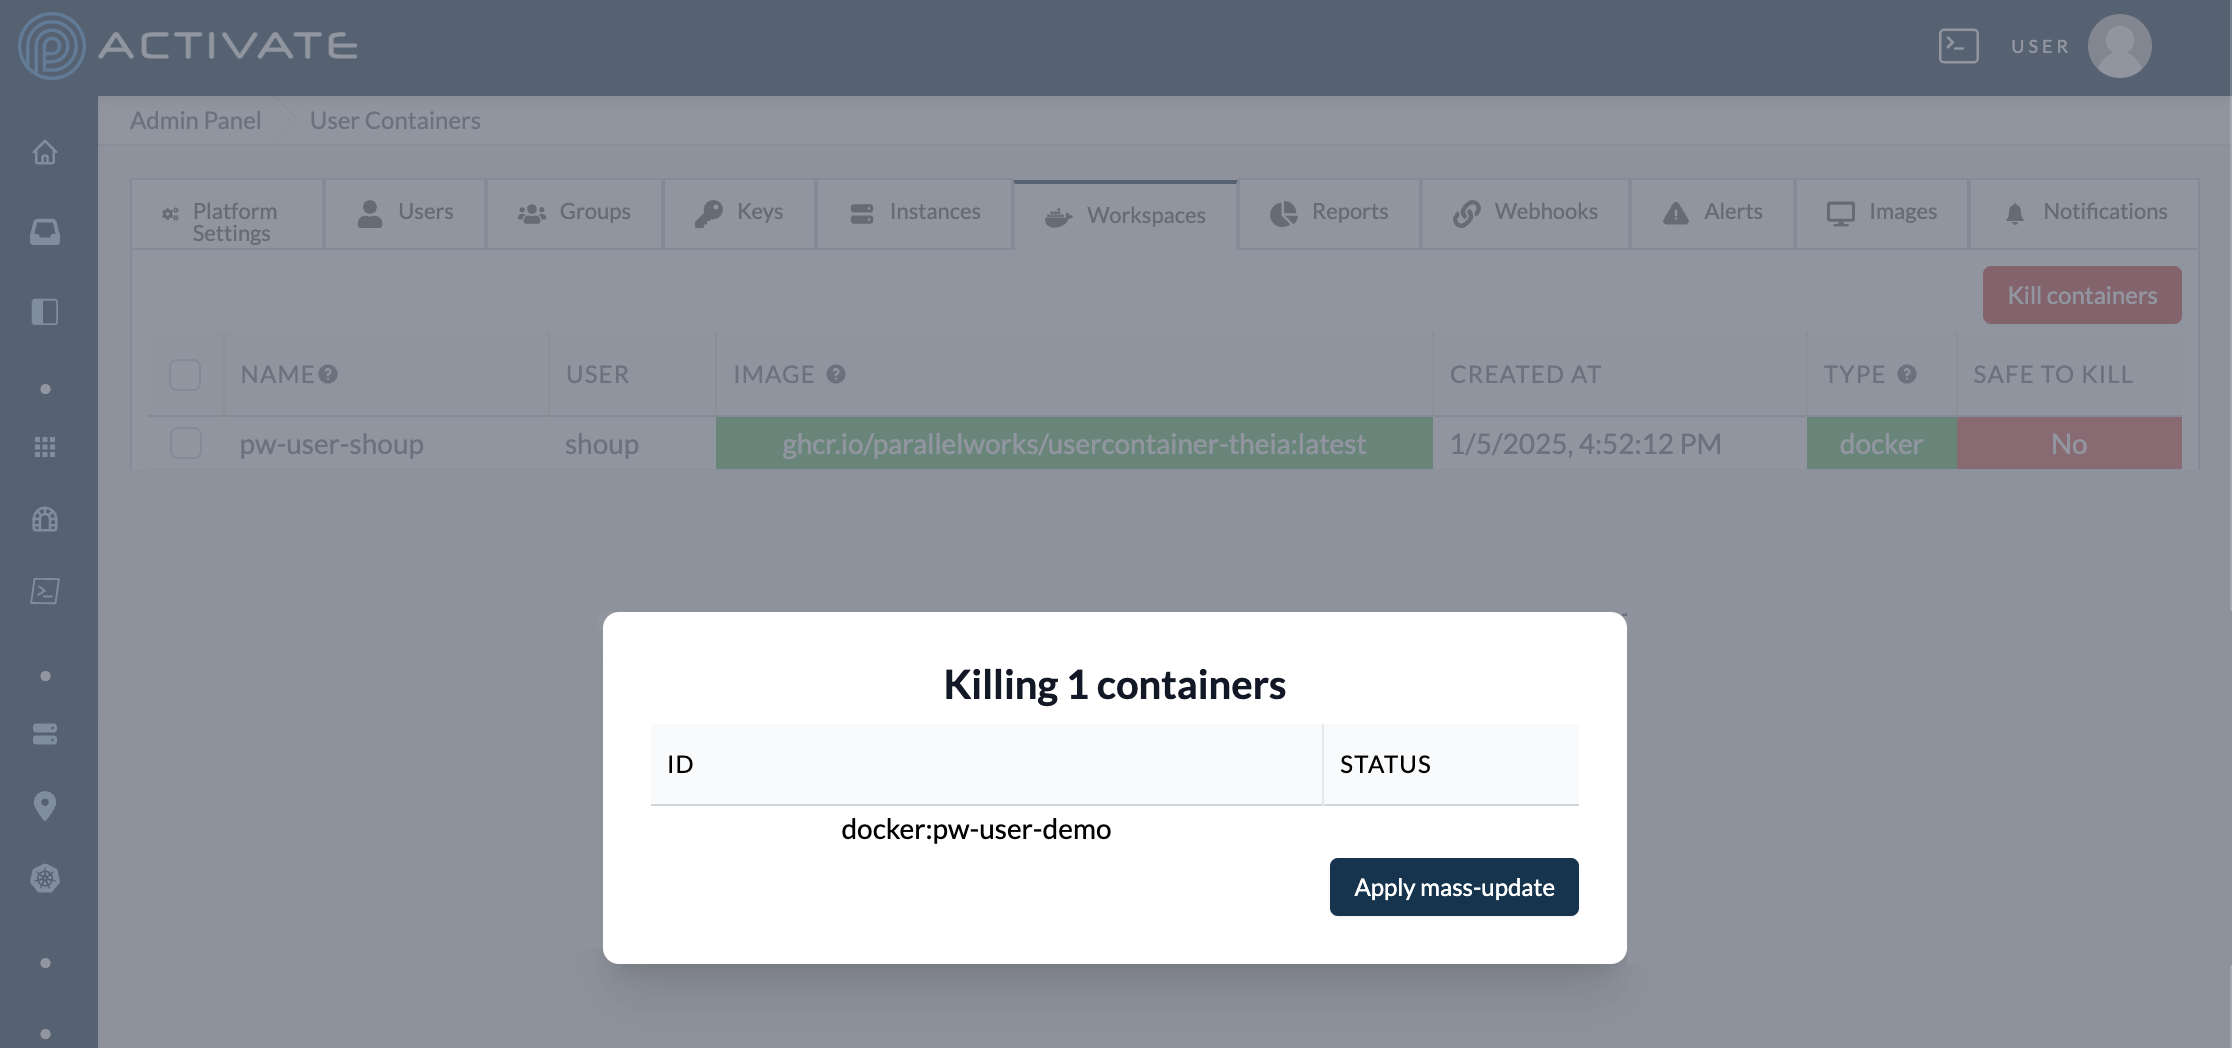
Killing User Containers
In the Containers tab, select users with their checkboxes. Click Kill containers.
A dialog box will appear. Confirm that you’ve selected the containers you want kill.
Click Apply mass-update. Your changes will be applied immediately.
Images
This tab manages the compute images shown to users when they define clusters. The images listed here are references to images on your cloud service provider (CSP) — deleting an image from this tab will not delete it from the CSP account.
The table groups images by CSP and displays each image's name, ID, region, architecture, and size, along with whether it's Published and whether it's the Latest image. The latest tag automatically points to the most recently added image.
Adding an Image
Click Add Machine Image. On the next page, you can configure the parameters listed below.
- Name: the name of the image.
- CSP: the cloud service provider the image lives on (aws, google, azure, openstack, or oracle).
- CSP ID: the unique ID of the image in the CSP (e.g.,
ami-1234567890on AWS). - Region: the region the image is in. This field appears for AWS, Oracle, and OpenStack images.
- Size (GiB): the size of the image.
- Architecture: amd64 or arm64.
- OS Type: the operating system family of the image (platform, rhel, ubuntu, or windows).
- Published: makes the image available for use.
When you're done, click Save. A dialog box with the message Image added successfully will appear.
Managing Images
Each image's row has a menu with the following actions. Each action asks for confirmation before it's applied.
- Edit opens the image's parameters.
- Set published and Set unpublished control whether the image is available for use. If a published image is currently set as latest, unpublishing it will prevent it from being used as the latest image.
- Set latest points the
latesttag at the image. This action is available for published images only. - Disable and Enable control whether the image can be selected by users at all.
- Delete permanently removes the image reference from the platform.
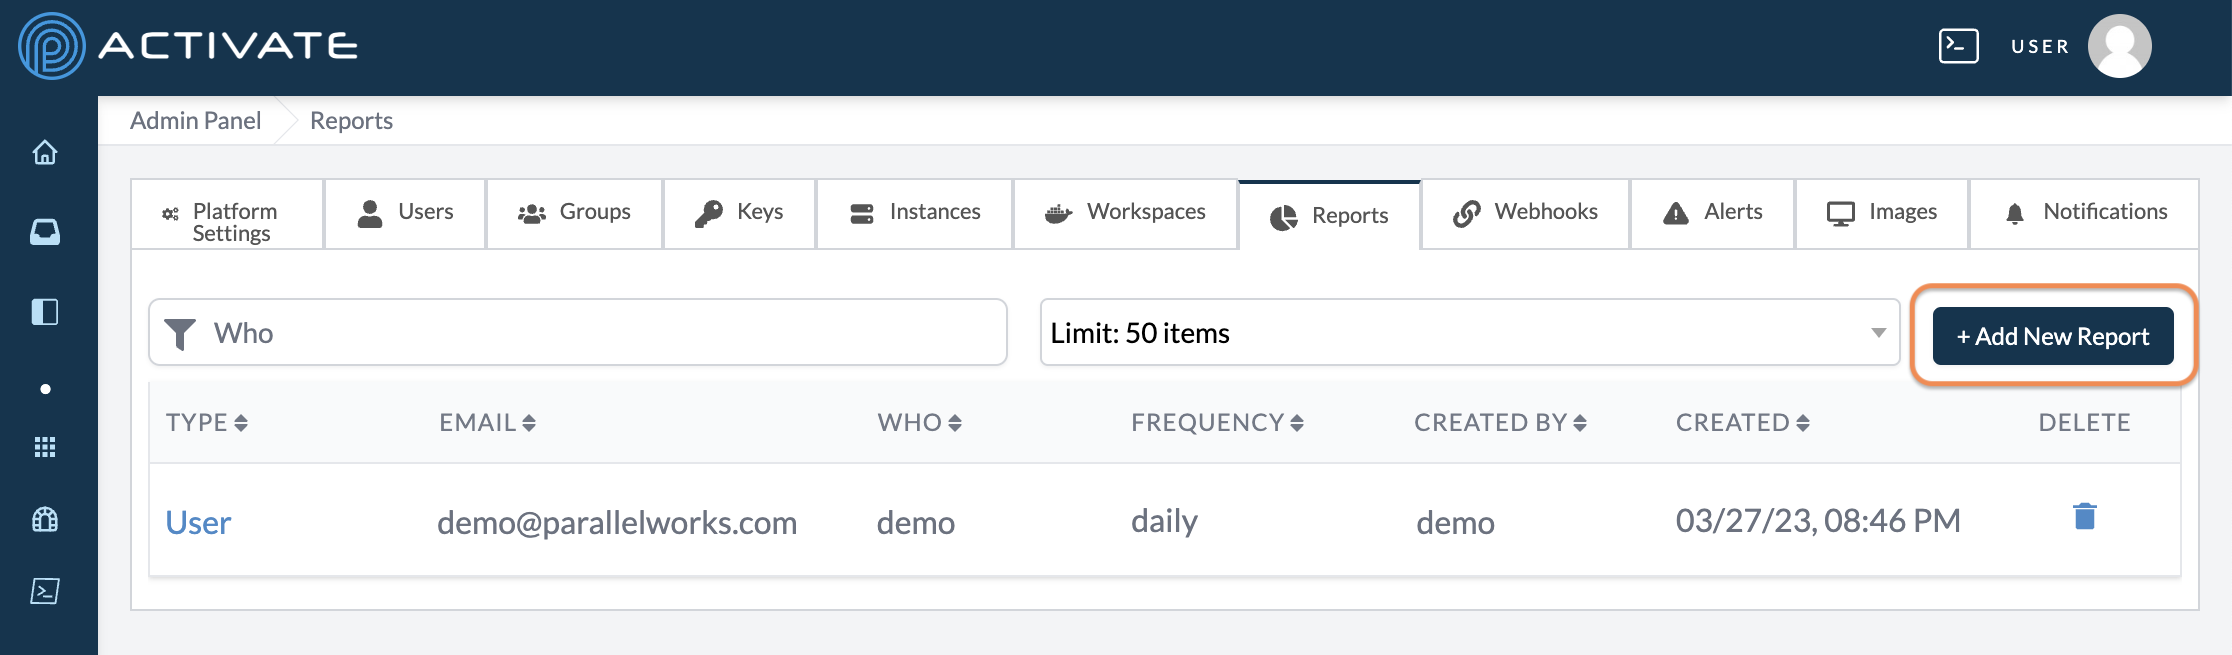
Reports
This tab displays information for your reports, including:
- type of report
- email address that receives reports
- who the report monitors
- frequency
- creator
- creation date

Creating Reports
In the Reports tab, click + Add New Report.
On the next page, you can edit the parameters listed below.
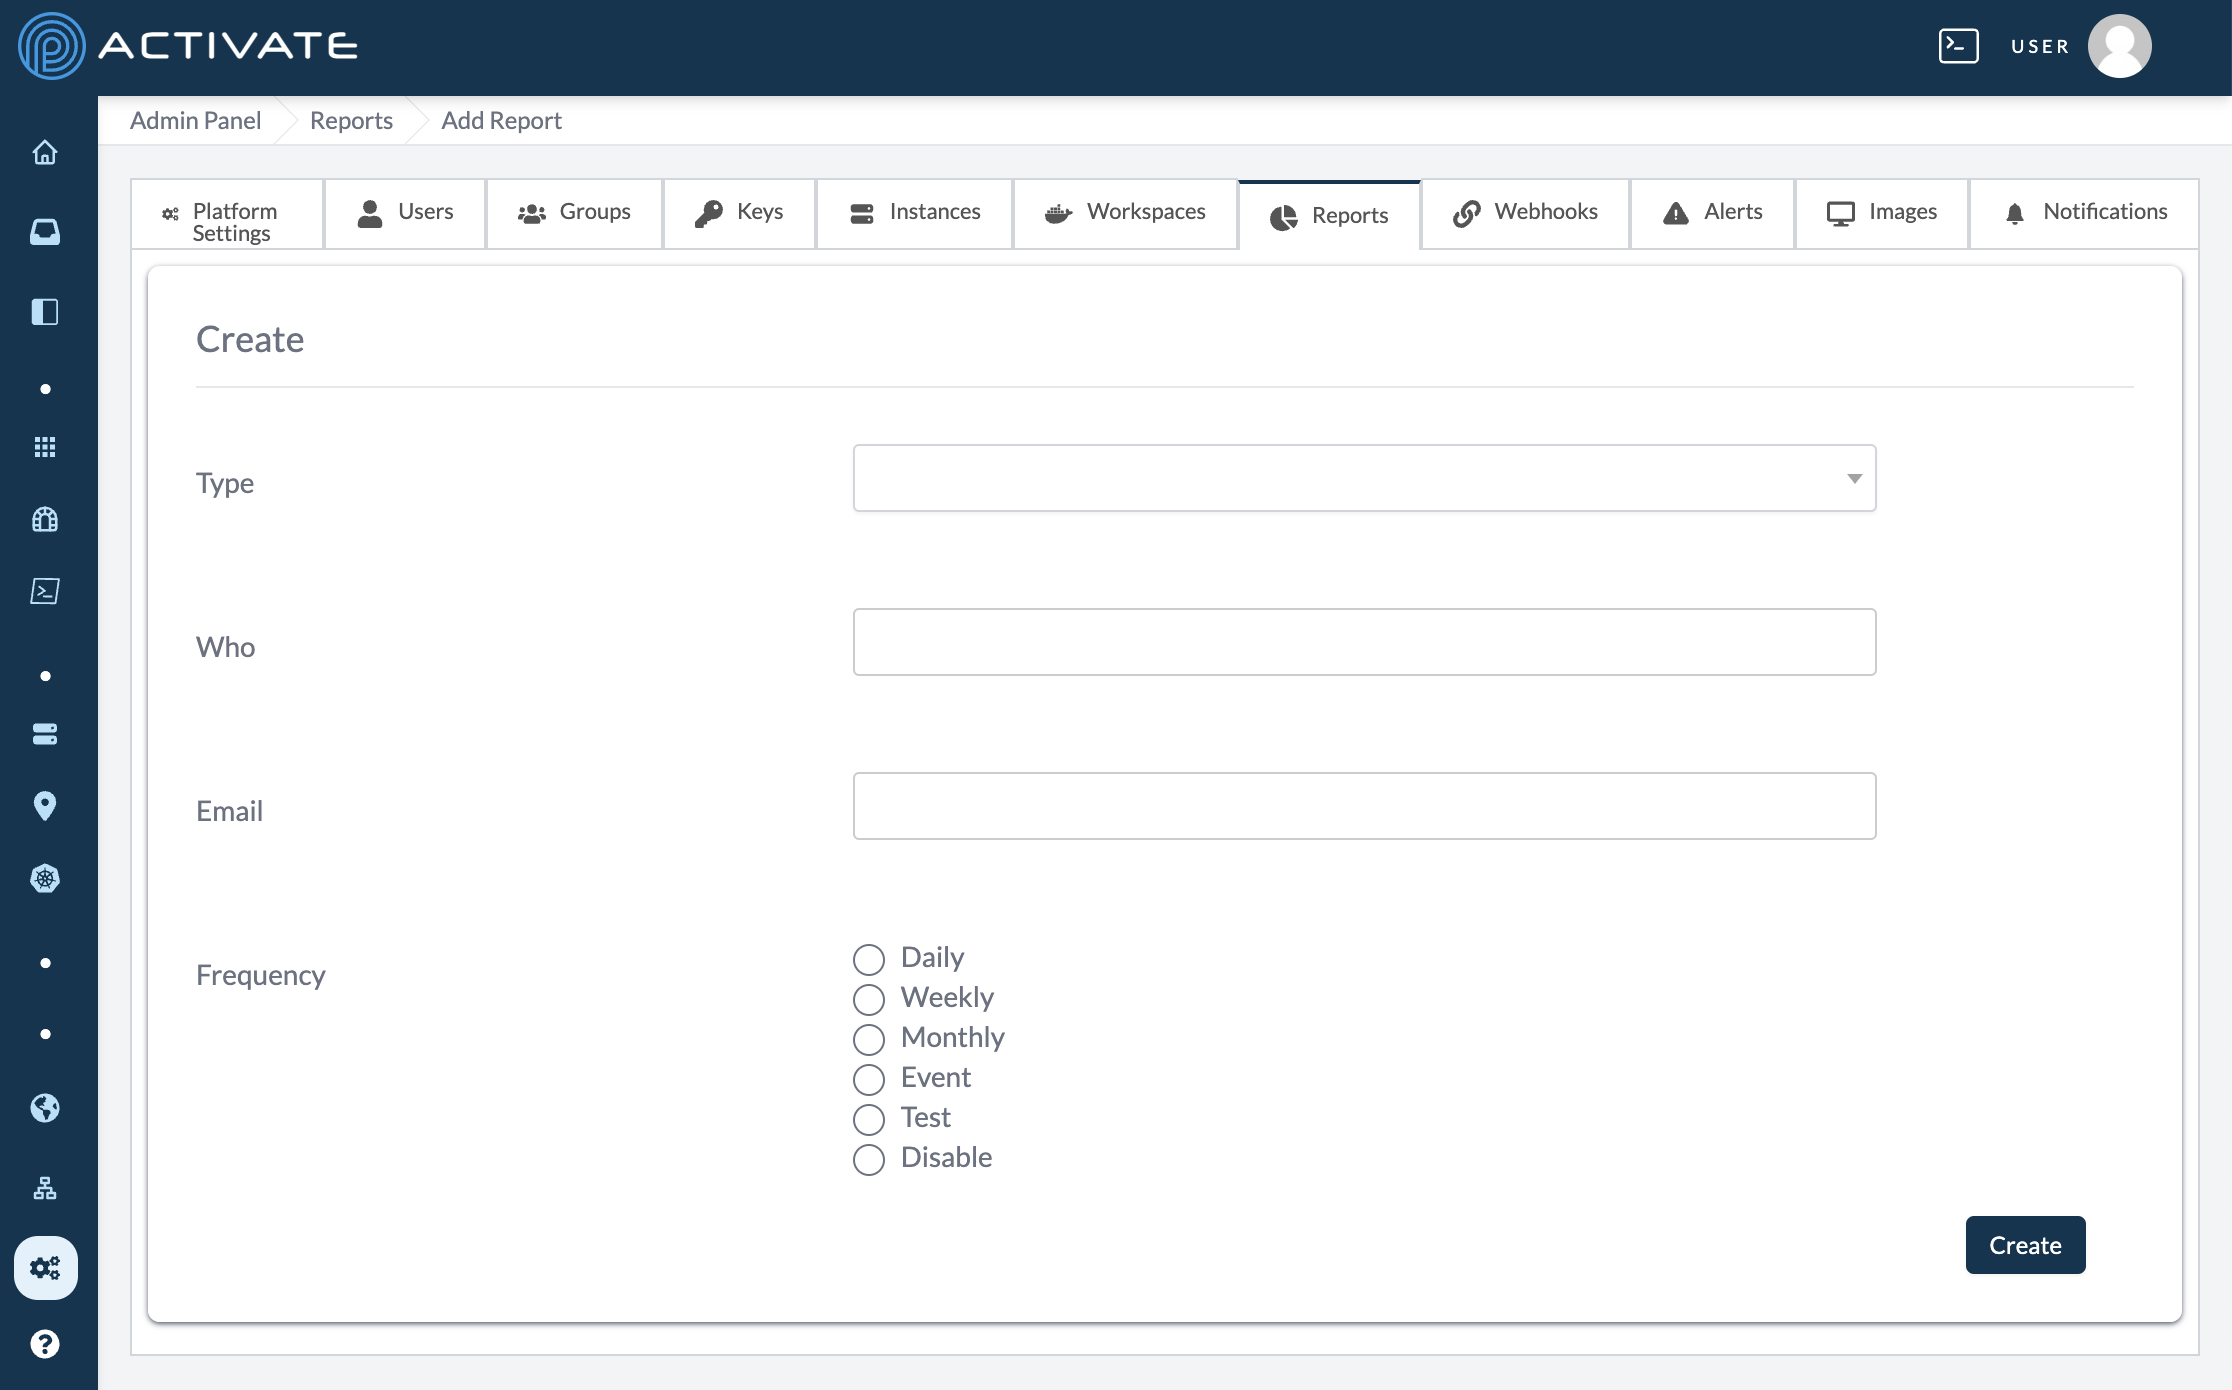
Use the Type dropdown menu to select the type of report you want to generate:
- summary
- project
- monthly
- user
- application
Use the Who field to enter the username who the report will monitor.
Use the Email field to enter the report recipient’s email address.
Use the Frequency bubbles to select how frequently the report will be generated:
- daily
- weekly
- monthly
- event (once, at the time of creation)
- test (once, at the time of creation)
- disable (end reports for the time being)
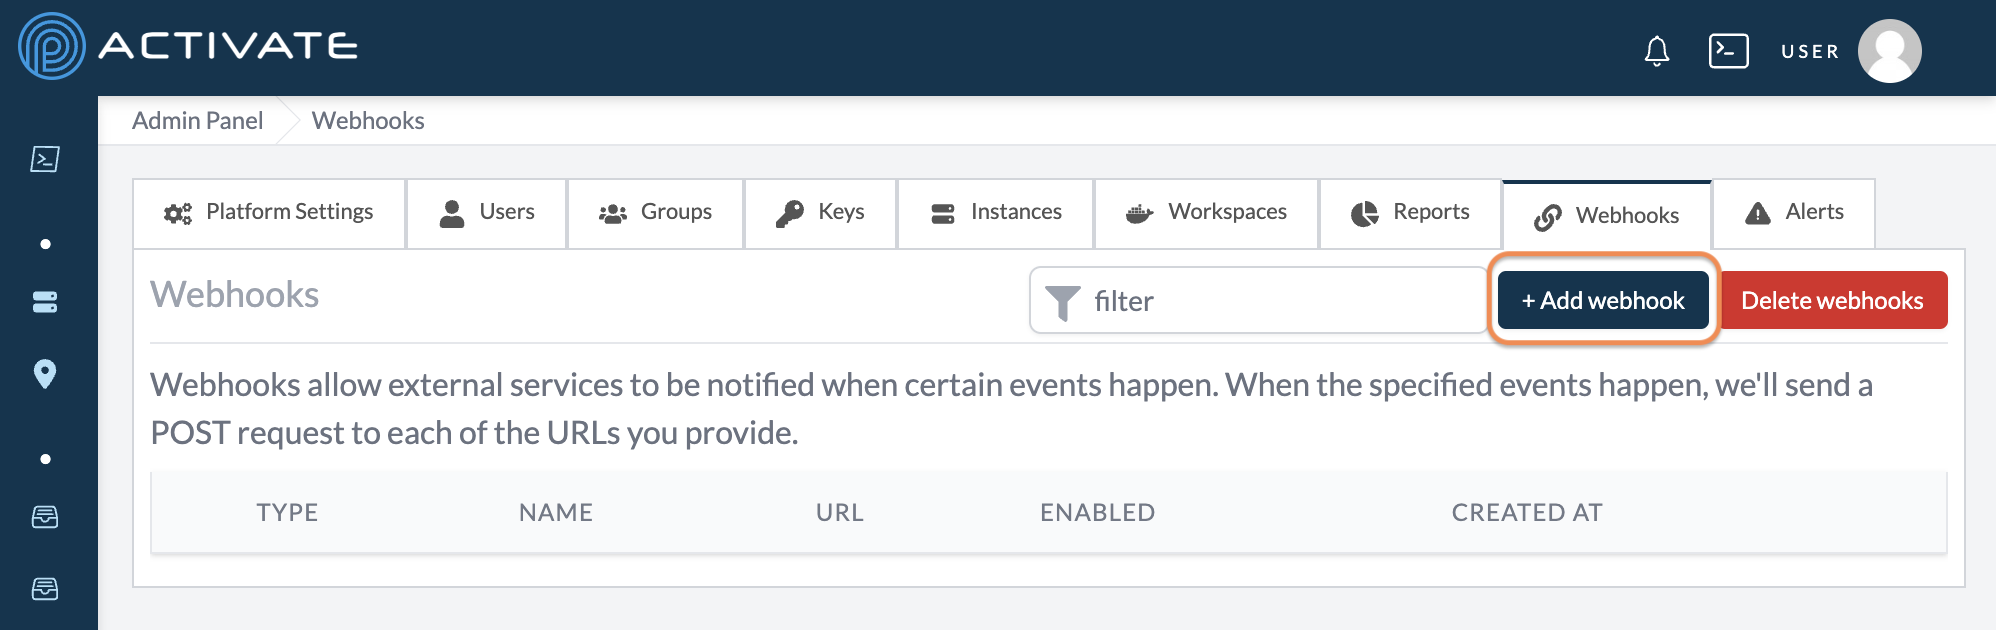
Webhooks
Webhooks allow external services to be notified when certain events happen. When the specified events happen, we'll send a POST request to each of the URLs you provide.
Adding a Webhook
Click + Add Webhook.
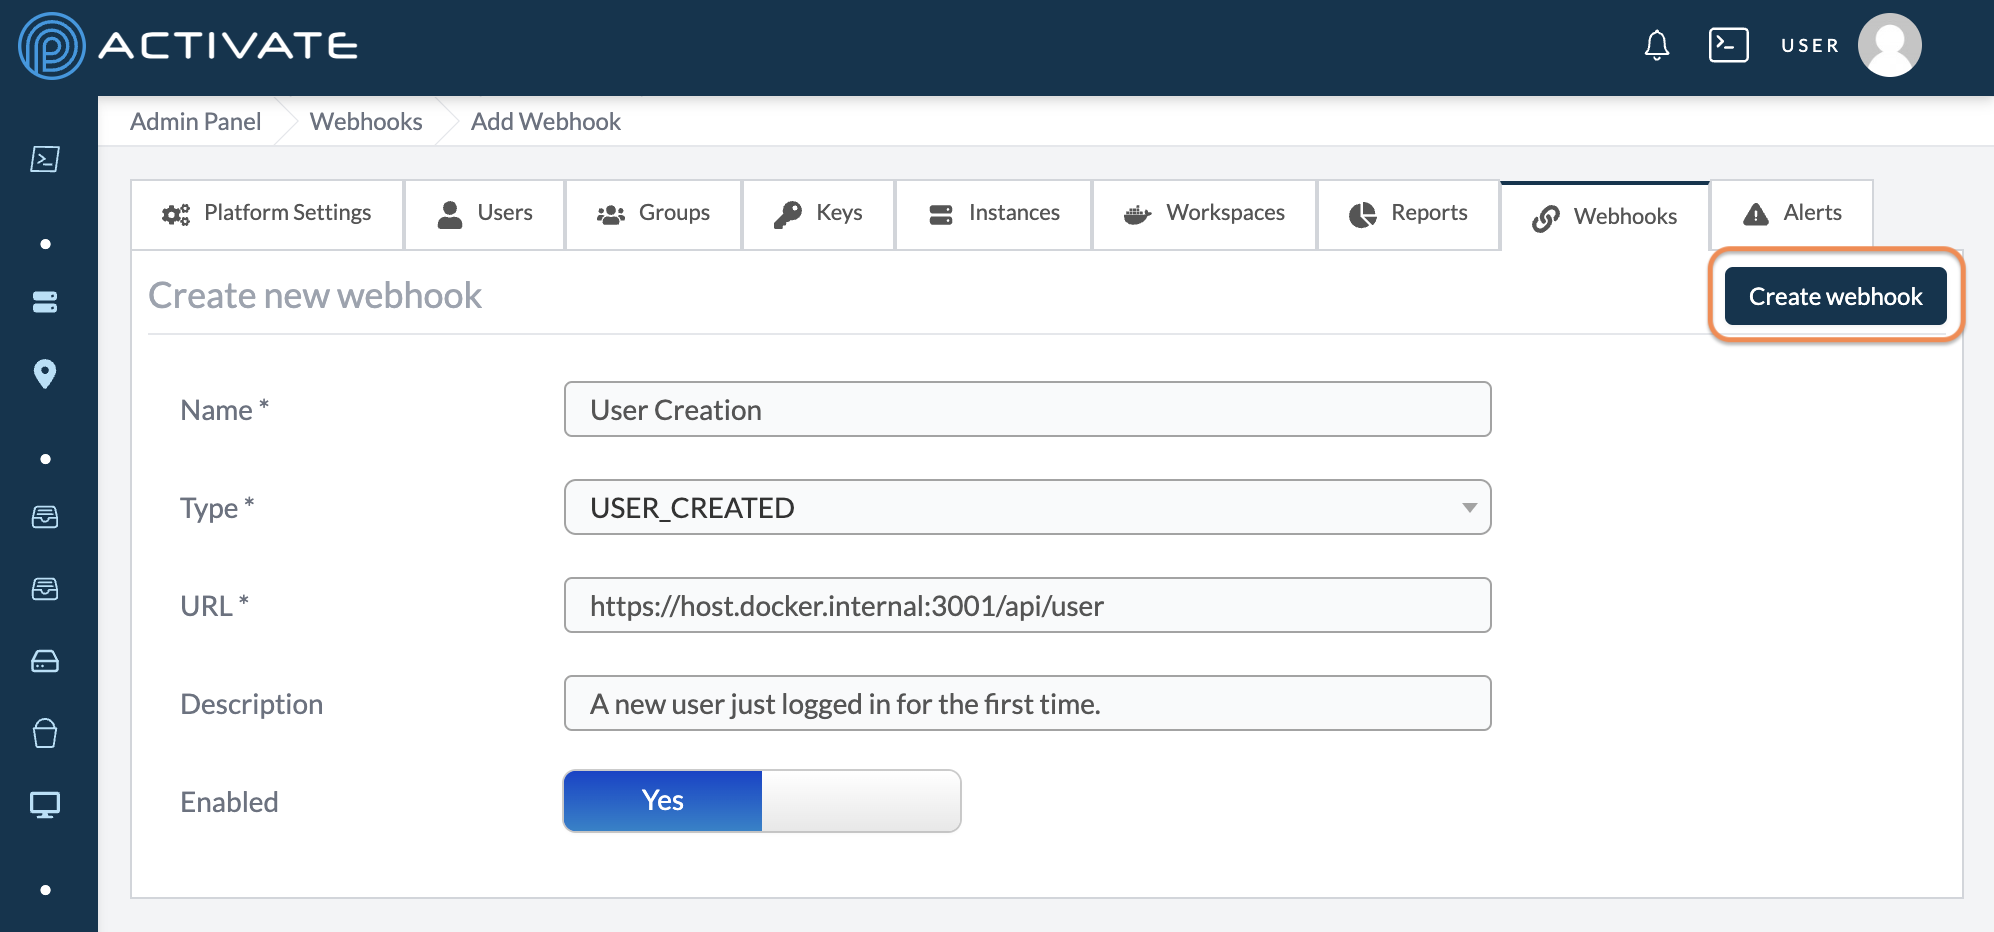
On the next page, select a Type. Currently, you can choose from these webhook types:
USER_CREATEDflags when a new user logs in for the first time.USER_DISABLEDflags when a user has been disabled.USER_REMOVED_FROM_GROUPflags when a user has been removed from a group in your organization.
Add a Webhook name and paste the URL that your webhook will be sent to. Description is an optional field.
Choose whether to Enable this webhook.
Click Create webhook.
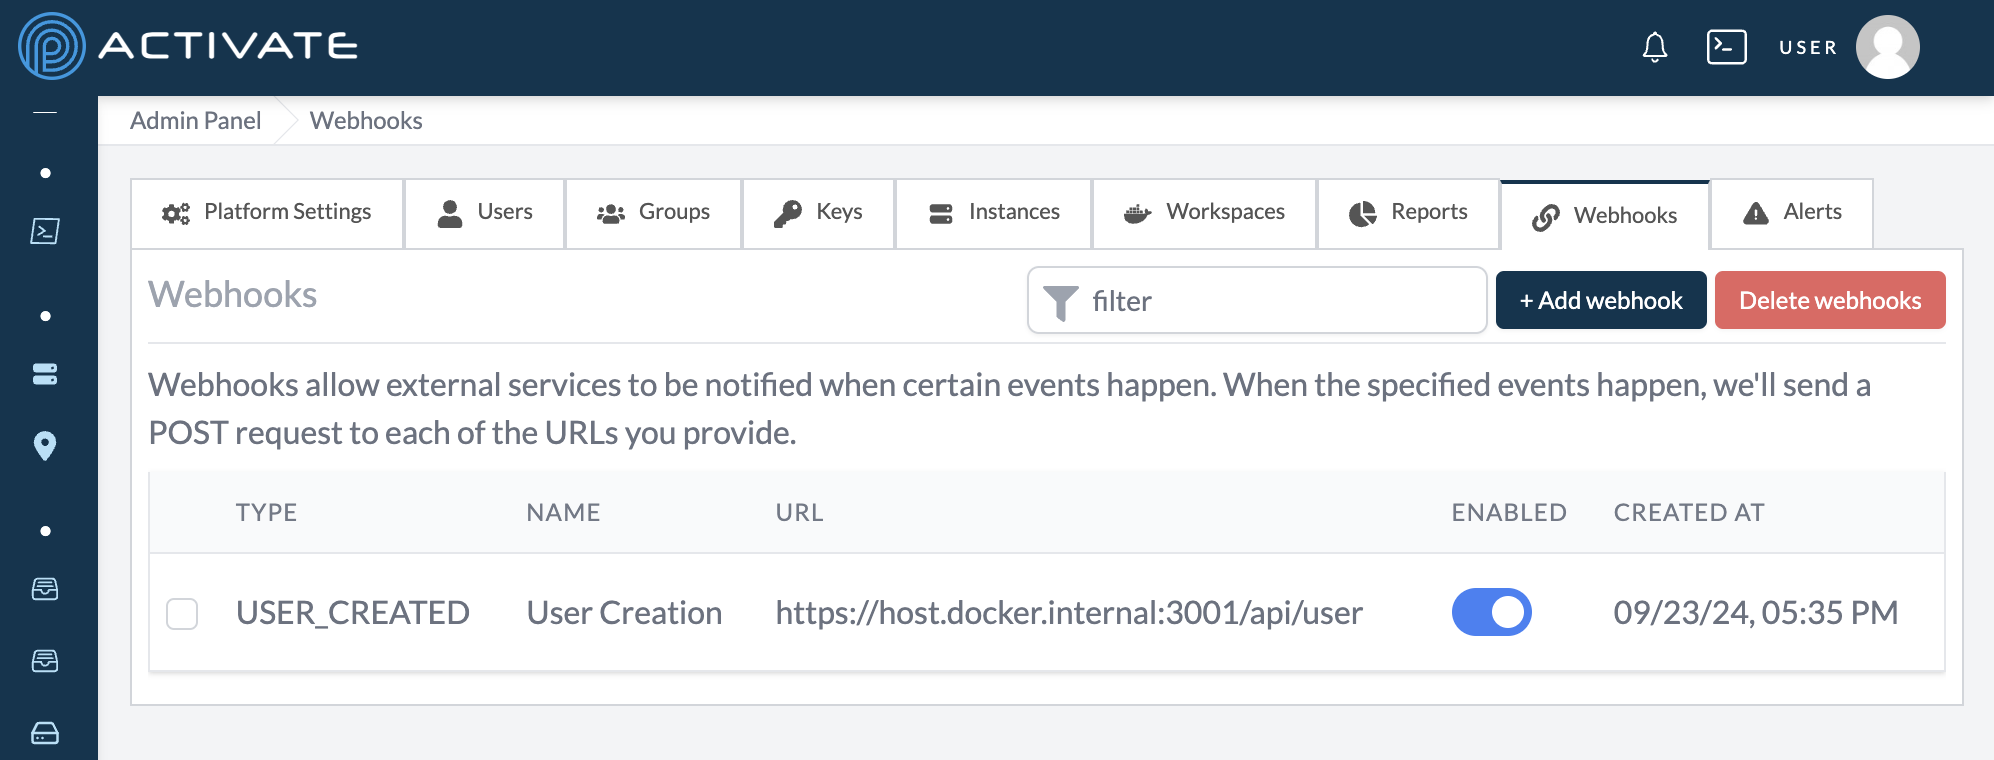
You'll be taken back to the Webhooks tab. A dialog box with the message Webhook created successfully will appear in the bottom right corner of your screen.
Deleting a Webhook
Select the webhook you'd like to delete, then click Delete webhooks.
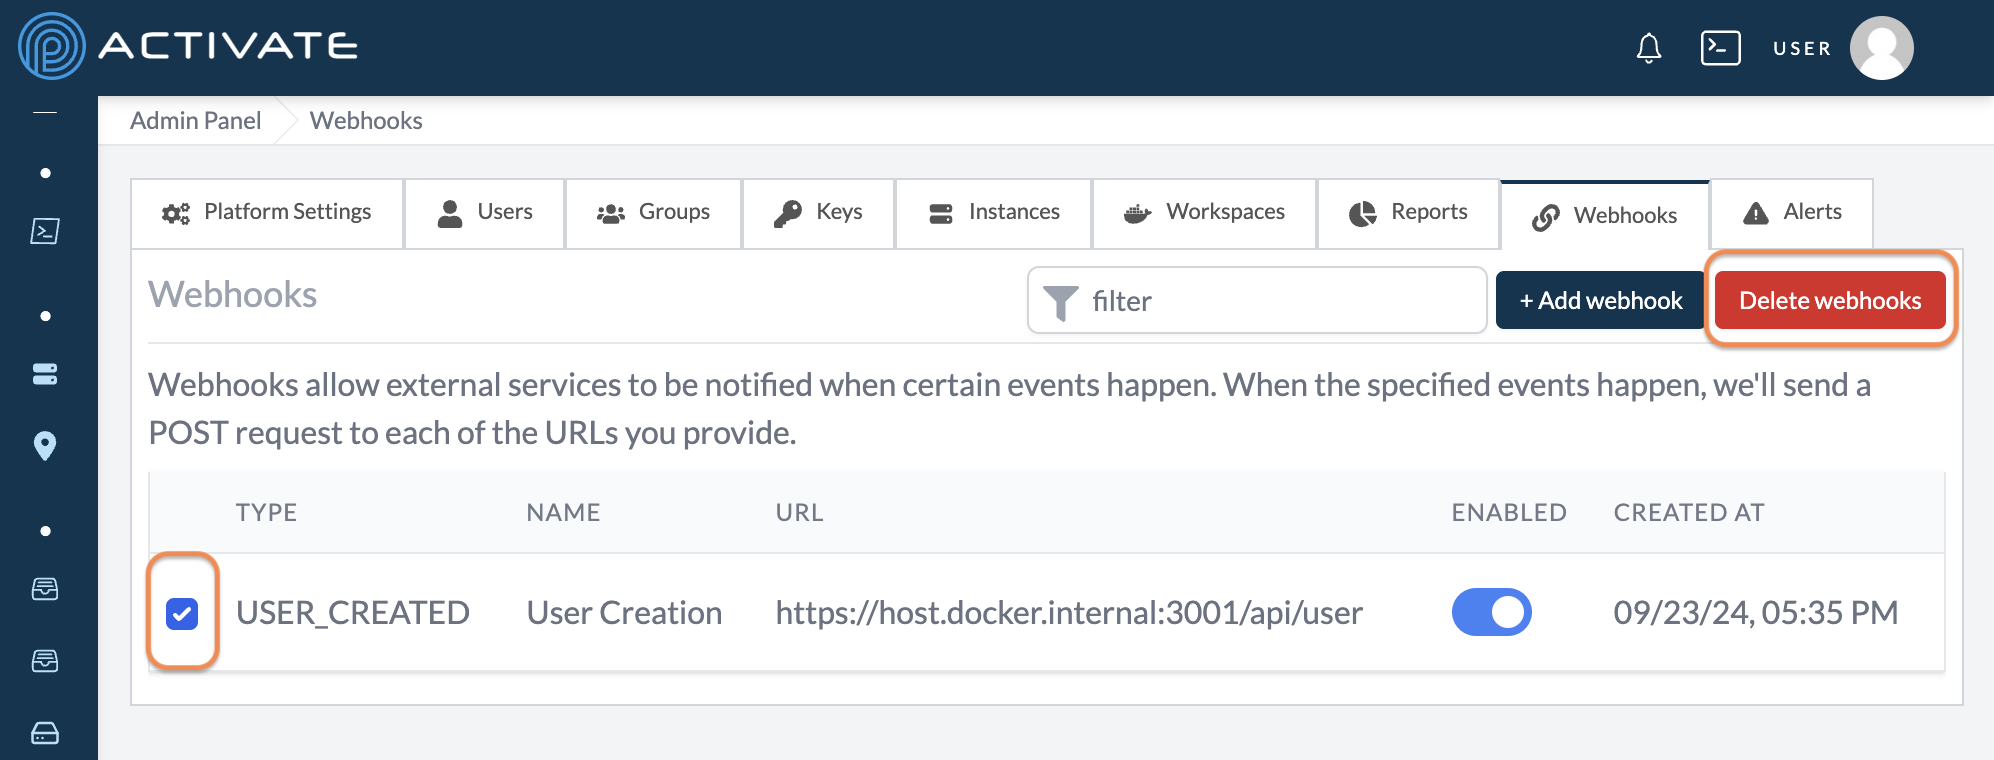
A pop-up module will appear. Click Delete.
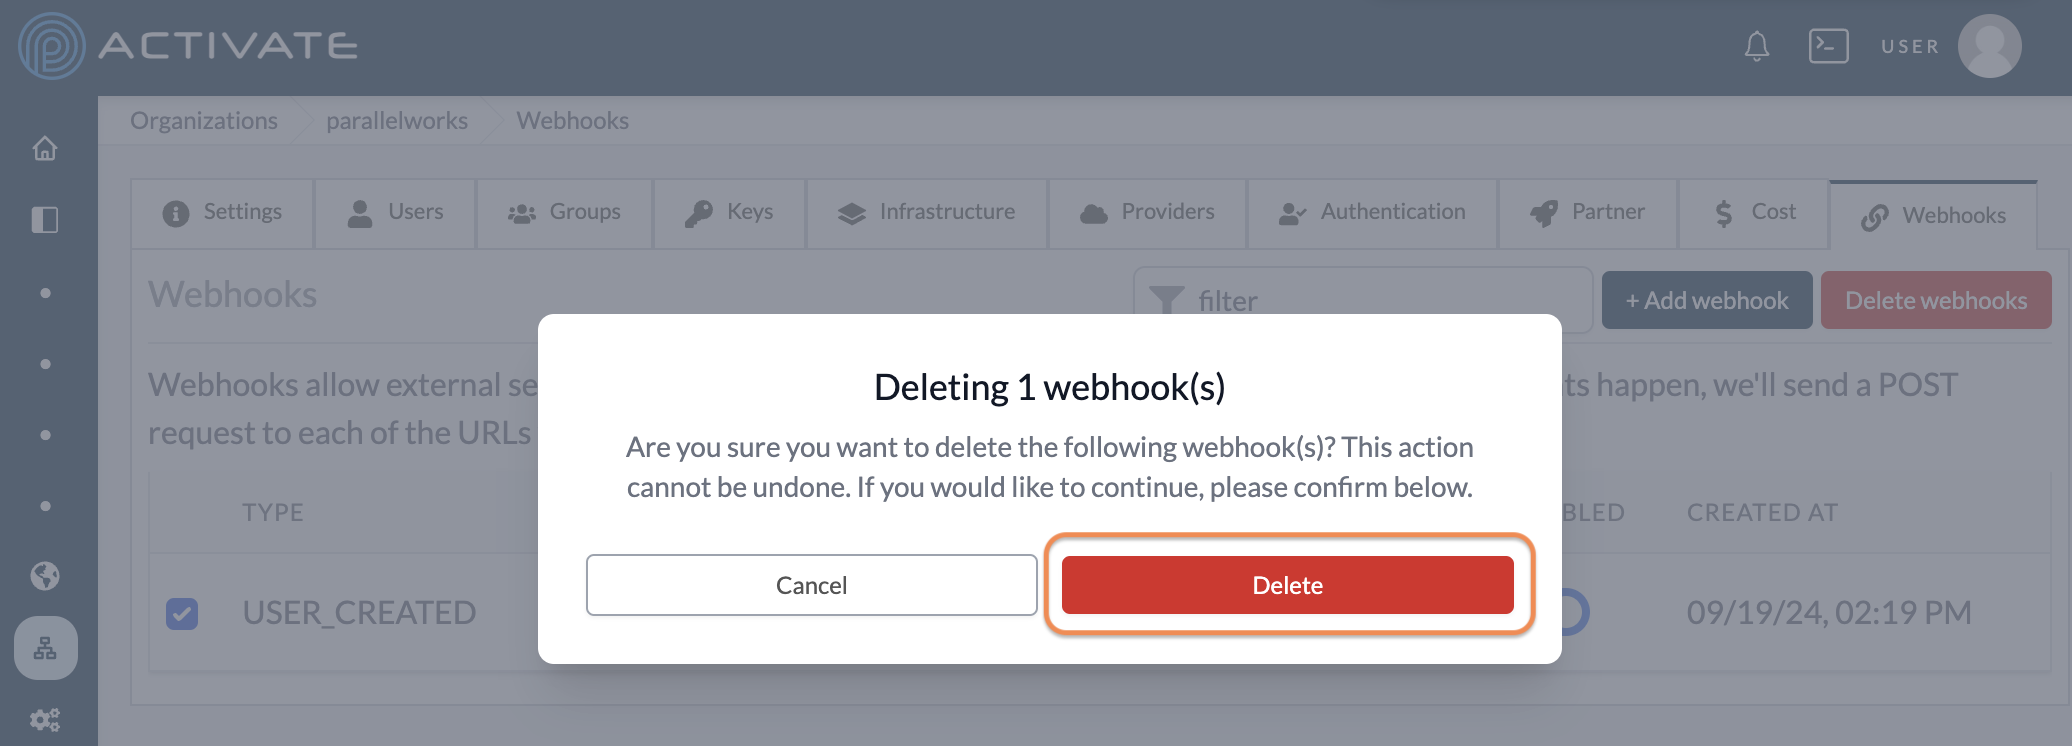
You'll be taken back to the Webhooks tab. A dialog box with the message Webhook(s) deleted successfully will appear in the bottom right corner of your screen.
Responding to Events
To see the shape of webhooks, please see this section. Admin-level webhooks take the same shape as organizaiton-level webhooks, with one exception:
- You will not see
organizationinside thewebhookobject.
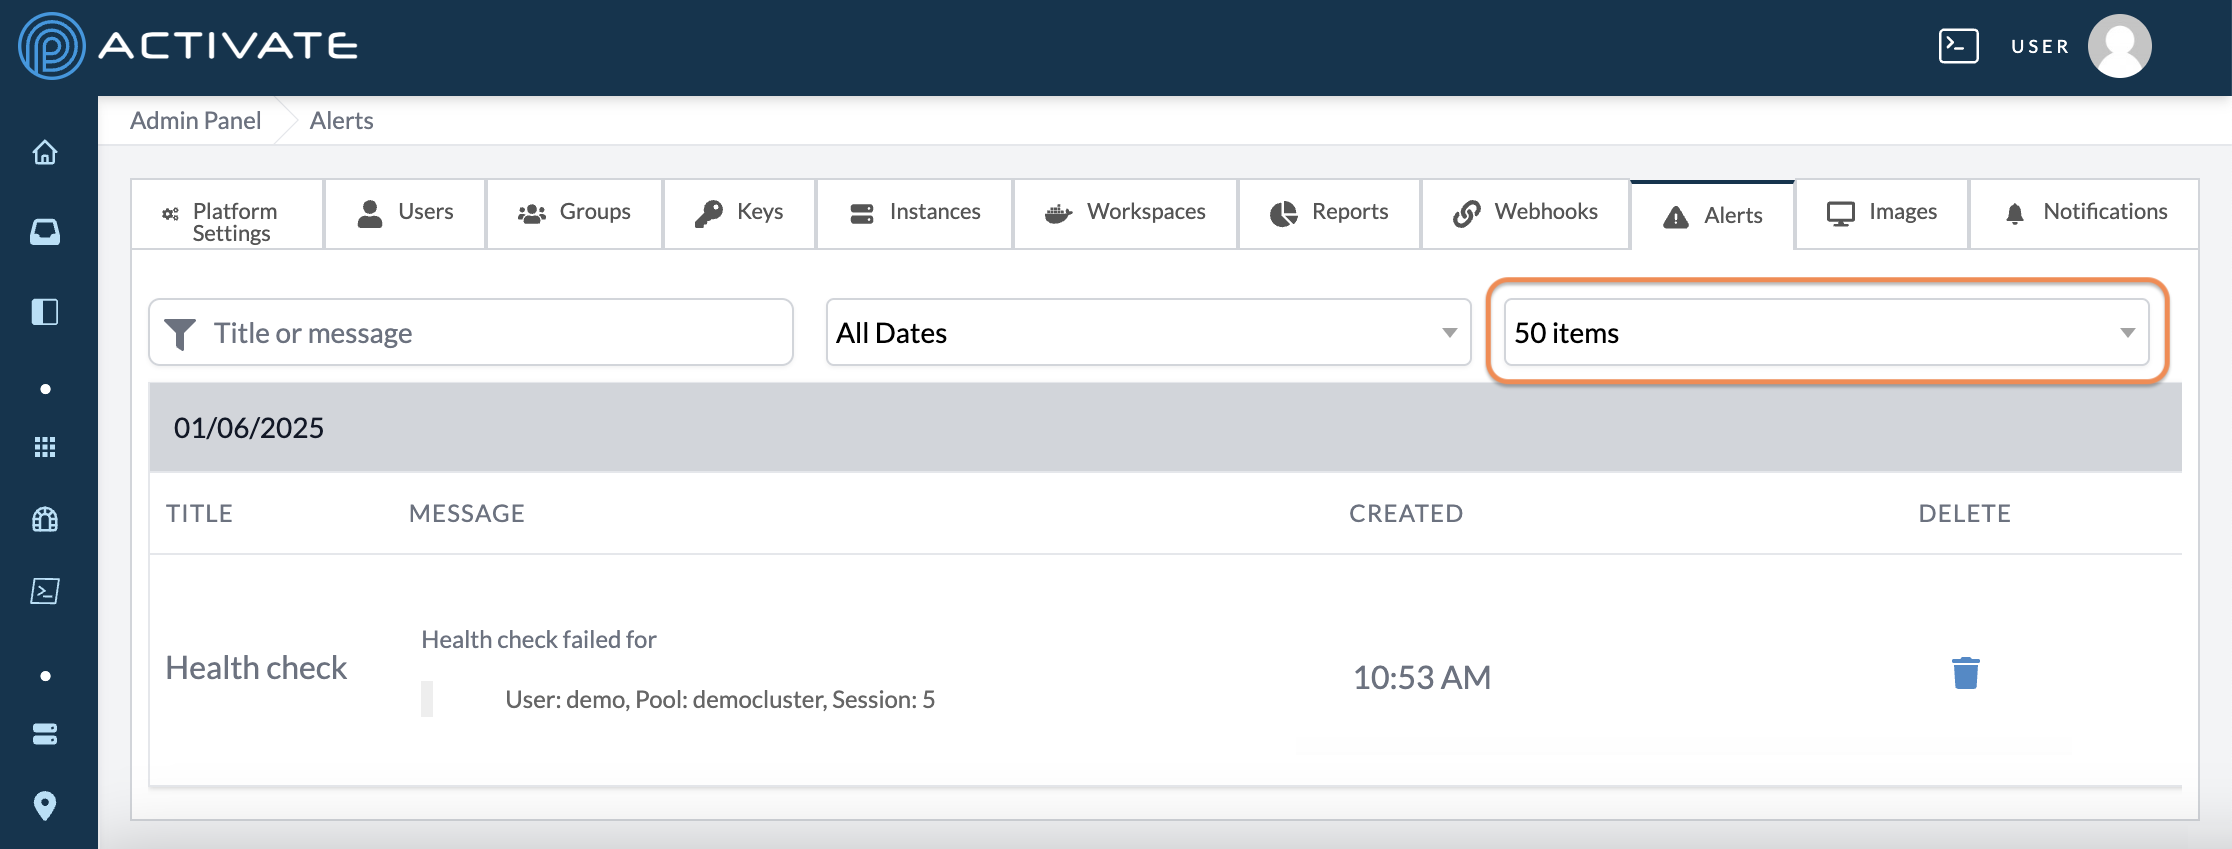
Alerts
This tab collects error messages from all users in your organization. These messages are shown for 7 days before they're automatically deleted.
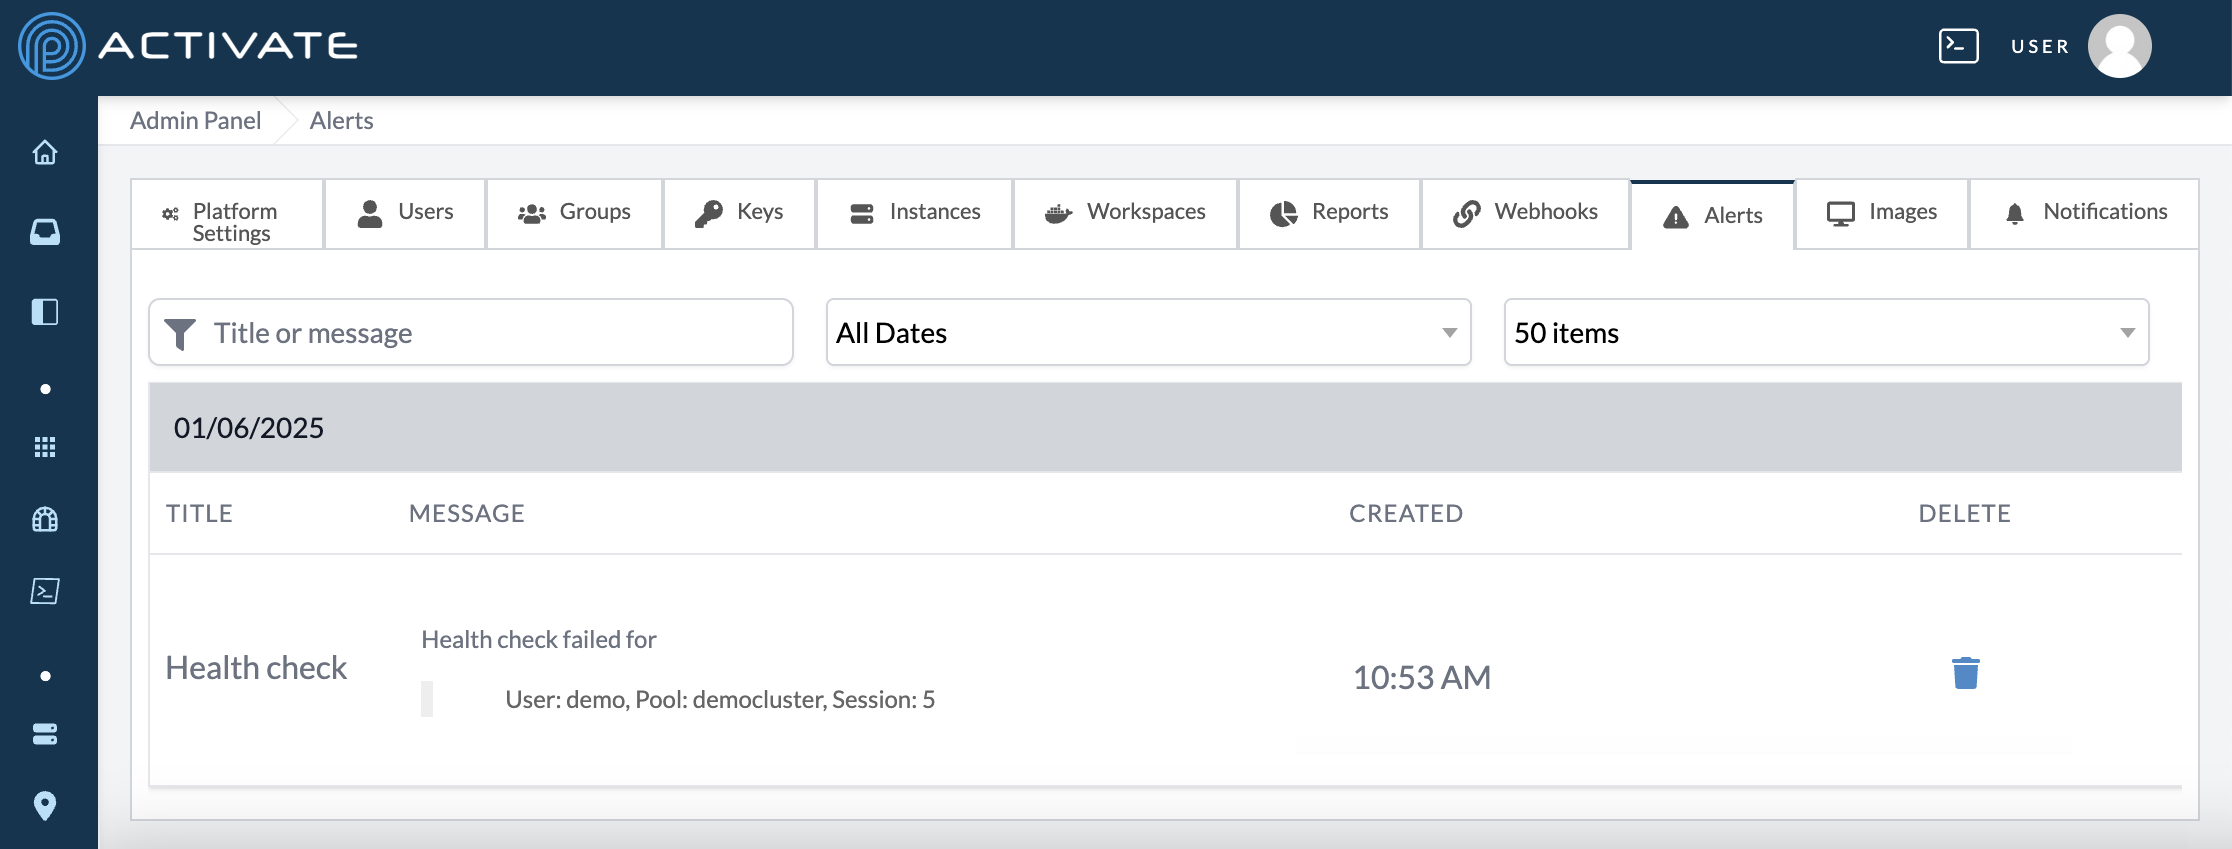
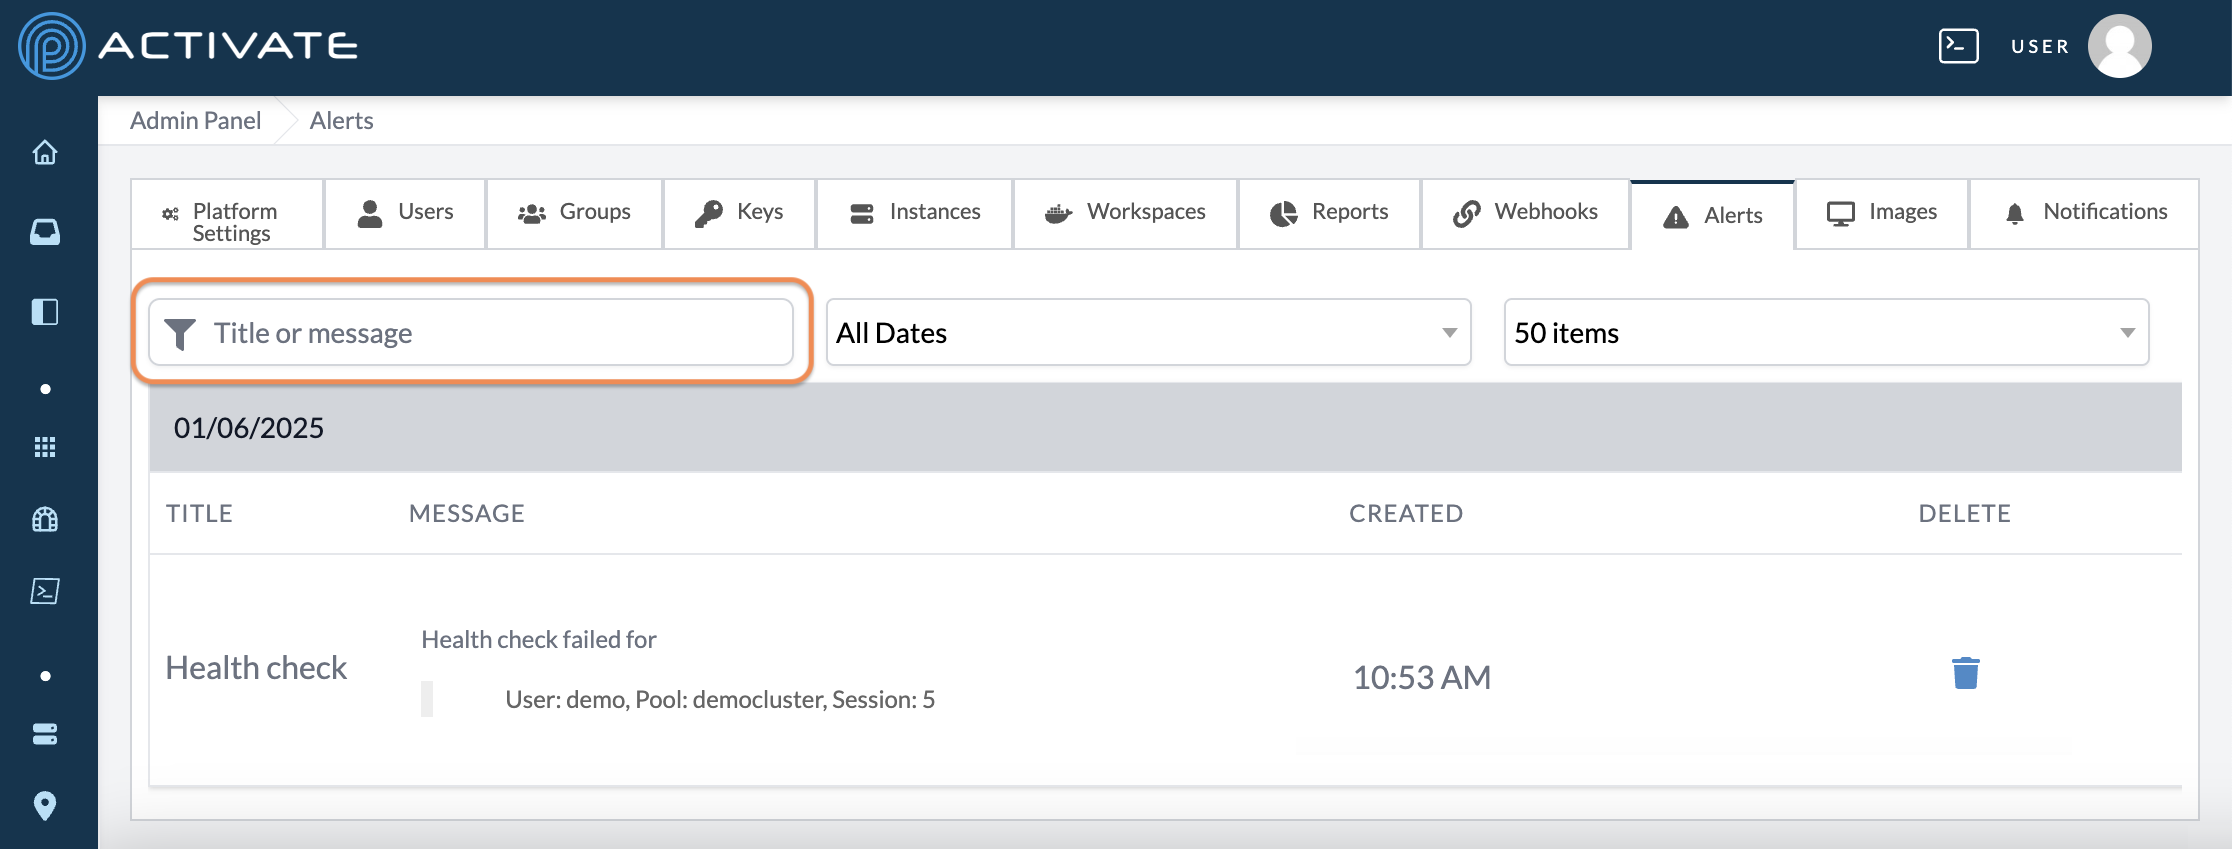
Use the Title or message field to search for alerts by keywords.
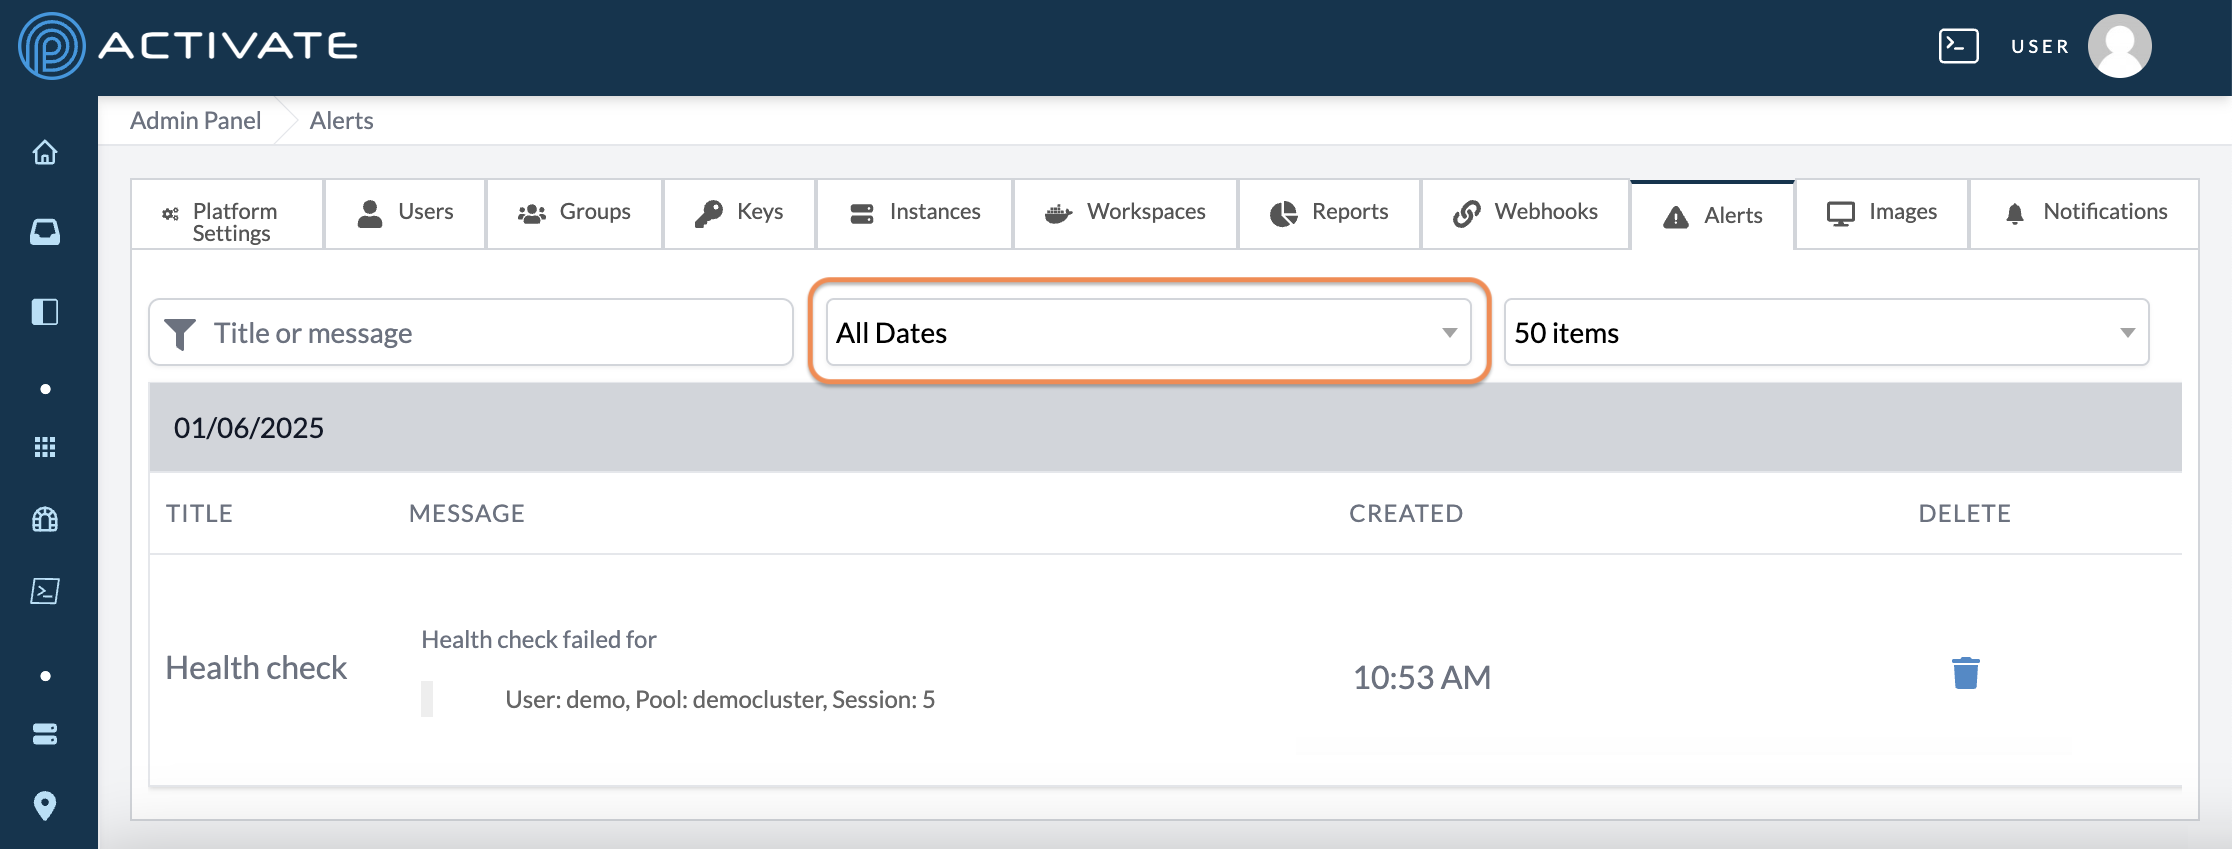
Use the All Dates dropdown menu to display alerts from a specific date.
Use the max item dropdown menu to narrow the listed users to 10, 20, 50, 100, or max items. This option is set to 50 by default.
Errors
This tab displays recent unknown errors from the platform API, including each error's method, path, message, user, request ID, and time. The oldest entries are automatically removed when the storage limit is reached.
Use the search bar to filter errors by message, path, user, or request ID.
Click Refresh to reload the list. You can also click Trigger Test Error to generate a sample error and confirm that error reporting is working.
Use the Previous and Next buttons at the bottom of the page to move through the list.
Notifications
This tab lets you send notifications to individual users, organizations, or the entire platform. Recipients see them in their Inbox.
Use the Target dropdown menu to choose who receives the notification:
- User sends the notification to a single user. Select the recipient in the Username dropdown menu that appears.
- Organization sends the notification to every user in an organization. Select the recipient in the Organization dropdown menu that appears.
- All sends the notification to every user on the platform.
Use the Level dropdown menu to select Info or Alert.
Enter a Notification title. You can optionally add a Message and a Notification href, which attaches a link to the notification.
The Preview section shows what the notification will look like to recipients. When you're ready, click Send notification. A dialog box with the message Notification sent successfully will appear.
Previews
This tab manages platform-wide feature previews. When a preview is enabled here, it's active for all users and cannot be individually disabled.
Click a feature card to see its details, including which users have enabled it under Enabled by Users. Features marked Admin only aren't visible to regular users.
If previews that no longer exist on the platform are still present in user accounts, an Orphaned previews message will appear. Click Clean up to remove them.
Integrations
This tab connects third-party services to extend platform functionality. Each integration card shows whether the service is Configured or Not configured.
Sentry
The Sentry integration monitors errors, performance, and user sessions. Click Configure to set it up. Once configured, error tracking and session replays are active.
Health Monitoring
The Health Monitoring integration shares a small health snapshot with Parallel Works every 5 minutes so support can catch expiring certificates, failed certificate renewals, and outages before they cause downtime. Reporting is on by default; click Edit on its card to review exactly what is sent or to turn it off.
Each snapshot contains only the following. It never includes usernames, email addresses, IP addresses, job or workflow data, or any other user content.
| Field | Contents |
|---|---|
| Version | The deployment's installed platform version |
| Domains | Per platform domain: domain name, certificate expiry date, certificate source, and renewal status |
| License | License expiry date and whether it is in the grace period or expired |
| Health | Whether the deployment can reach its own database, and the process start time |
| Usage | Monthly active user count, assigned seat count, and total/free seat counts when seat allocations are configured |
Snapshots are pushed over outbound HTTPS; nothing connects back into the deployment, and a failed send is simply retried at the next interval without affecting the deployment itself. The identity the deployment reports as (shown on the tile under Reports as) is derived from its platform license.
To stop reporting, toggle Enable reporting off and save. The change takes effect within one interval, without a restart. You can also point Custom endpoint at your own receiver instead of the Parallel Works default.
GitHub
The GitHub integration connects a GitHub App to enable repository access on the platform. Click Configure to set it up. Once configured, users can link their GitHub accounts in their account settings. For more information, please see Connections.
To remove the GitHub App configuration, click the delete icon on its card.
Irreversible Action
Removing the GitHub App configuration will disconnect all linked users and delete all stored credentials.
PKI Validation
This tab serves a configurable token file at /.well-known/pki-validation/ for HTTP-based domain control validation, which some certificate issuers require when provisioning SSL/TLS certificates.
Note
The file is served over plain HTTP without authentication.
Enter the Filename, including its extension (e.g., 1e2175b230684937b0093e71b3cc3404.txt), and paste the verification token in the File contents field. The file body is preserved exactly, including whitespace.
Once you enter a filename, the Public URL field displays the address where the file will be served. Click Save to start serving the file. The tab will display an Active badge while a file is being served.
To stop serving the file, click Remove. A dialog box will appear; click Remove to confirm. The endpoint will return a 404 error afterward.
Migrations
This tab runs and manages database migrations for Postgres and MongoDB. It's primarily used when operating a self-hosted ACTIVATE deployment.
The Mongo Migrations Registry table lists each migration with its status (Applied or Not Applied), whether it runs automatically, when it was first applied, and who applied it. Click Run (or Rerun) in a migration's row to execute it individually, or click Run Unapplied Auto Mongo Migrations to run all pending automatic migrations.
To run migrations in bulk, click Run Migrations and choose Both (Postgres + Mongo), Postgres Only, or Mongo Only.
Irreversible Action
Running migrations will modify your database schema and data. Ensure you have backups before proceeding.
The Migration Run History section logs each run with its start time, duration, actor, and per-step results. Click Delete All Logs to clear the history. Deleting logs only removes the log entries; it does not affect the migrations or the data in your database.
Maintenance
This tab cleans up old or orphaned data to free database space and keep the platform running smoothly.
Each operation shows a preview of what will be deleted before you confirm.
Irreversible Action
Deletions on this tab permanently remove data from the database and cannot be undone.
Old Workflow Runs Cleanup
This section removes workflow runs created before a specified time period. Enter a number of months in the Delete workflow runs older than field and click Preview to see how many runs will be deleted. If the preview returns results, click Delete Workflow Runs and confirm.
Orphaned Workflow Runs
This section finds workflow runs that reference non-existent users or workflows — for example, runs where the user has been deleted, or where the workflow definition no longer exists. Click Scan for Orphaned Runs to preview them, then click Delete Orphaned Runs and confirm.
Orphaned Infrastructures
This section finds infrastructure that references non-existent users — resources whose owner's account has been deleted. Click Scan for Orphaned Infra to preview them, then click Delete Orphaned Infra and confirm.