Configuring Clusters
Most users on the PW platform will work exclusively with elastic clusters. These clusters are made up of a controller node and compute nodes, with the controller delegating tasks to the compute nodes.
Clusters have several adjustable parameters for both controller and compute nodes, such as compute instance types and node count. Additionally, compute nodes are grouped together in partitions, which have their own settings. For more information, see Partition Settings below.
The PW platform also supports an optional parallel filesystem, Lustre. For more information on setting up Lustre for your account, see Configuring Storage.
Accessing Configuration Settings
You can access a resource’s configuration settings from the Home page. Navigate to the Computing Resources module and click the gear icon for the resource you want to configure.
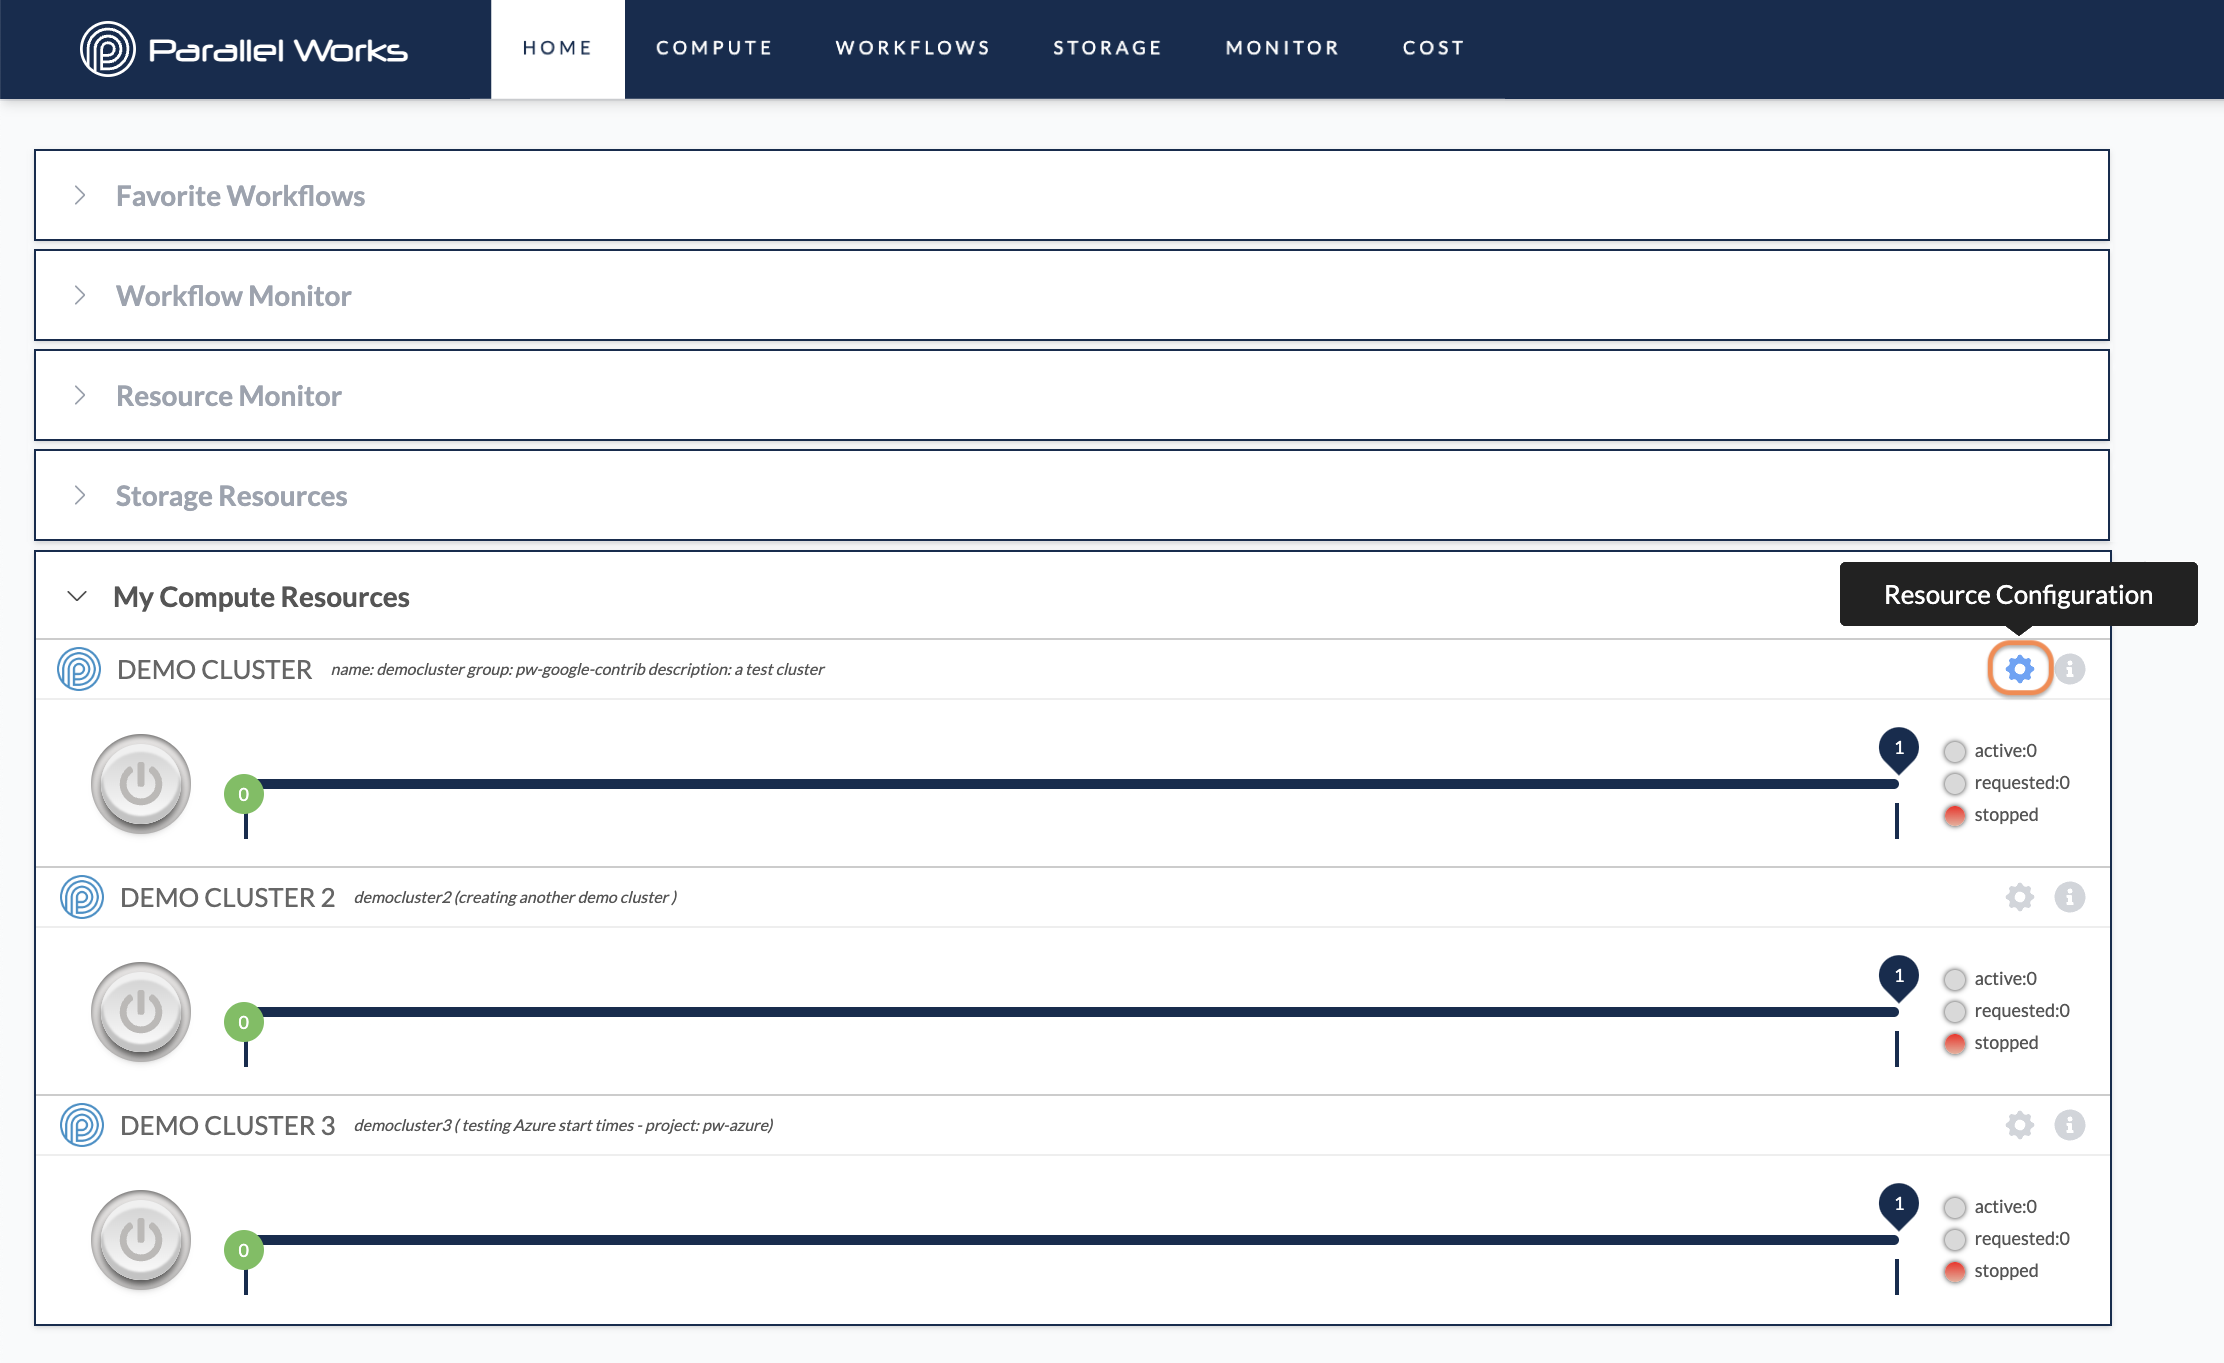
Alternatively, you can navigate to the Compute page and click the name of the resource you want to configure.
About the Resource Configuration Page
When you navigate to a cluster's configuration settings, there are four tabs for customization.
Sessions
By default, you’ll see the Sessions tab when you navigate to configuration settings. This tab shows your previous cluster sessions well as provisioning and deletion logs.
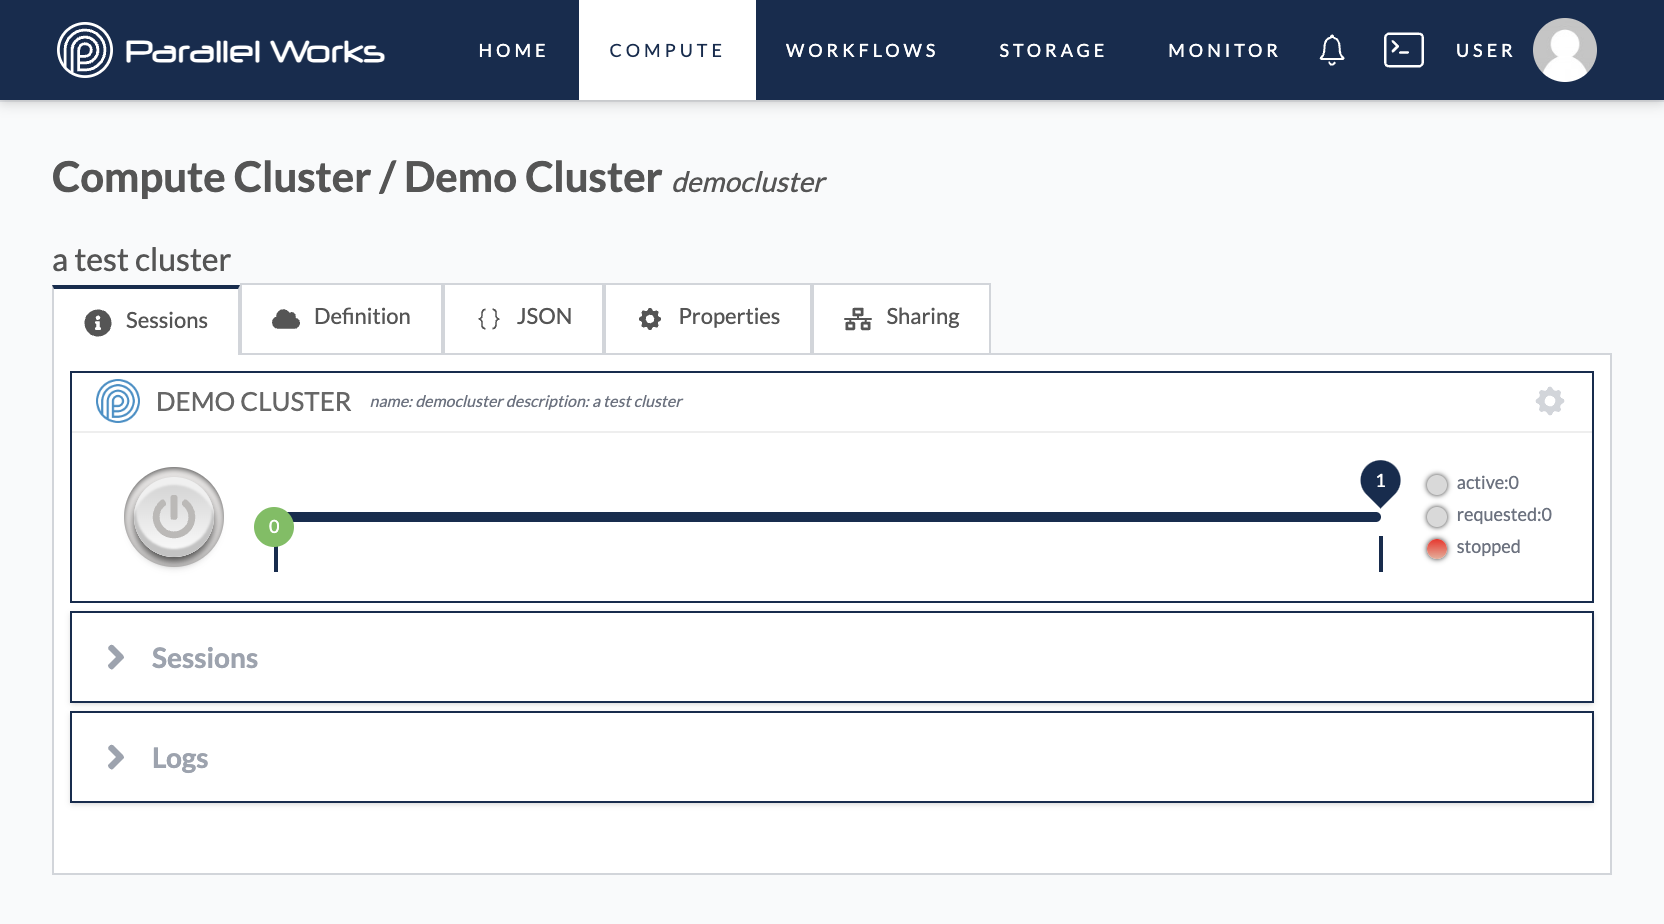
In the Sessions module of this tab, you’ll also be able to see sessions for any attached ephemeral storage resources. If multiple ephemeral storage resources are attached to the cluster, you’ll see a dropdown to select when ephemeral storage logs you’d like to see. The deletion logs for ephemeral storage resources are combined with the cluster deletion logs.
For more information, please see Storage Types.
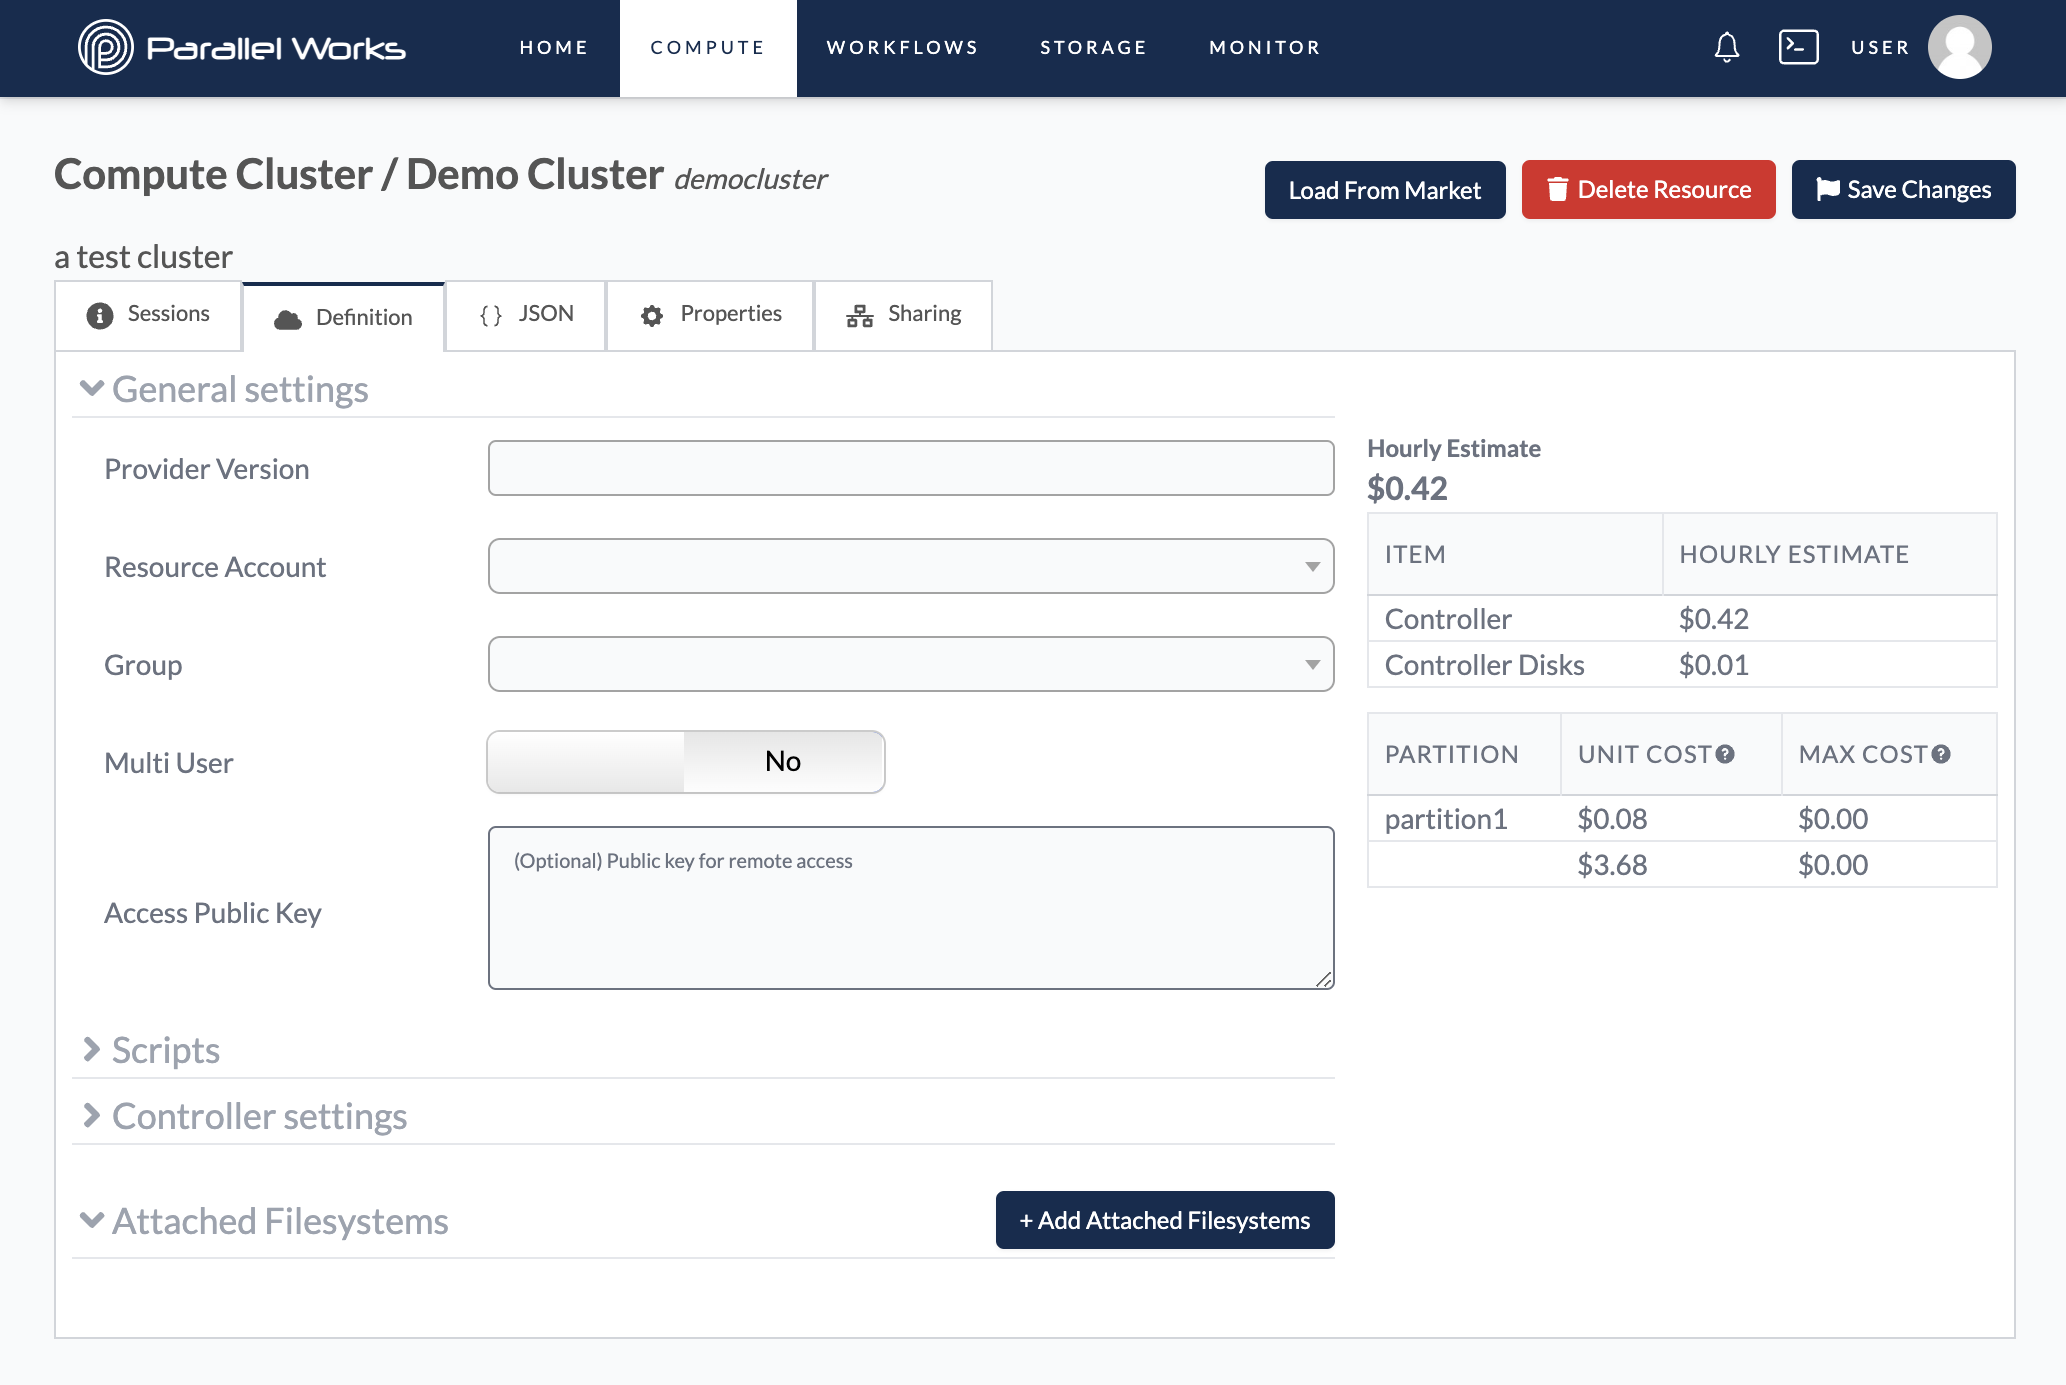
Definition
Here, you can adjust your cluster's parameters. For more information, see General Settings below.
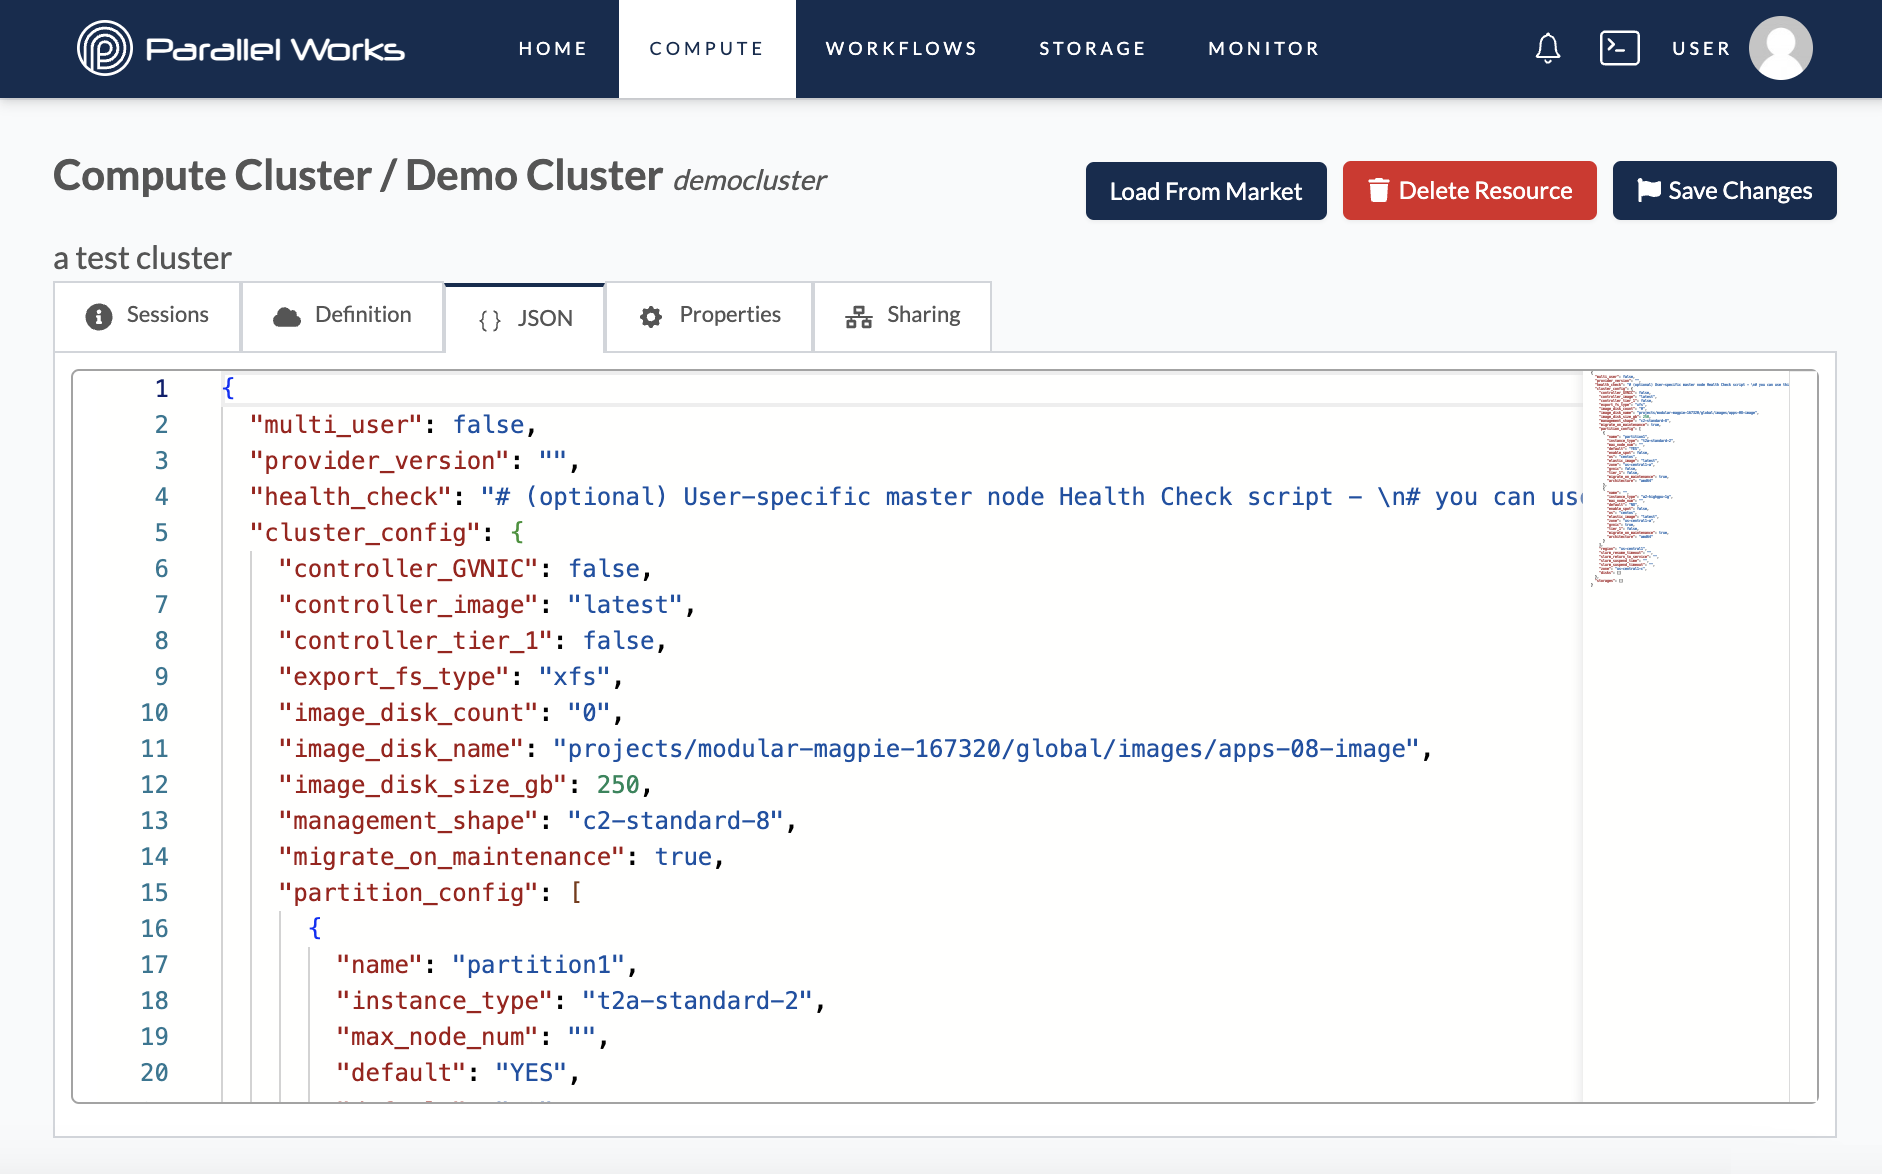
JSON
This tab shows the code version of your resource’s configuration settings. Here, you can manually adjust the parameters seen in the Definition tab.
Properties
This tab shows the resource name, description, display name, and tags that were entered when the resource was created. Here, you can adjust those settings and upload a new thumbnail for the cluster.
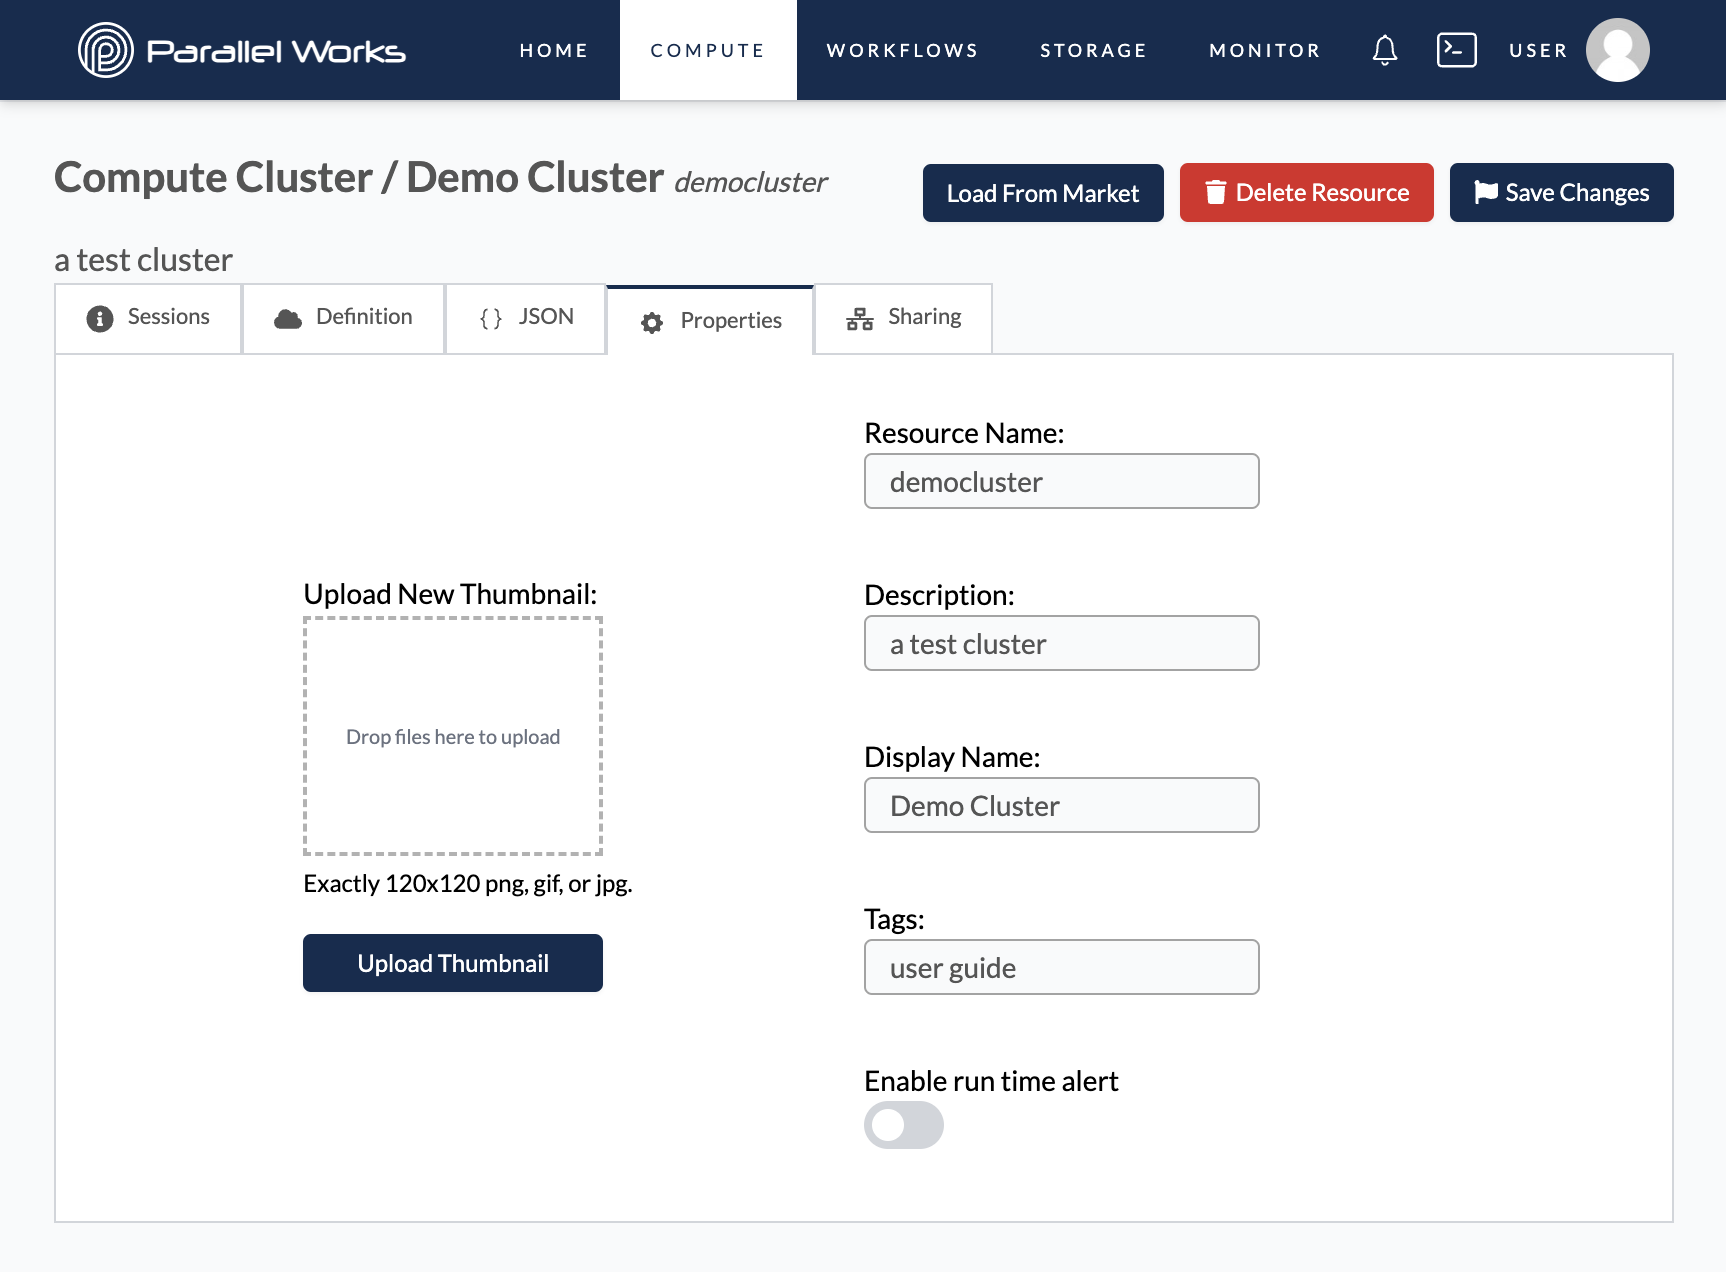
You can also enable automated alert emails from noreply@parallelworks.com by clicking the Enable run time alert toggle button. The field for Alert Interval (Hours) will appear, and the value you enter here determines how often you'll receive run time alerts.
Sharing
This tab lets you share your resource's configuration with any groups you're in. When you share a resource, that group's users can clone the resource into their account.
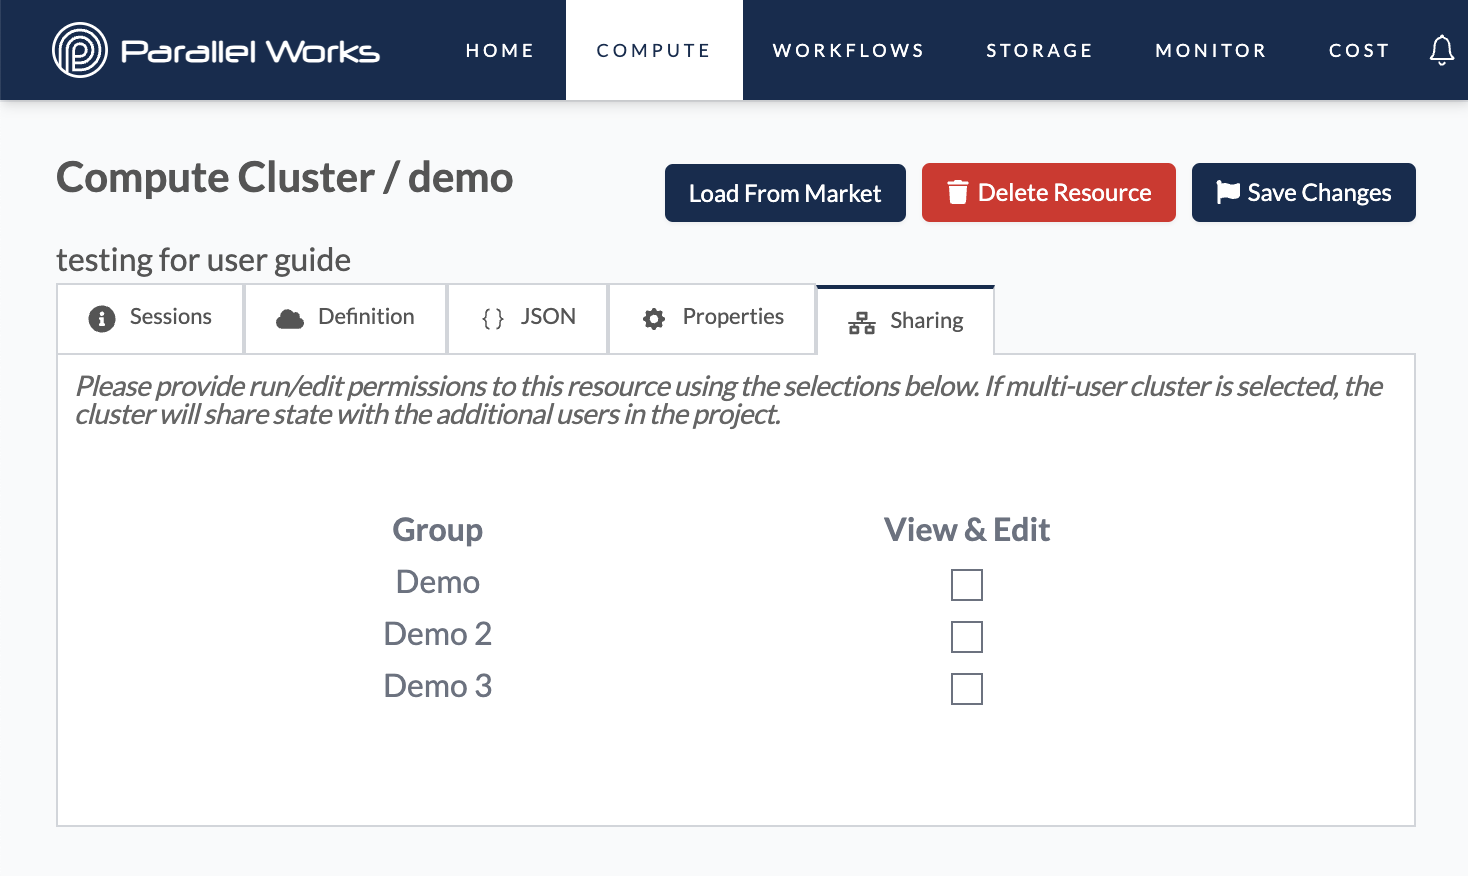
Your group name(s) will be specific to your organization. For more information, please see Group below.
To allow other users to access a specifc resource rather than its configuration, the Multi User option must be enabled in the Definition tab. Users must be in the resource's group to access it.
General Settings
Clusters will typically have these settings in the Definition tab of the configuration page. If you're using an existing on-premises cluster, see Existing Cluster Settings below.
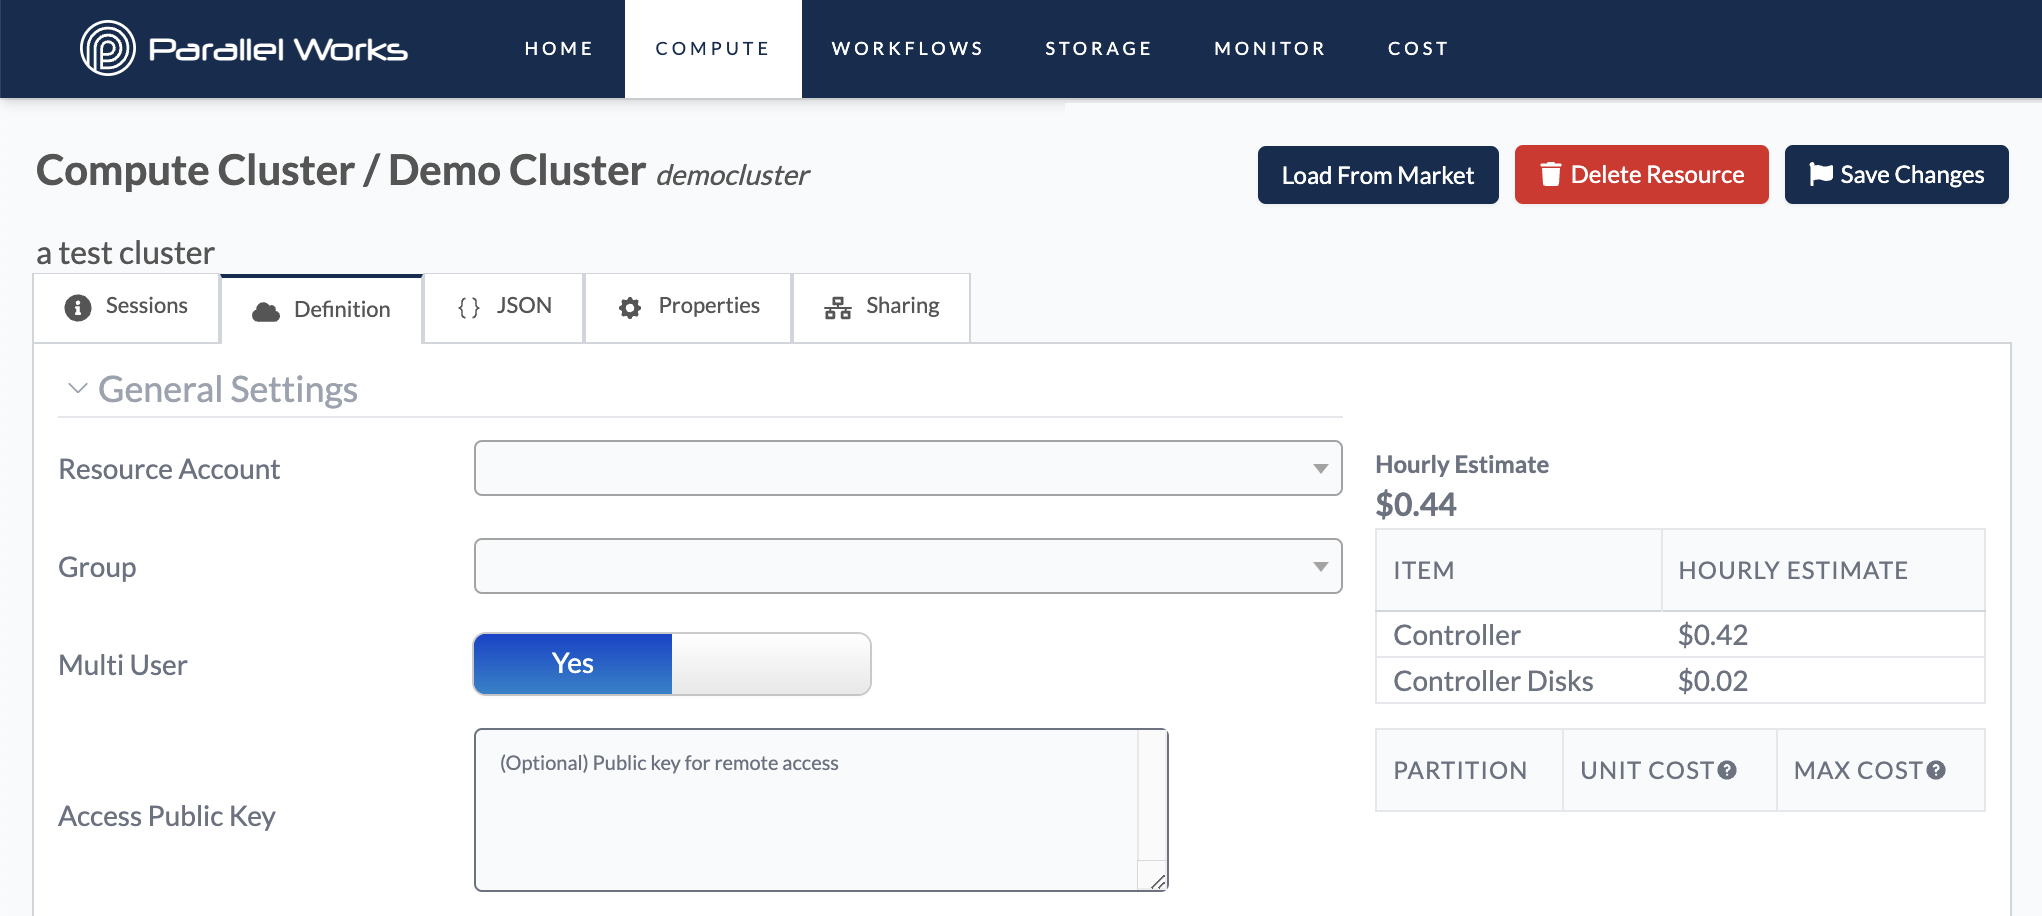
Resource Account
Use this dropdown menu to select the account that your organization uses for a specific cloud service provider.
By default, this menu will show the resource account that your organization has selected for that type of cluster (for example, the screenshot above shows a Google cluster, and Resource Account was automatically populated with the Pworks GCP account).
Group
Use this dropdown menu to select the group name that your organization uses to allocate costs. This menu is especially important if your organization is running multiple groups simultaneously.
If you’re not sure which group to select, you can contact us or your organization’s PW platform administrator.
Multi User
Use this toggle button to automatically create a home directory for all users in the selected group.
This option is different from the Sharing tab, which allows sharing the resource's configuration with other users in your organization.
Access Public Key
Use this text box to add an SSH key so you can access the cluster from a remote device, like your local laptop.
Please note that keys must be in OpenSSH format and you should only enter a public key, not a private key.
For more information on how to use a public key, see Logging In to the Controller.
Script Settings
Optionally, you can set scripts to execute when you start a cluster.
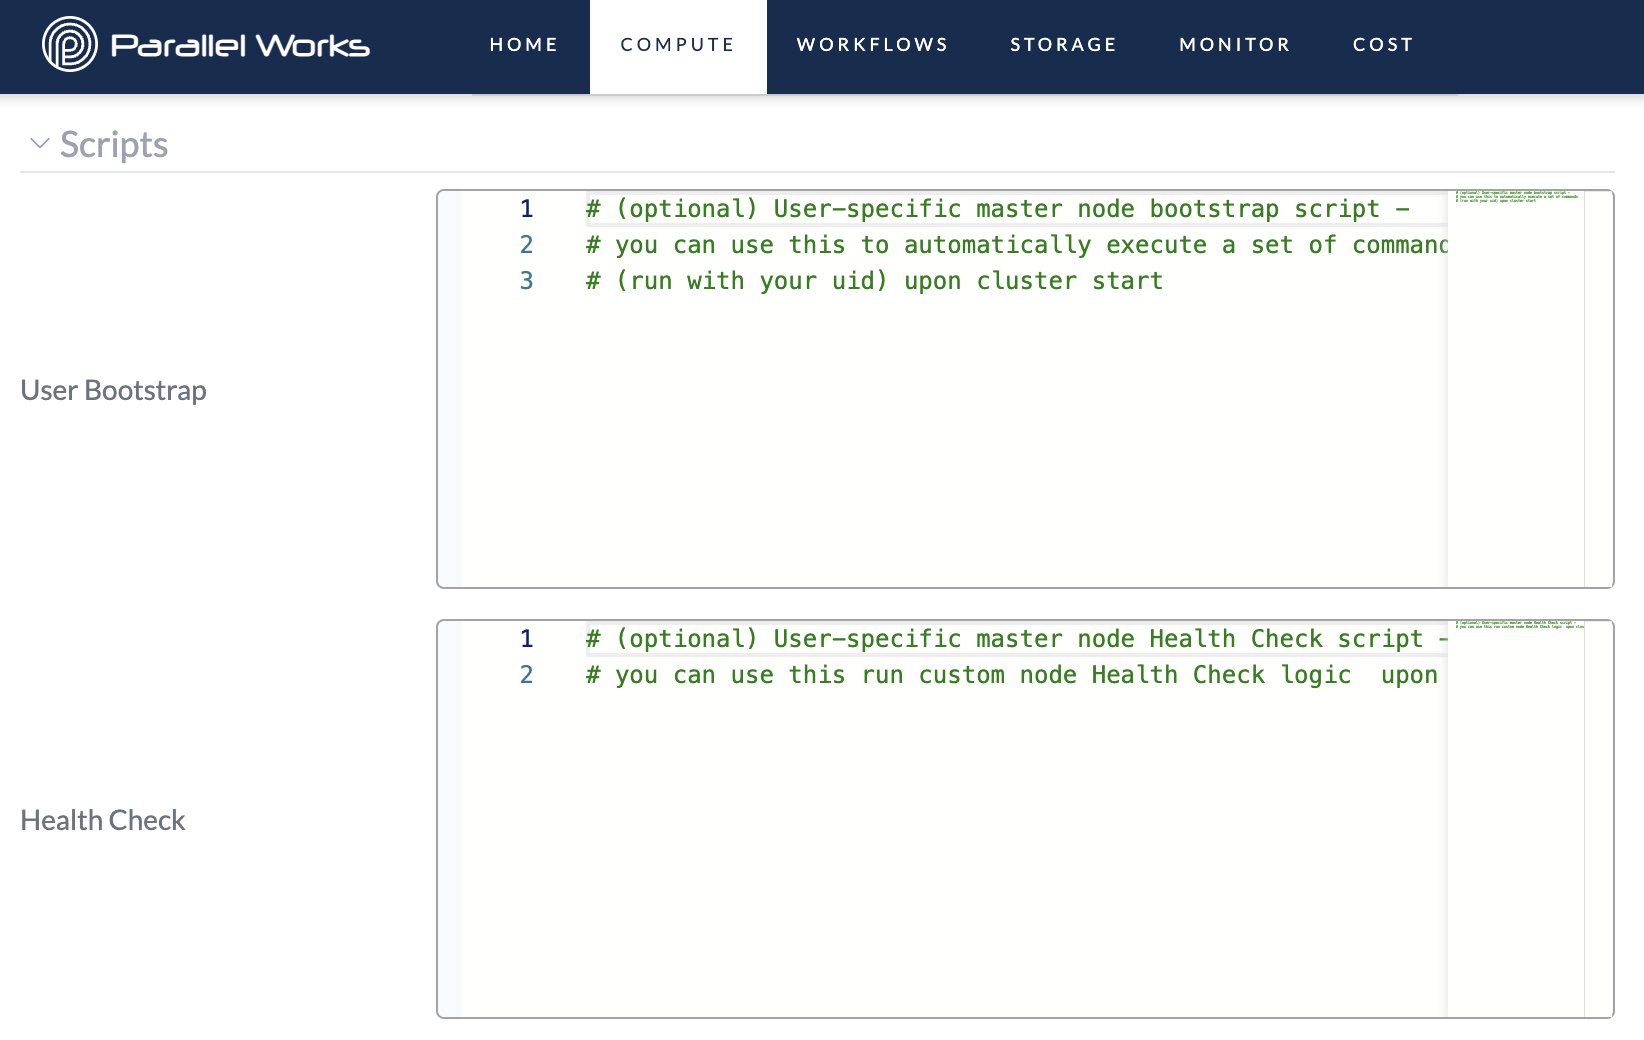
User Bootstrap
Use this text box to set a script that executes once a controller node has started. For example, you can set files to automatically move into a specific folder.
Health Checks
Use this text box to set a script that runs a health check on a controller node. When the script is done running, you’ll see any error codes in red or an exit code of 0 in green if there are no errors.
For more information, see Health Checks (coming soon).
Controller Settings
These settings define the configuration for the controller node, such as region, instance type, and OS image. Some settings will differ depending on which type of resource you’re using. For more information, see CSP-Specific Settings below.
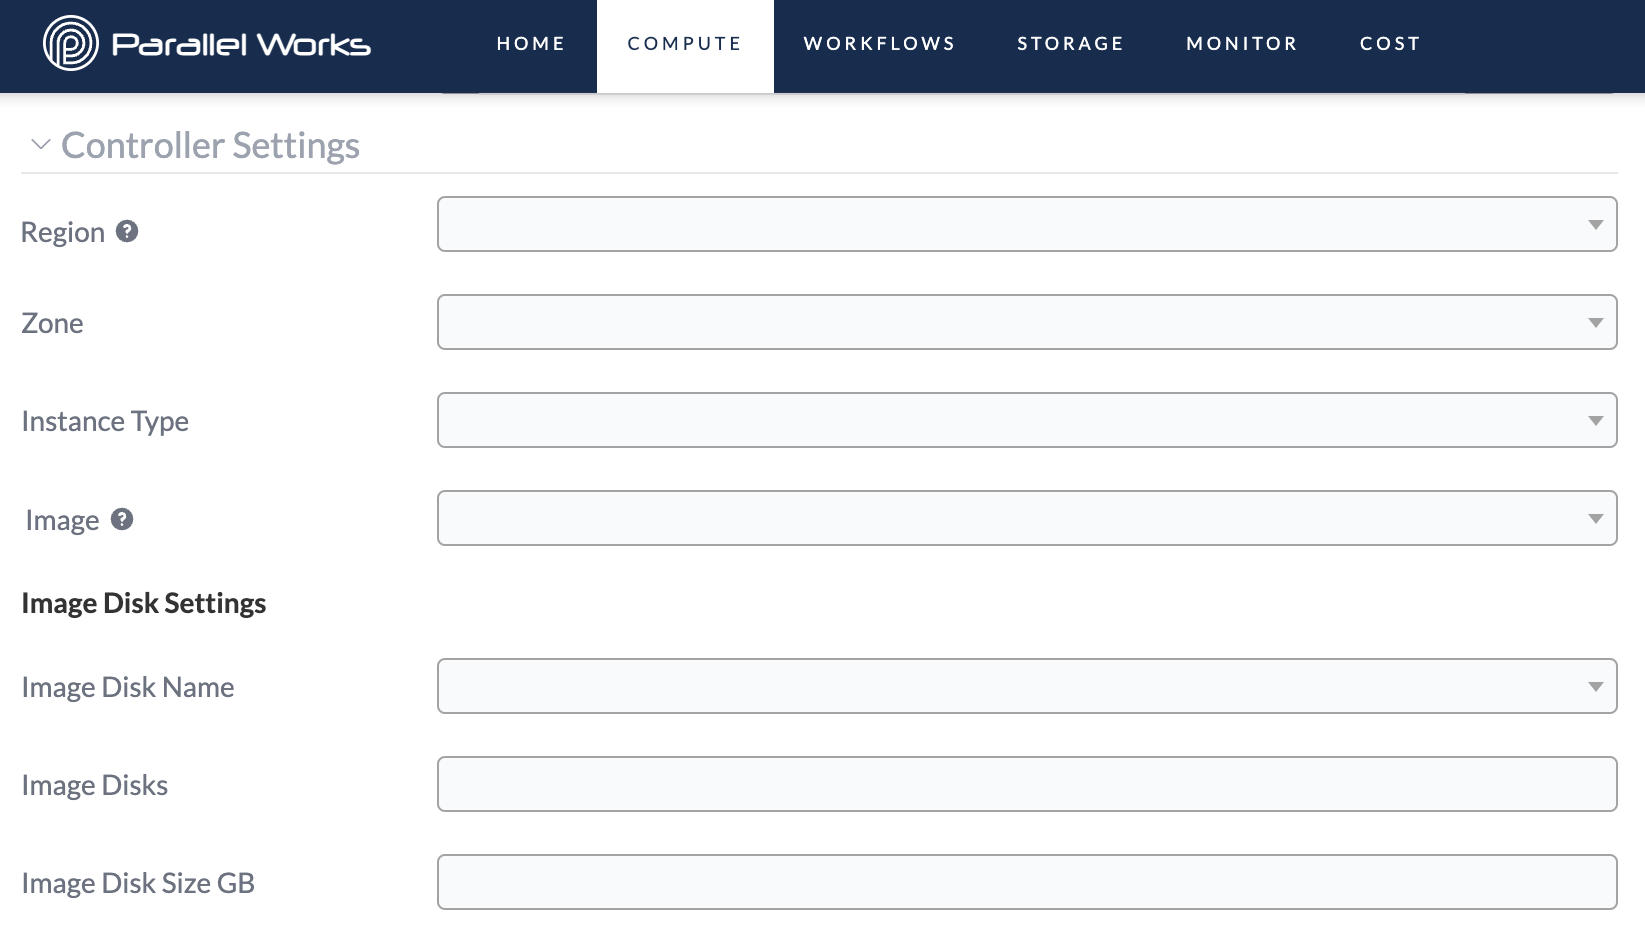
Region
Use this dropdown menu to select the region that your cluster will deploy computing resources into.
A region represents a geographic area.
Zone
Use this dropdown menu to select the zone to use for the controller.
A zone refers to an isolated location inside a region.
Azure clusters do not have a Zone menu.
Instance Type
Use this dropdown menu to select the instance type of the controller. The instance type determines the CPUs and amount of memory available on the machine. Certain instance types may also have specialty hardware, such as GPUs or low-latency networking options.
For more information about instance types and what they mean, please see Choosing Instance Types.
Image
Use this dropdown menu to select the operating system (OS) image for the cluster's controller node. We recommend using the latest version because this will ensure you have the most up-to-date software on your cluster; the latest image version includes OS updates and software required to connect to the PW platform.
Image Disk Name (Fixed)
If your organization uses a snapshot of a disk, this field will identify that snapshot.
For example, your organization may have specific applications that users need to complete their work. Your administrator may create a snapshot of a disk to make those apps available to users whenever a cluster starts, and the name of that snapshot would be in Image Disk Name.
Please note that if you make any changes to this directory while on the cluster, those changes will be lost when you turn the cluster off. Your changes will not affect the snapshot, or other users’ work.
Image Disks
Use this field to enter the number of image disks you’ll need for the cluster. Typically, you’ll either enter 1 if you need the directory from Image Disk Name or 0 if you would like to disable the image disk.
Image Disk Size GB
Use this field to enter the amount of storage on your image disk. The size depends on the size of the snapshot, and should be provided by your organization's administrator.
Partition Settings
You can create partitions in clusters to send your work to differently configured sets of worker nodes. Partitions are especially useful if you’re working on a project that needs more or fewer nodes for specific tasks (for example, if you were running a simulation model and only a small dataset required twice the amount of GPU power to render properly).
You must have at least one partition in your cluster.
If you click + Add Partition, a list of new settings will expand. Typically, a partition will have the following configuration options. Some settings will differ depending on which type of resource you’re using. For more information, see CSP-Specific Settings below.
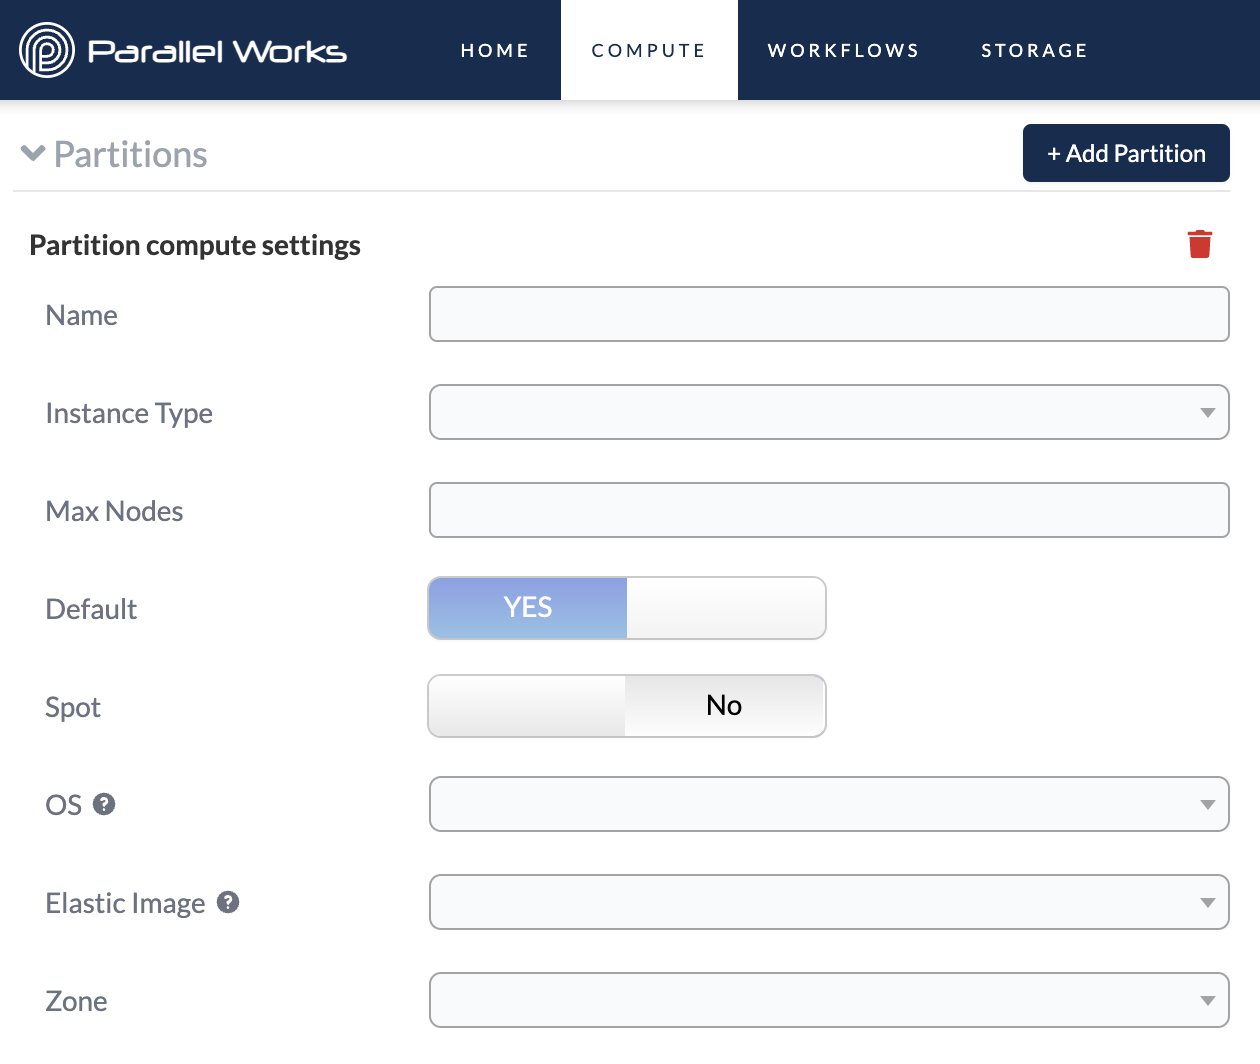
Name
Use this field to name your partition. Be sure to use a unique name for each partition you create. Your partition should never be named default.
Instance Type
Use this dropdown menu to select the configuration of the partition. These options work in the same way that the controller instance types do.
Max Nodes
Use this field to enter the max number of nodes in a partition.
Default
Use this toggle button to specify whether a partition is the default location for running jobs. For more information on running jobs on specific partitions, see Submitting Jobs.
This feature is important if you create multiple partitions. If you only create one partition, it will automatically be set to Default and cannot be changed, as shown in the screenshot above.
Spot
Use this toggle button to specify whether a partition is a spot instance. Spot instances can be cost effective because they make use of resources that are already available but currently unused.
However, spot instances can be disrupted because another user can take over that available resource at any time. For this reason, we recommend using spot instances at your own risk.
OS
Use this dropdown menu to select the operating system (OS) for your partition. This option should match the OS selected for Elastic Image.
Elastic Image
Use this dropdown menu to select the operating system image for the partition. We recommend using the latest version.
Zone
Use this dropdown menu to select the zone within your selected region.
Your partition's zone must be the same as your controller's zone.
Slurm Settings
The PW platform uses Slurm to manage jobs on controller and compute nodes. The settings below determine how Slurm behaves for your cluster's nodes.
Please note that numerical values you enter in these fields are measured in seconds.
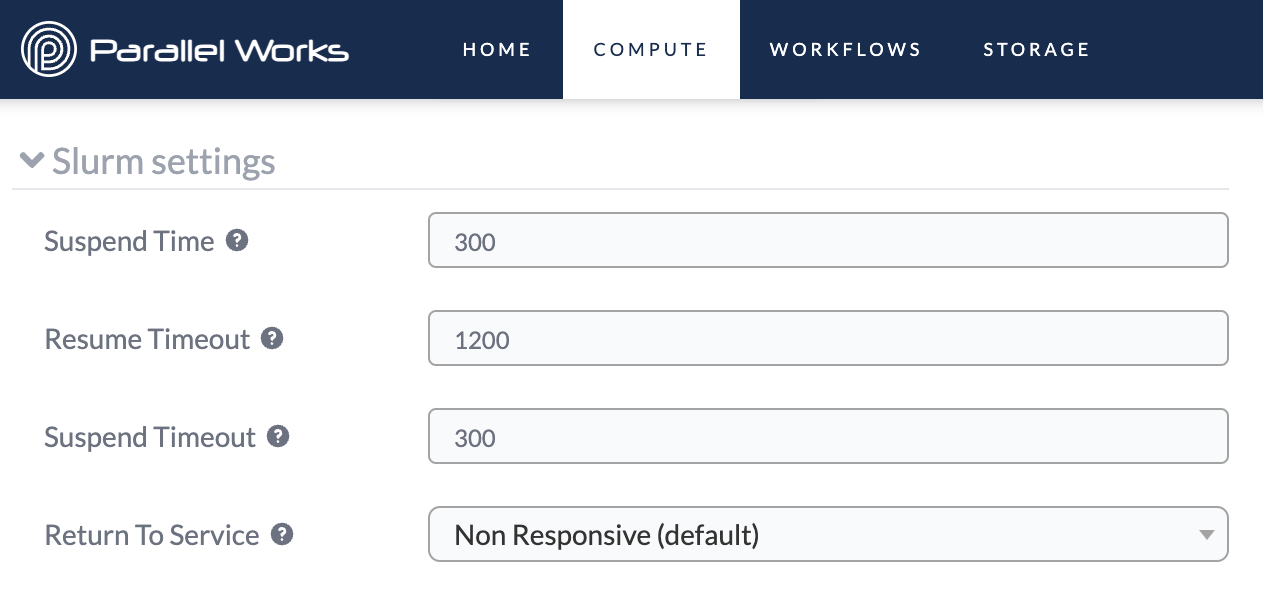
Suspend Time
Use this field to set how long Slurm will wait before shutting down idle nodes. This field is set to 300 by default.
Resume Timeout
Use this field to set the maximum amount of time Slurm will try to start nodes. If the nodes don’t start by the end of the set time, Slurm will end the initialization attempt. This field is set to 1200 by default.
Suspend Timeout
Use this field to set how long Slurm will wait to make nodes available again after shutting them down. This field is set to 300 by default.
Return To Service
Use this dropdown menu to select when down nodes are returned to service.
The Non Responsive option means that down nodes will become available only if they were set to down because they were non-responsive.
The Any Reason option means that down nodes will become available if they were set to down for any reason, including low memory, an unexpected reboot, or being non-responsive.
This field is set to Non Responsive by default.
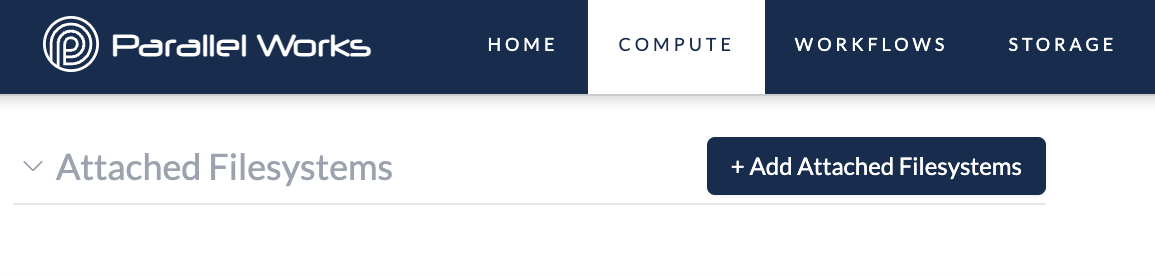
Attached Filesystems Settings
Use this section to attach any of your configured storage resources. For more information, please see Attaching Storage.
CSP-Specific Settings
Each cloud service provider (CSP) builds and configures their resources differently. Clusters on the PW platform have settings that correspond to each CSP’s model of cloud services. The CSP-specific parameters are outlined below.
Please note that these CSP-specific settings will also appear as options inside the partition settings on clusters.
AWS
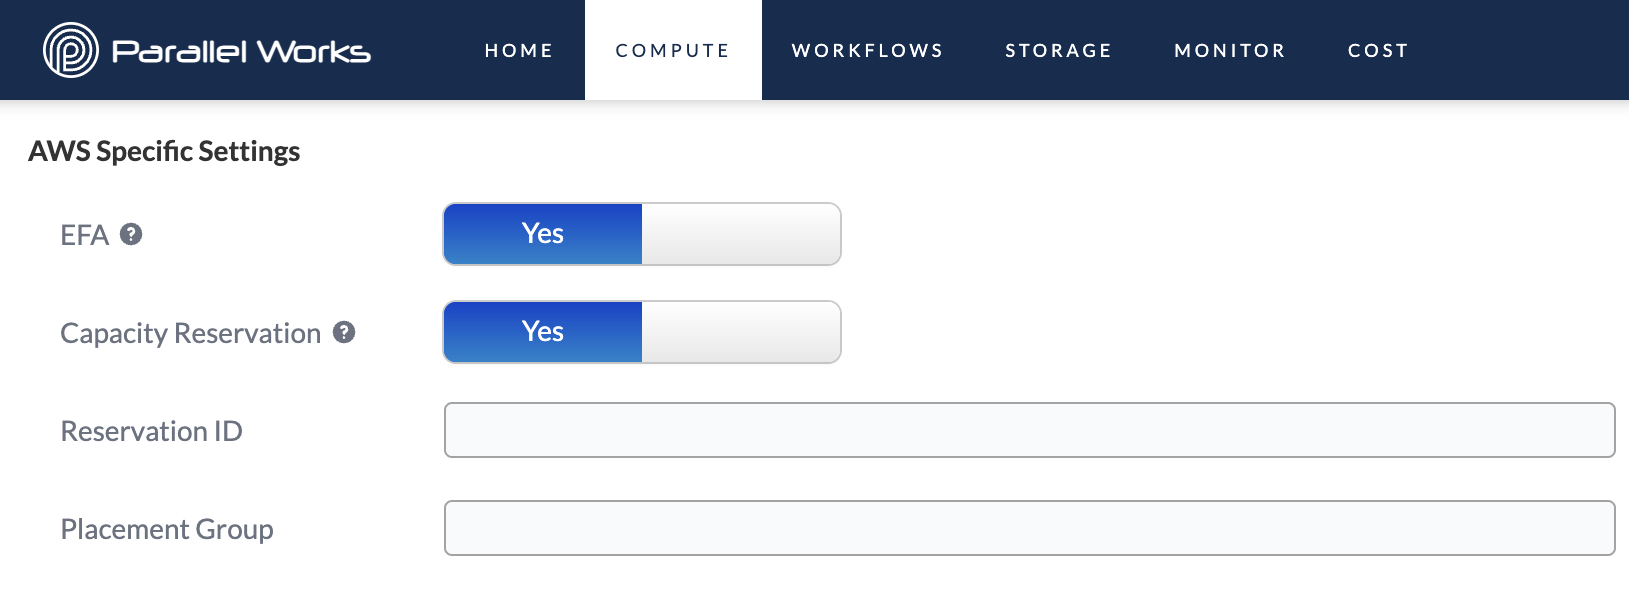
EFA
Use this toggle button to enable Elastic Fabric Adapter (EFA), which improves inter-instance network performance. EFA is useful if you need to scale HPC or machine-learning applications to thousands of CPUs or GPUs.
Please note that EFA is not supported on all instance types.
For more information and a list of supported instance types, see the AWS documentation on EFA.
Capacity Reservation*
Use this toggle button to enable on-demand capacity reservations, which reserve a set amount of compute capacity. When Capacity Reservation is enabled, two new fields will appear: Reservation ID and Placement Group. These identifiers come directly from AWS.
Before you can use a capacity reservation on the PW platform, it must first be configured on AWS Cloud by an administrator in your organization. After this initial step, your administrator can distribute the values for Reservation ID and Placement Group.
*This setting is only available on AWS partitions, not on AWS controllers.
Azure
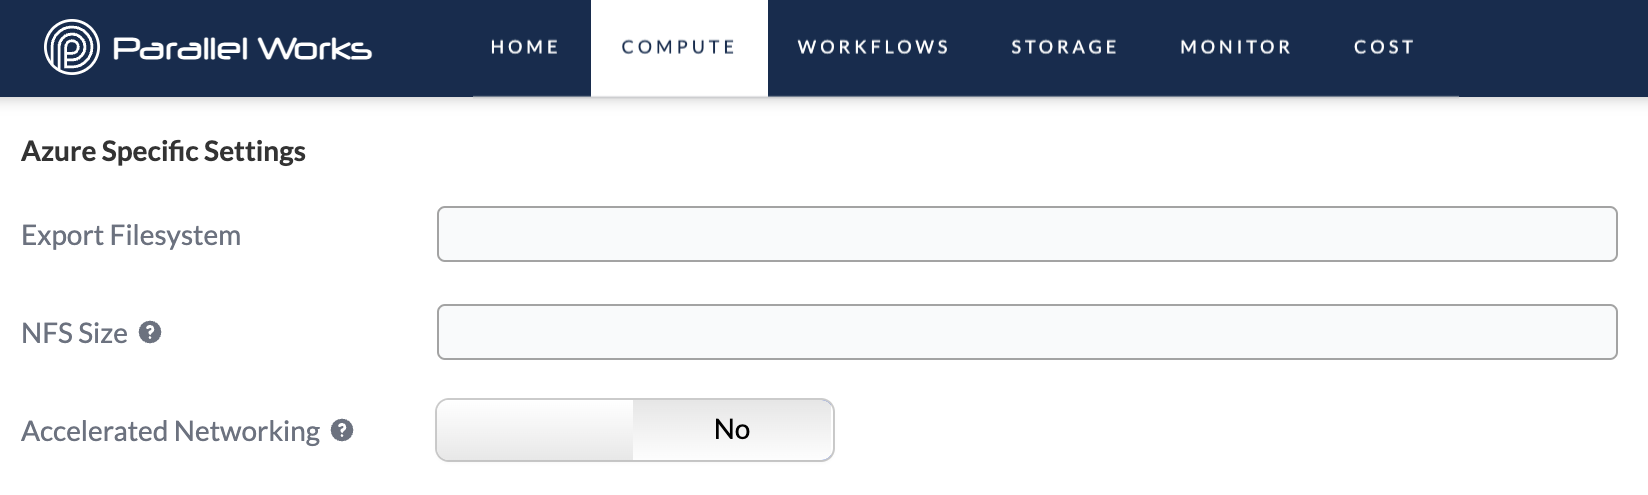
Export Filesystem
Use this field to enter the name of a network filesystem (NFS), which is an existing system on an external device that’s available for read and/or write access on your cluster.
If you want to set up an NFS, please contact us or your PW platform administrator.
NFS Size
Use this field to enter the size of your NFS.
Please note that the values for NFS Size and Image Disk Size must be the same.
Accelerated Networking
Use this toggle button to enable accelerated networking, which improves networking performance for large workloads on multiple cloud clusters.
For more information, see the Azure documentation on accelerated networking.
Google
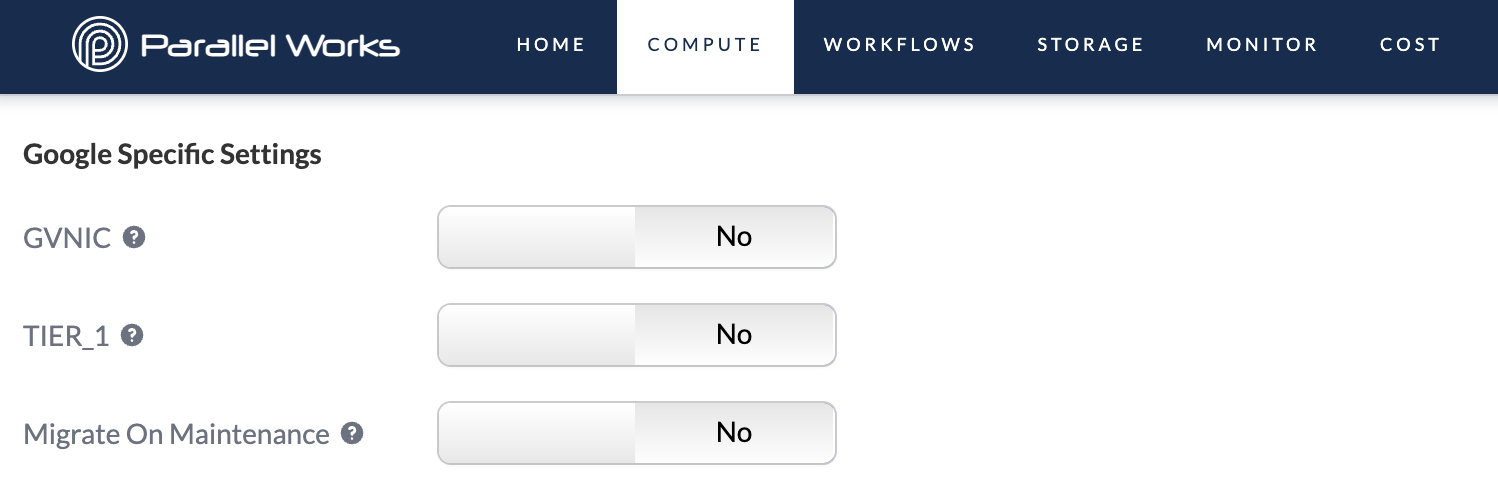
GVNIC
Use this toggle button to enable Google Virtual Network Interface Card (gVNIC), which supports higher network bandwidths from 50–100 Gbps.
Please note that gVNIC is not supported on all instance types.
For more information and a list of supported instance types, see the Google documentation on gVNIC.
TIER_1
Use this toggle button to enable Tier_1, which increases maximum egress bandwidth (upload speed) to 50–100 Gps, depending on the size of the instance. If Tier_1 is off, the egress bandwidth will range from 10–32 Gbps.
Please note that Tier-1 is only supported if gVNIC is also active. If you try to start Tier-1 by itself, the PW platform will display the error message Tier_1 is only supported if gVNIC is on.
For more information, see the Google documentation on Tier_1.
Migrate On Maintenance
This toggle button enables live migration whenever the virtual machine’s host undergoes maintenance, meaning that Google will migrate the virtual machine to another host without any downtime.
Please note that GPU and spot instances cannot be live migrated. When supported, we recommend turning this feature on.
For more information, see the Google documentation on live migration.
Existing Cluster Settings
Typically when you create an existing cluster, you’ll be connecting to an on-premises cluster associated with your organization. The settings that are specific to this type of cluster are outlined below. If you’re unsure what to choose for these options, contact your organization’s PW platform administrator.
General Settings for Existing Clusters
Resource Account
Use this dropdown menu to select how the PW platform will connect to the existing cluster.
The Default options means that the platform will try to SSH to the cluster by using only your PW account’s SSH key, which is stored in ~/.ssh/pw_id_rsa. For more information about your PW SSH key, see our documentation.
The PIN or Password Only option creates a dialog box when you start the cluster, where you can enter the password for your user account (the account you define in Username). This options means that the platform will connect to the cluster using only these credentials.
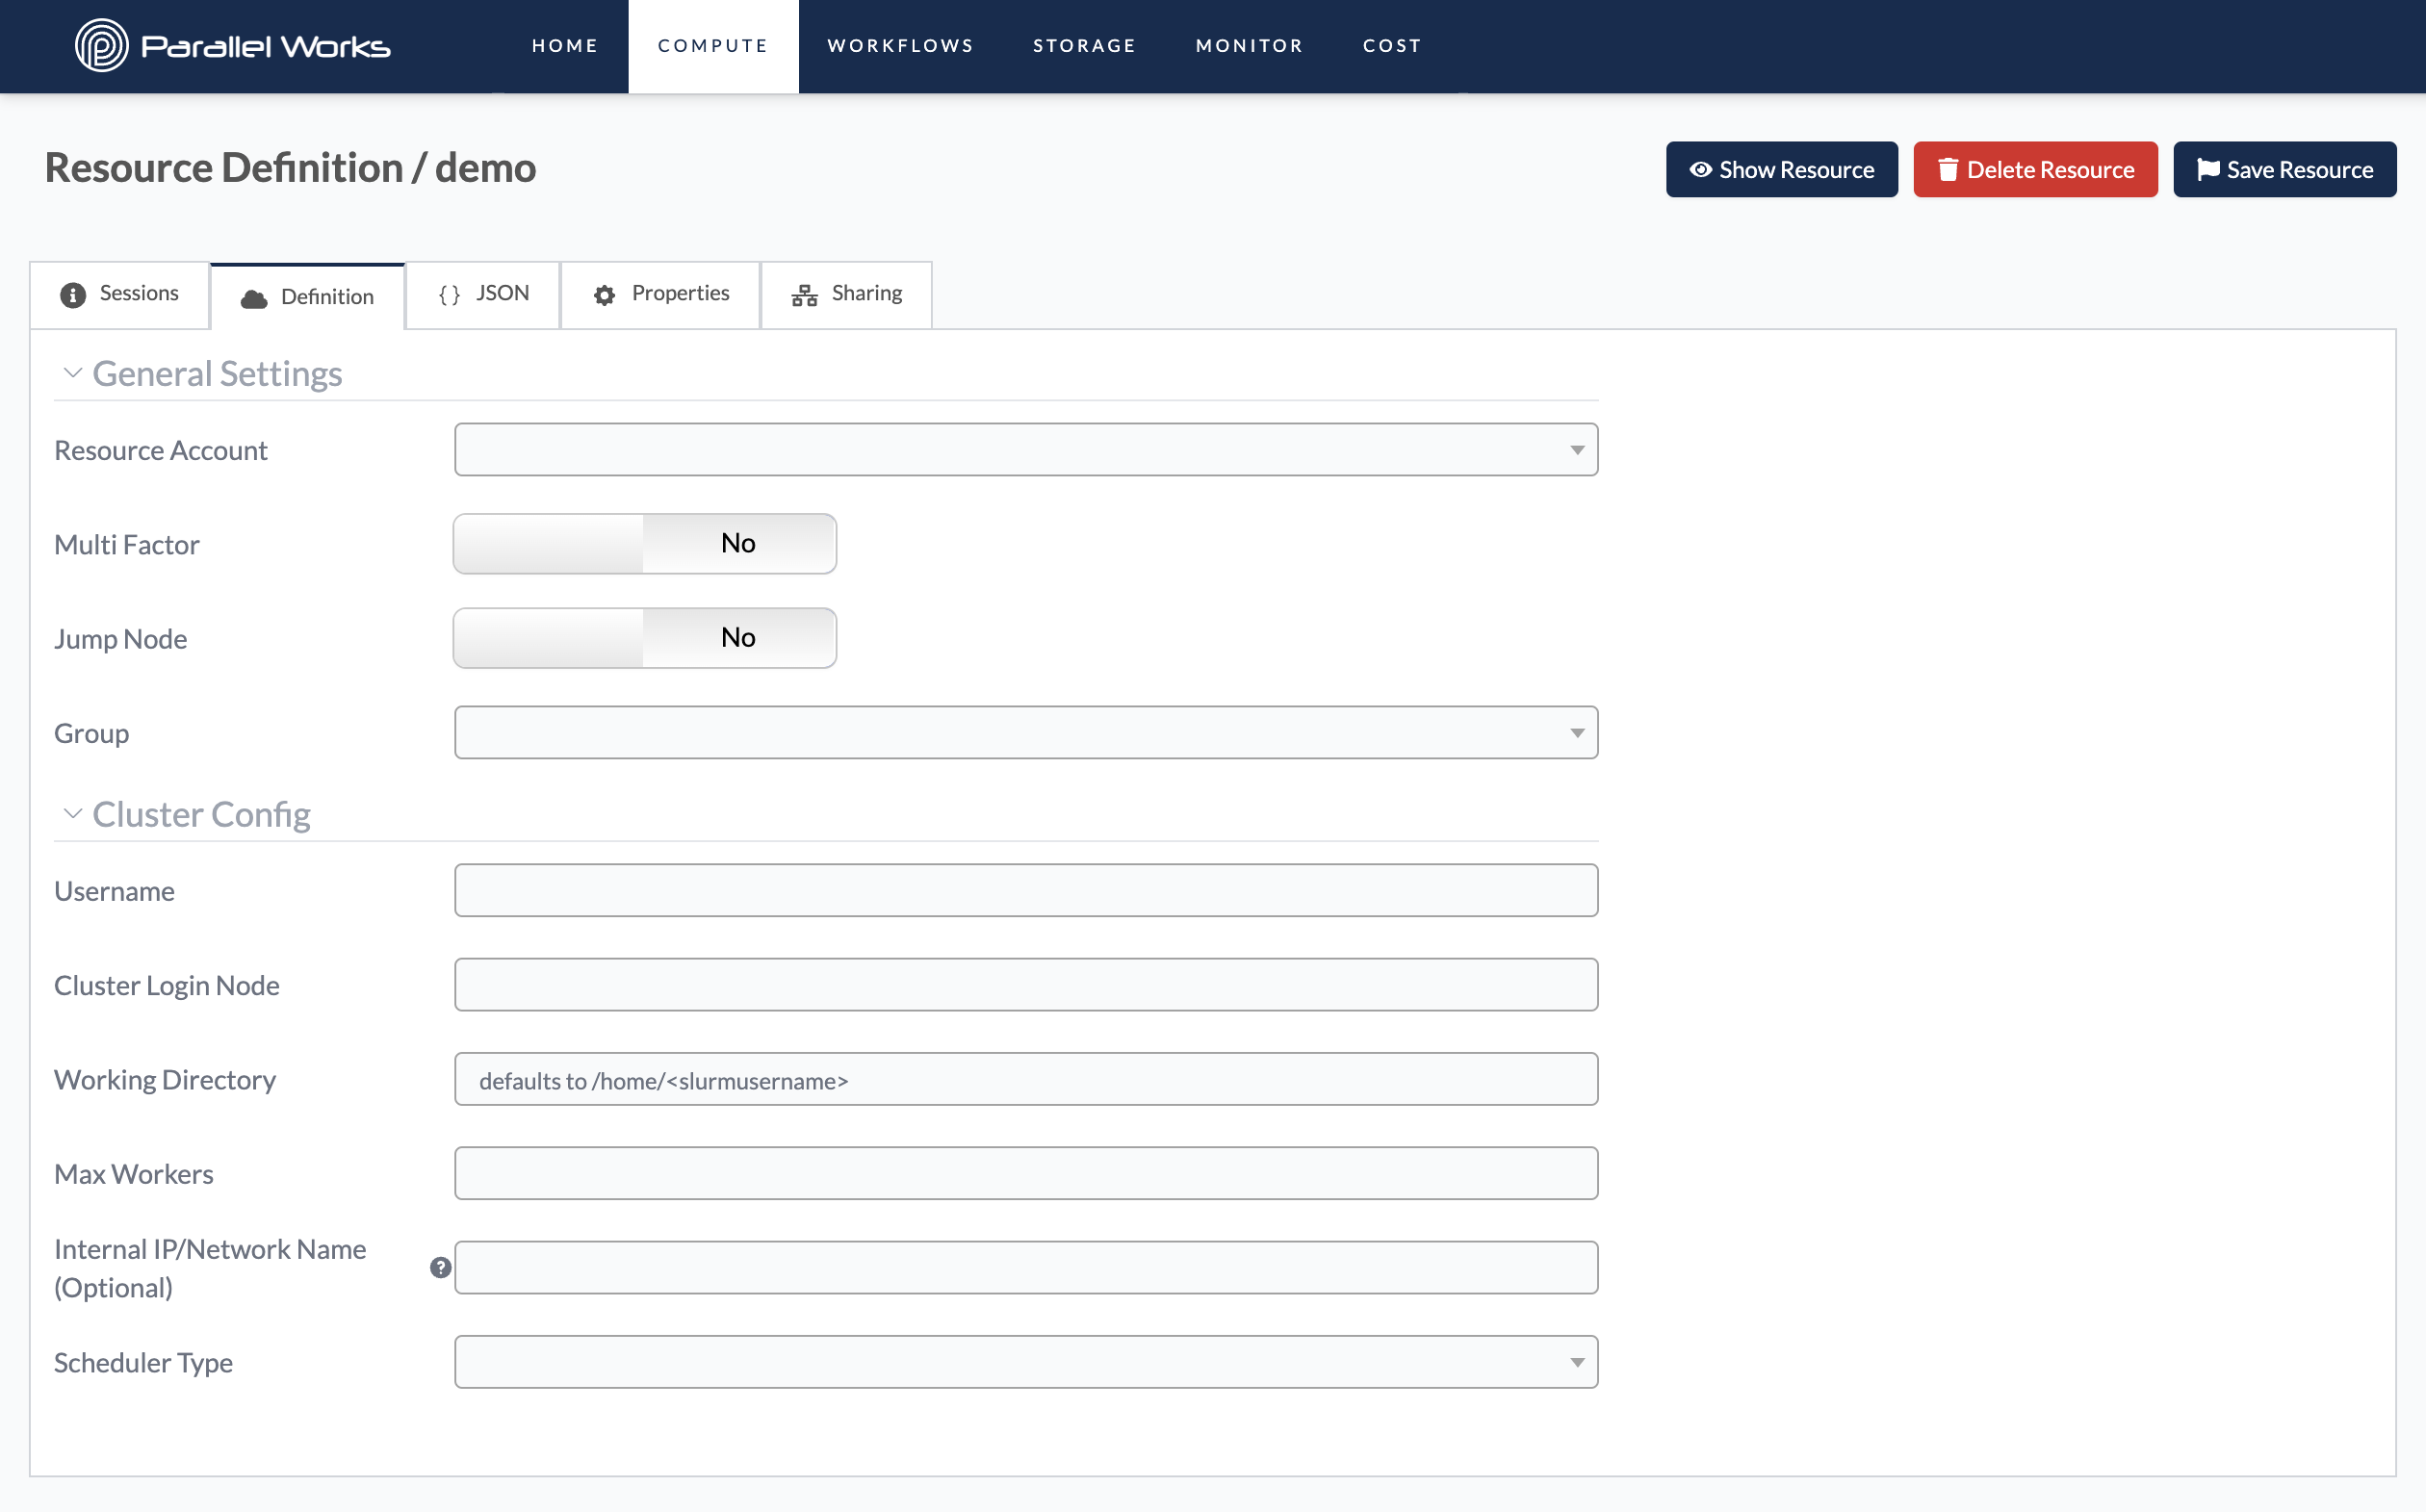
Multi Factor
Use this toggle button if you’re connecting to a cluster that has MFA enabled. When you turn on the resource and MFA is enabled, a dialog box will appear, prompting you to enter your MFA code.
This button is different from the options in Resource Account; if you toggle MFA on, the platform will connect to the existing cluster using both the SSH key in your PW account and your MFA credentials.
Jump Node
Use this toggle button if you’re connecting to a cluster that has a jump node enabled. A jump node—also called a host node, bastion node, or login node—is a high-security server that allows a user to access a private machine or network.
If you enable this feature, two new fields will appear for Jump Node User and Jump Node Host. Your organization will have these credentials if you need them.
Group
Use this dropdown menu to select the group name that your organization uses to allocate costs. This menu is especially important if your organization uses multiple groups.
If you’re not sure which group to select, you can contact us or your organization’s PW platform administrator.
Cluster Configuration Settings for Existing Clusters
Username
Use this field to enter the username assigned to you for this cluster.
On existing clusters, you can enter __USER__ into any box and the PW platform will automatically substitute your username for that field. For example, if your username is jdoe, the PW platform will automatically substitute __USER__ for jdoe in the Working Directory field.
Cluster Login Node
Use this field to enter the IP address or host name of the cluster.
Working Directory
Use this field to enter the directory you’ll be accessing while completing work on this cluster. By default, this field is set to /home/<slurmusername>.
Max Workers
Use this field to enter the maximum number of compute nodes you need to complete your work.
Internal IP/Network Name (Optional)
Use this field to specify the internal IP address or network name that the compute nodes use to communicate with the controller node(s).
You only have to use this feature if your organization has configured the cluster’s compute nodes to send information to an IP address other than the controller’s default IP address. You can run the command ifconfig on a cluster after logging in to the controller to see all of the available IP addresses.
Scheduler Type
Use this dropdown menu to select the type of job scheduler the cluster uses. Currently, the Existing Cluster resource type supports Slurm and PBS.
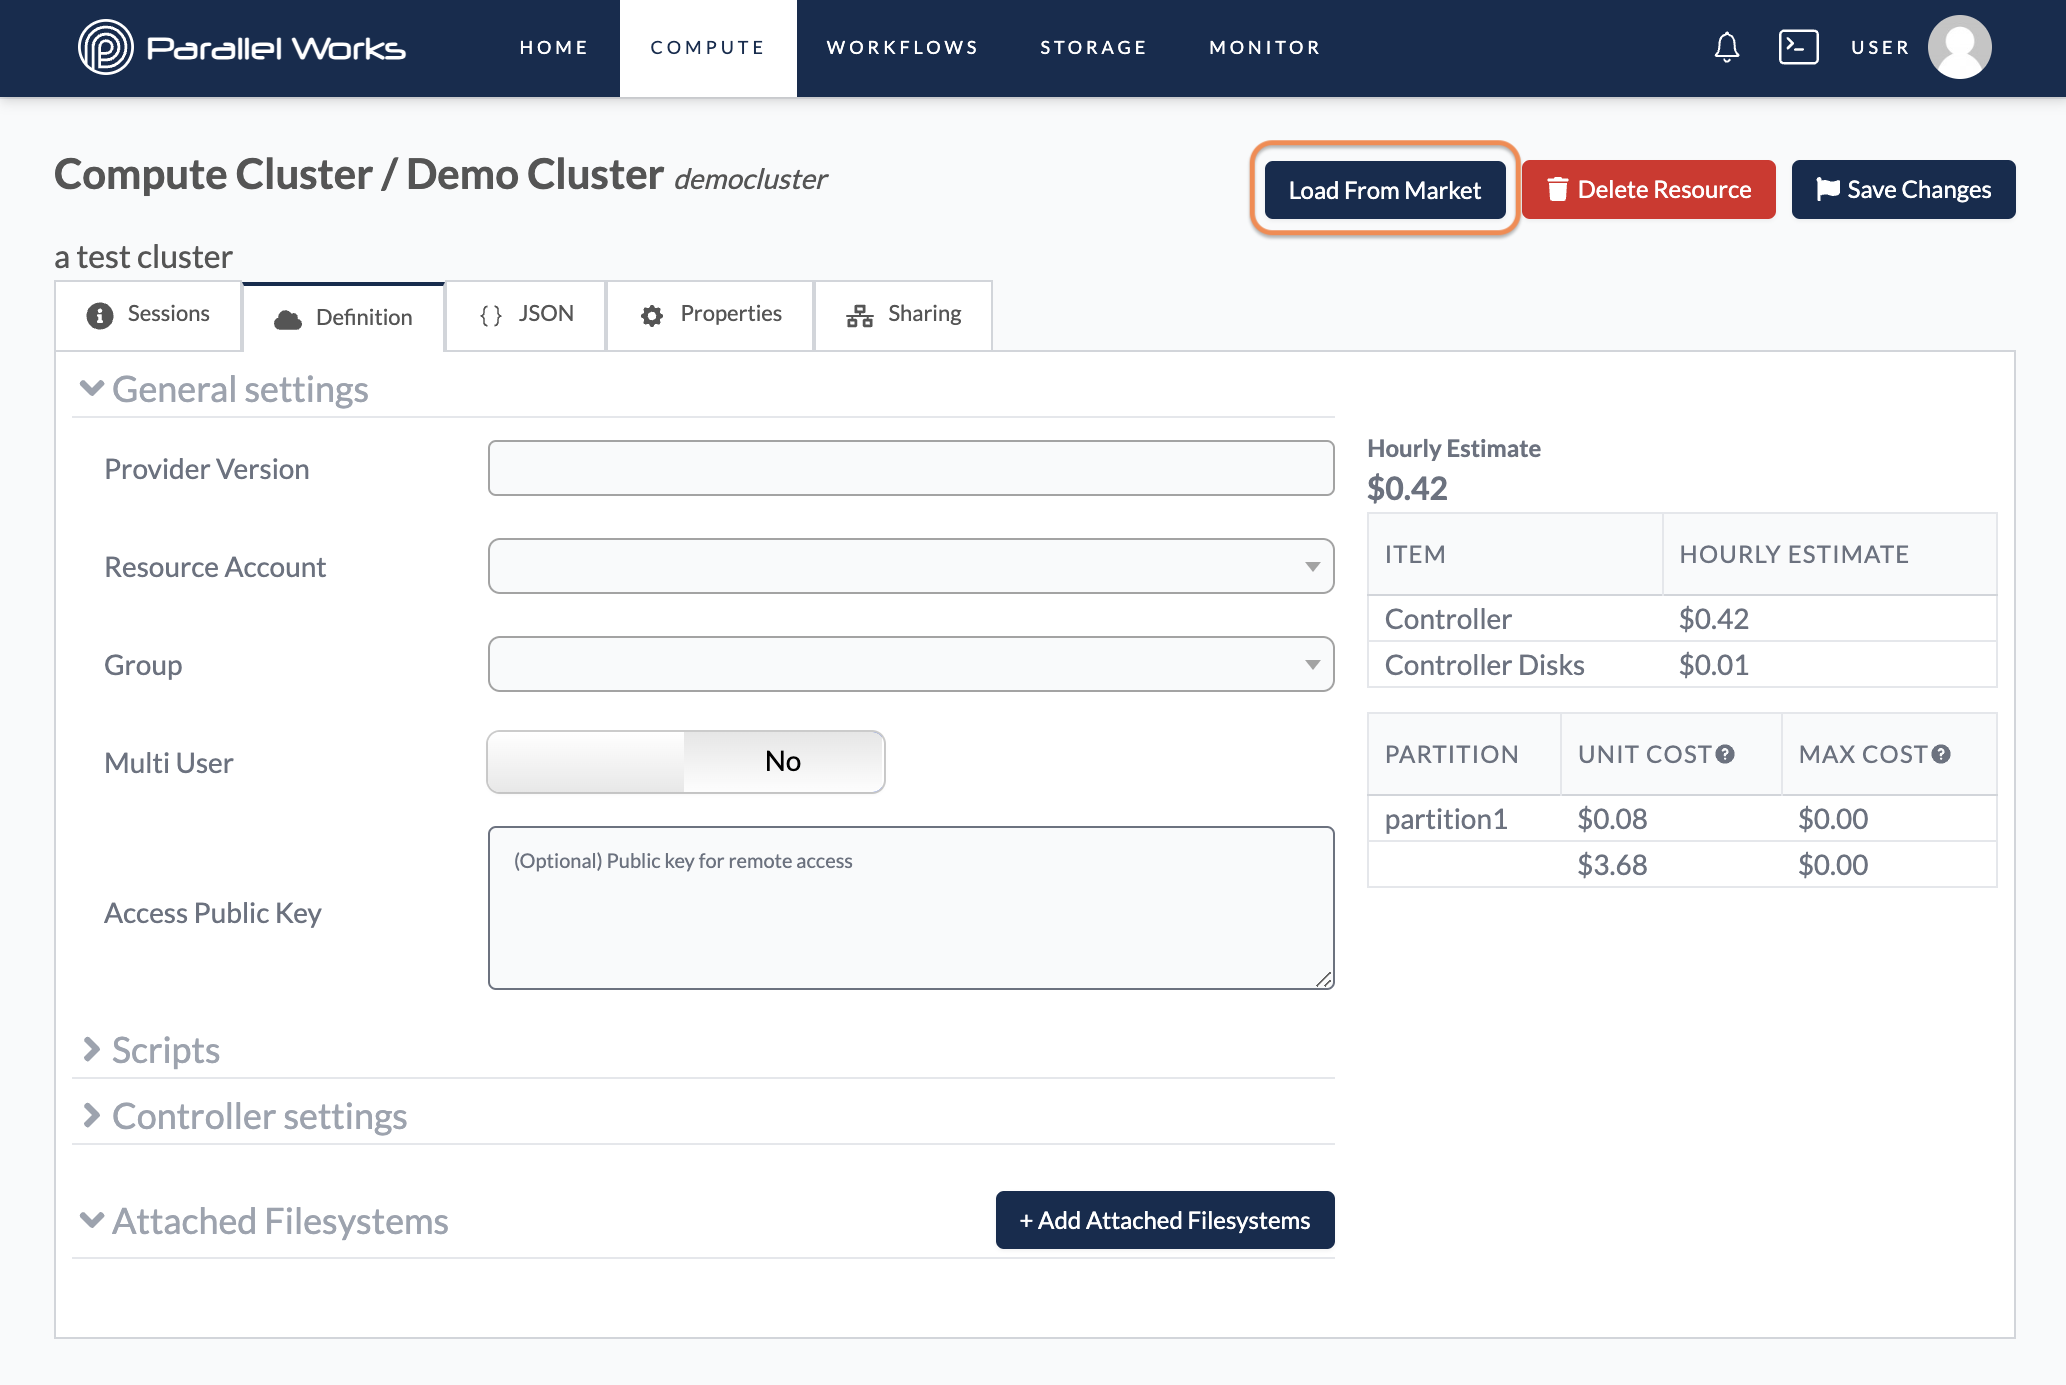
Load From Market
You can load pre-configured settings from existing resources in the Marketplace.
First, add an item from the Marketplace.
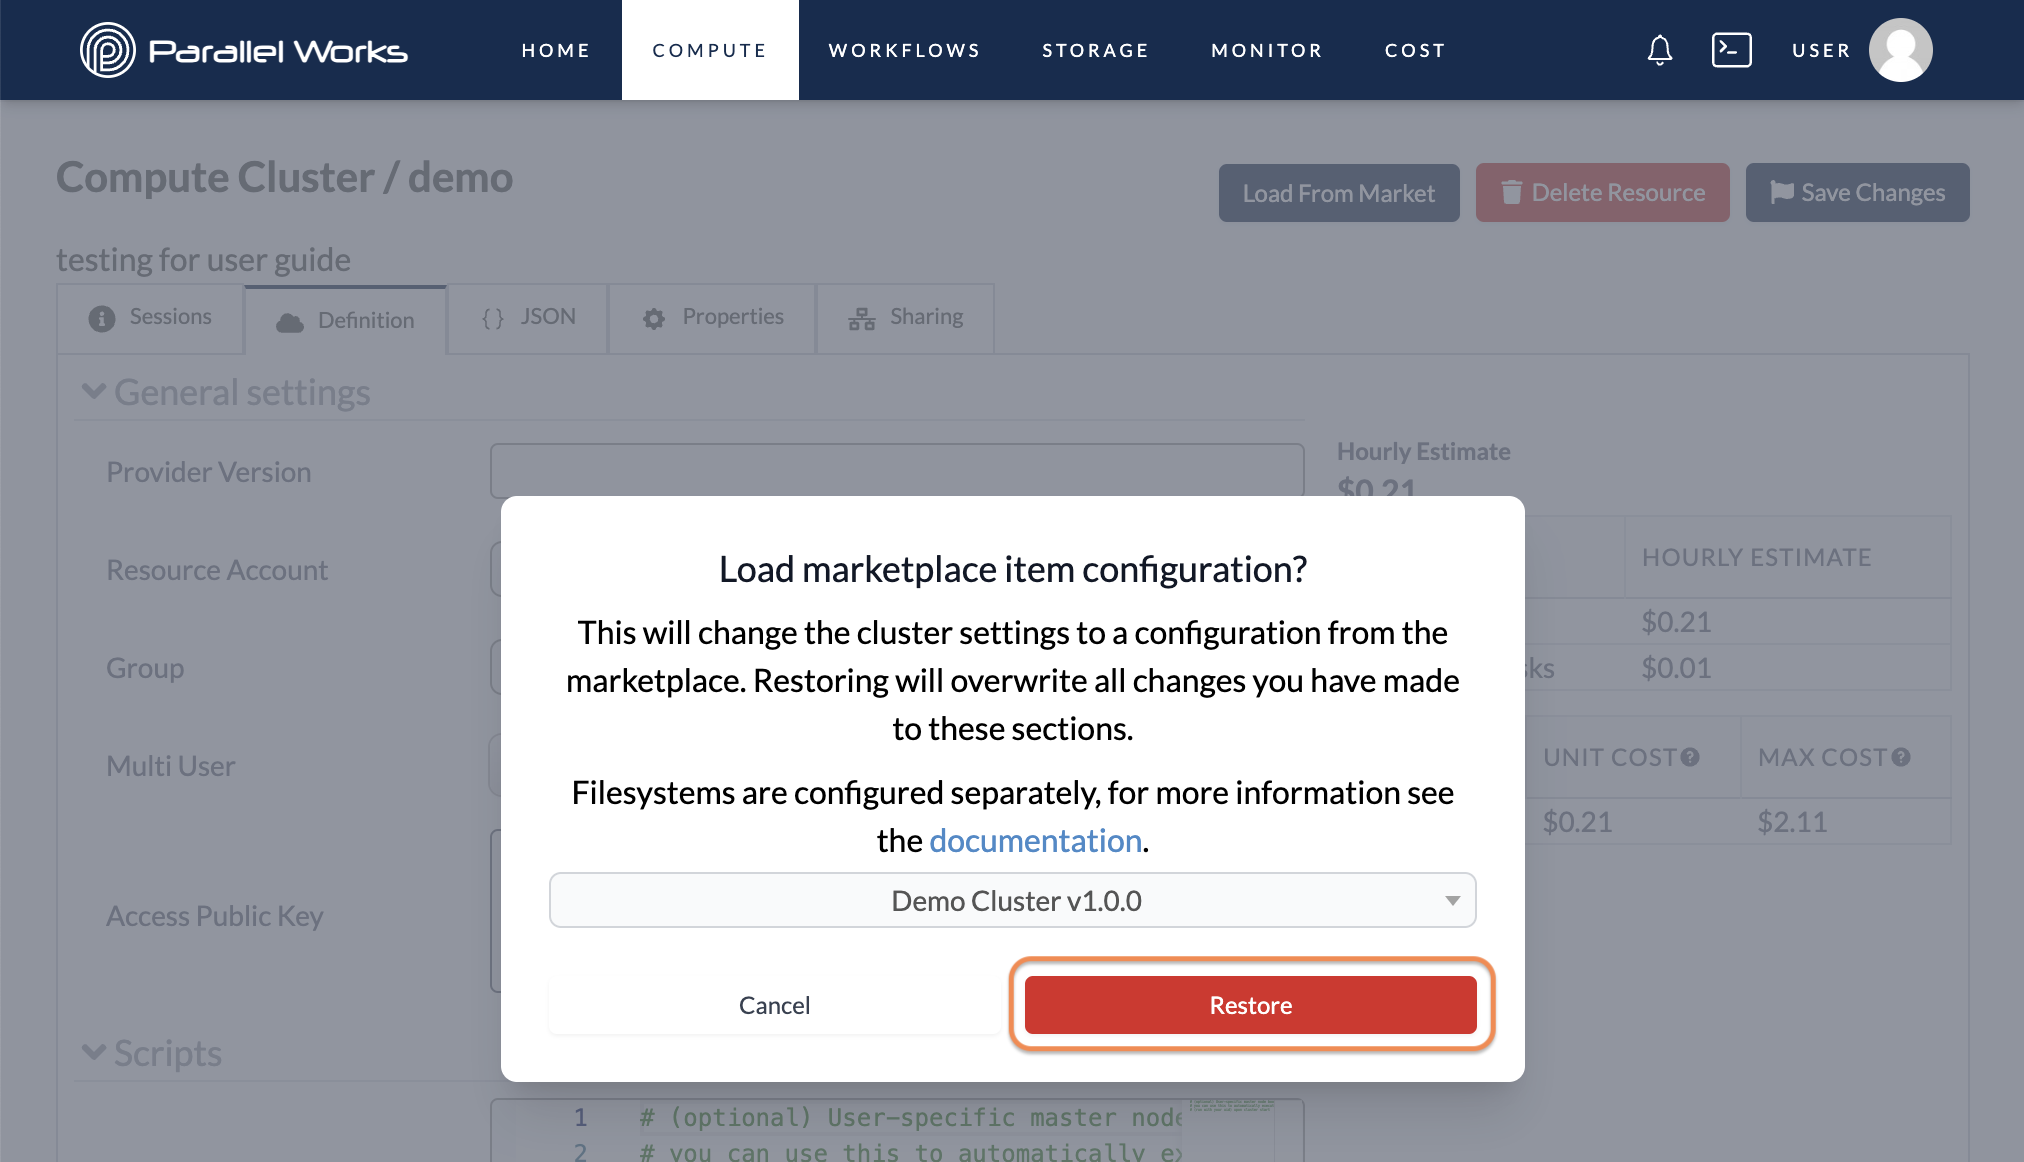
Next, create a new resource or navigate to an existing resource's settings. Click Load From Market.
After you click Load From Market, a dialog box will appear. Choose your resource from the dropdown menu, then click Restore.
Existing clusters do not have a Load From Market button.