Logging In to the Controller
Clusters use one node, called a controller, to delegate tasks to compute nodes so they can carry out commands and complete jobs. You can complete many tasks on ACTIVATE after logging in to the controller, such as submitting jobs and transferring data.
There are multiple ways to log in to the controller.
Within the Platform
One-Click SSH Connection
After you've started a cluster, navigate to the Home page.
In the Compute module, click on the cluster's IP address.
Alternatively, you can click the terminal icon, then click the arrow icon. A dropdown menu of your active clusters will appear. Click the one you'd like to SSH into.
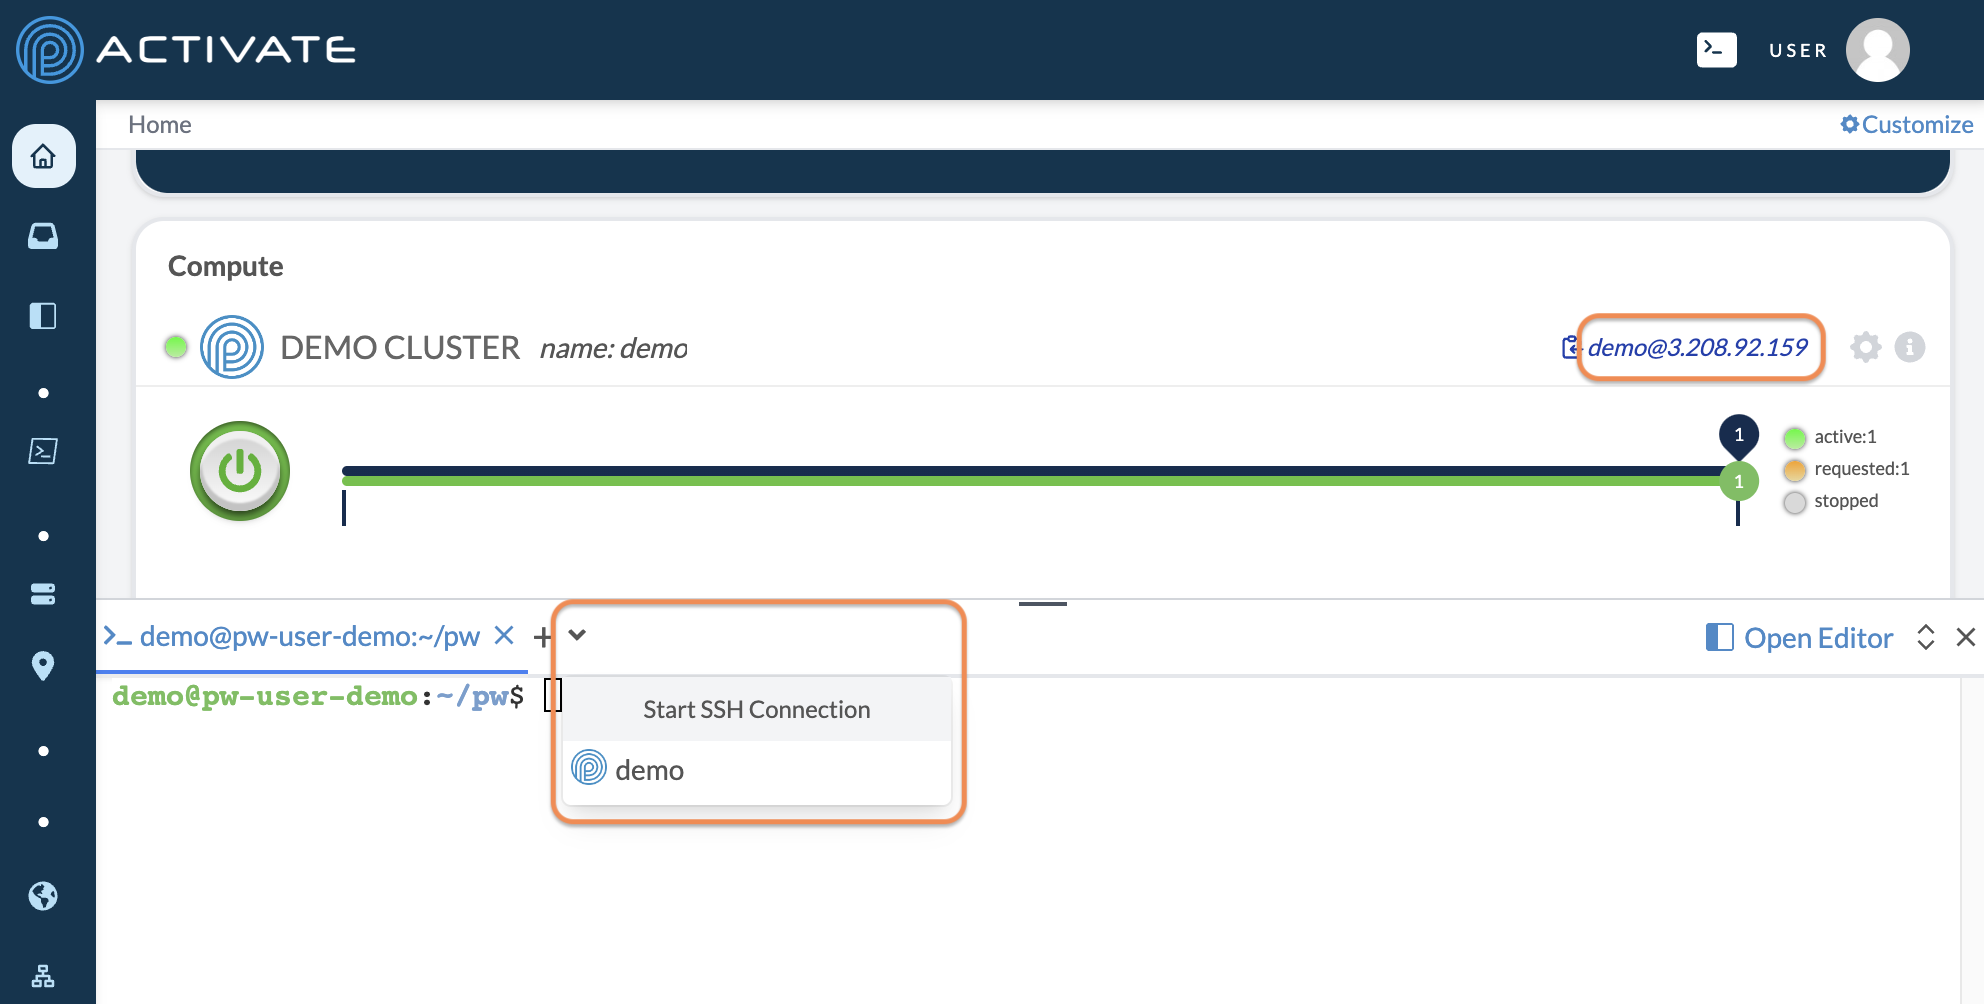
A terminal will open on the bottom half of your screen, where you'll be automatically logged in to your cluster's controller node.
Manual SSH Connection
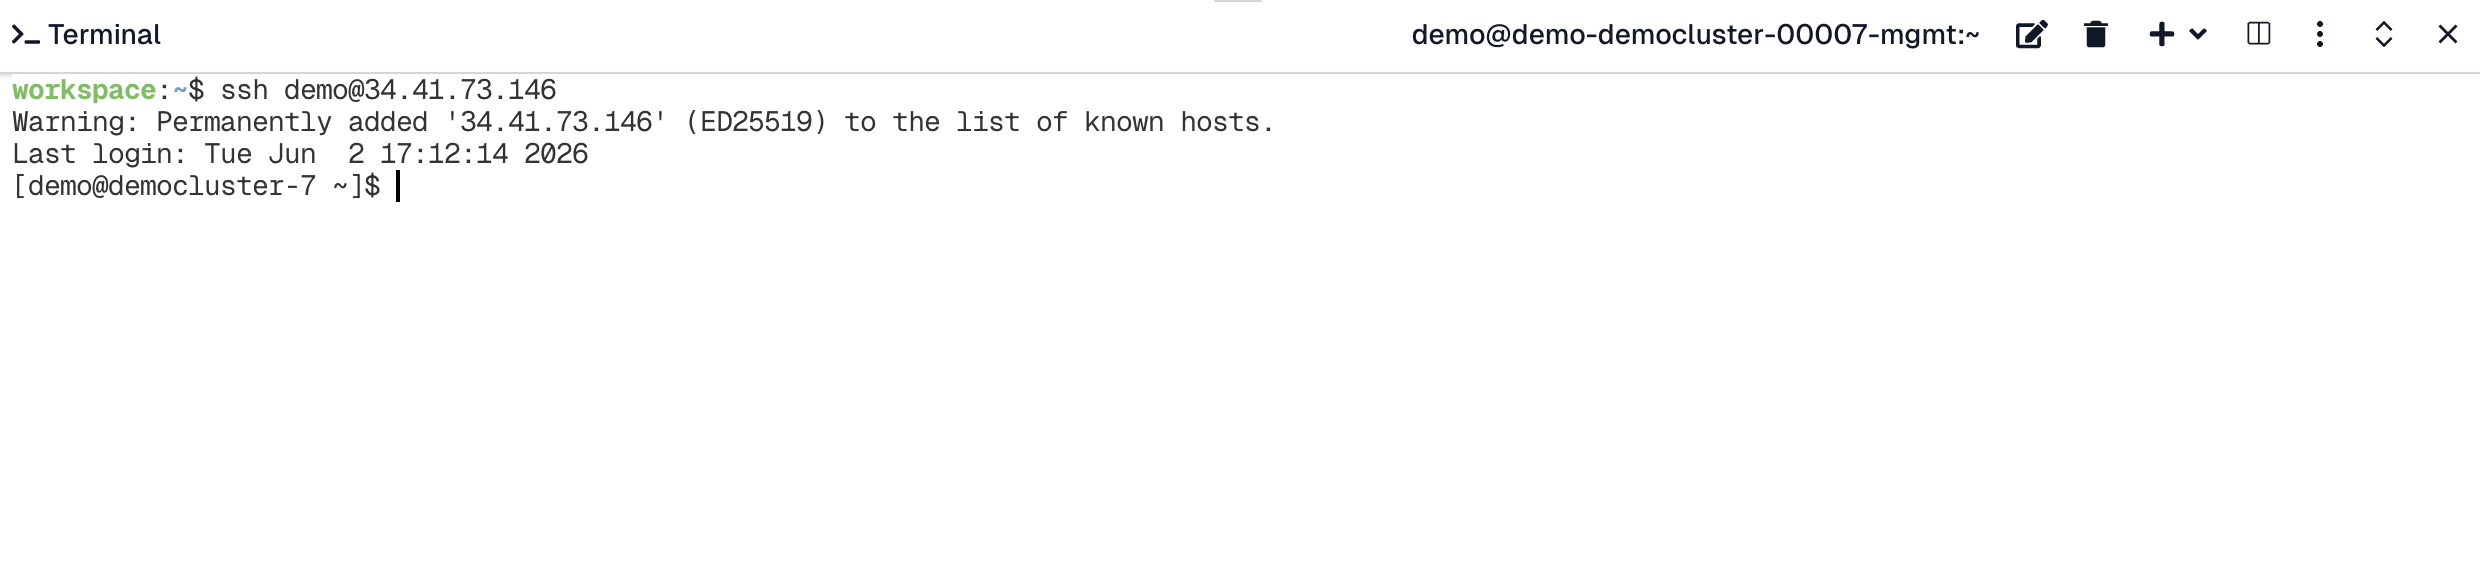
After you’ve started a cluster, navigate to the Home page.
In the Compute module, click on the clipboard next to the running cluster's IP address to copy it.
Open the terminal .
Enter the command ssh username@IPaddress. The terminal will display your last login and location.
Note
Each time you start a cluster, the controller will be assigned a random IP address from the cloud provider’s available addresses. If you stop the cluster, this IP address is released automatically and will most likely not be the same when you start the cluster again.
Although it’s unlikely that you’ll encounter the same cluster IP address, it may occur if you start and stop a cluster frequently. You may receive the following message: WARNING: REMOTE HOST IDENTIFICATION HAS CHANGED!.
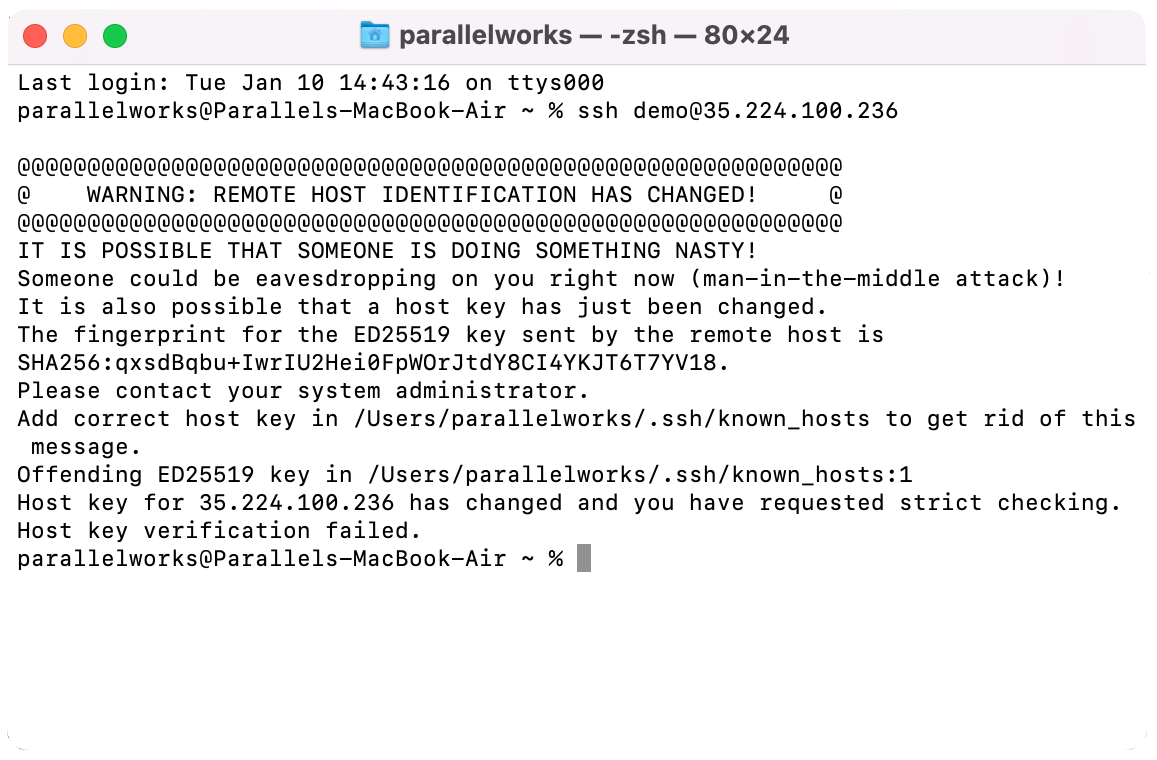
To resolve the issue, enter the command ssh-keygen -R controllerIPaddress. You should see the following message:
[demo@pw-user-demo ~]$ ~ ssh-keygen -R 35.224.100.236
# Host 35.224.100.236 found: line 137
/Users/demo/.ssh/known_hosts updated.
Original contents retained as /Users/demo/.ssh/known_hosts.old
[demo@pw-user-demo ~]$ ~ ssh canary.parallel.works
The authenticity of host '35.224.100.236' can't be established.
ED25519 key fingerprint is SHA256:KzR9SCW5QKmICeH2e5z7ZHPgAdoUOUuBNpkqj8UqSog.
This key is not known by any other names
Are you sure you want to continue connecting (yes/no/[fingerprint])?
Enter yes. You'll see a message that the IP address has been added to the list of known hosts.
Warning: Permanently added '35.224.100.236' (ED25519) to the list of known hosts.
Last login: Wed Jan 11 16:40:36 2023 from 104-60-190-63.lightspeed.hstntx.sbcglobal.net
[demo@pw-user-demo ~]$
Outside the Platform
You can add an SSH key to your ACTIVATE account, which will allow you to log in to any active cluster from any device with that SSH key on it. For more information, please see Managing SSH Keys.
FAQ
Why don't I have to use an SSH key from within the platform?
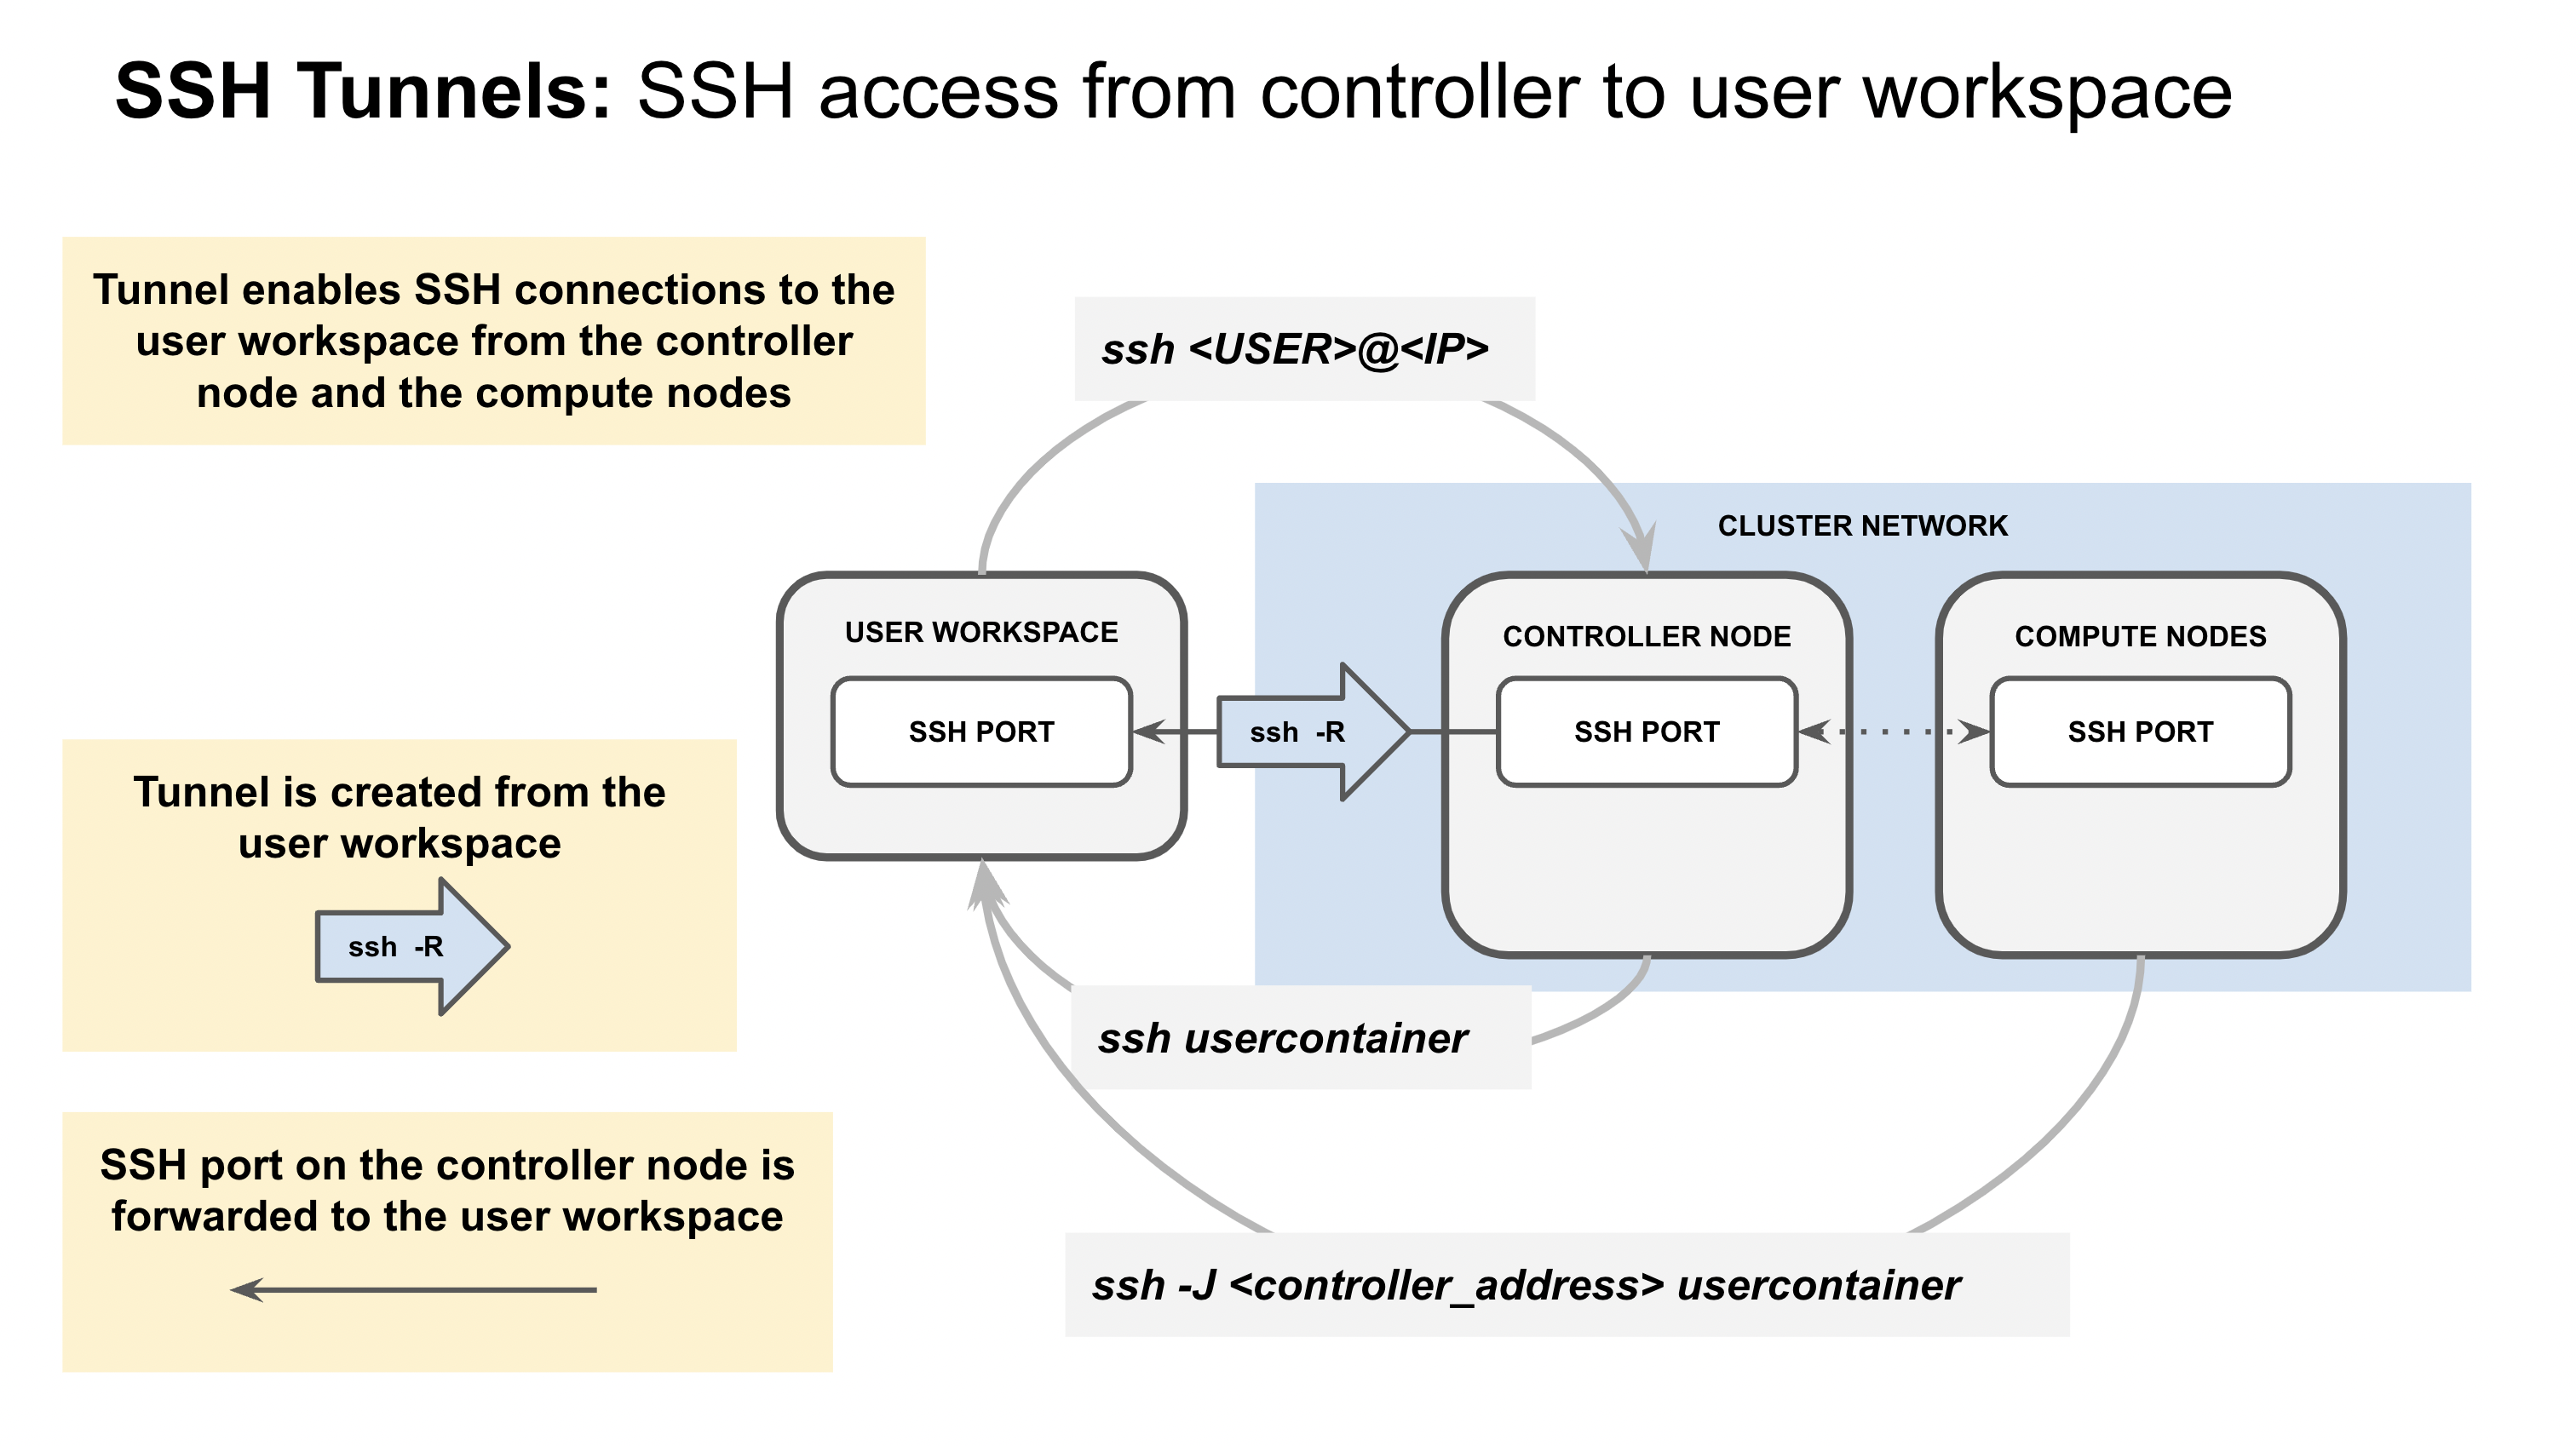
Each user's workspace has an SSH key preprovisioned, so logging in to the controller through the IDE doesn't require SSH key management. The public key is automatically propagated to the controller while the private key stays inside your workspace.
Whenever you start a new cluster, a new key is generated and propagated to facilitate SSH to compute nodes. This process works because the home directory is shared across all nodes in the cluster; adding your public workspace key to the authorized_keys file on the controller automatically allows you to SSH to the compute nodes too.
You can access your public workspace key at any time with the command cat ~/.ssh/pw_id_rsa.pub in an IDE terminal.
Why do I see __ failed login attempts the first time I log in to the controller?
These failed login attempts won't affect your cluster's performance: they're a result of how the ACTIVATE platform communicates with cloud service providers to make resources available.
During the provisioning process, the platform repeatedly tries to SSH to the controller. While the controller comes online, the platform attempts to establish a tunnel connection from the user workspace to the controller. Because the user workspace key isn't available on the system until partway through the bootstrap process, the system registers some of these connection attempts as failures.
Below is a diagram of this process.
What if I don’t have an SSH key?
The steps below will guide you through finding and creating SSH keys on your device for both macOS and Windows.
Note
The instructions in this section will work on Windows if you use a shell emulator like Git BASH or PowerShell.
If you use PuTTY to manage your SSH keys on Windows, see What if I use PuTTY? below.
Check for SSH Keys
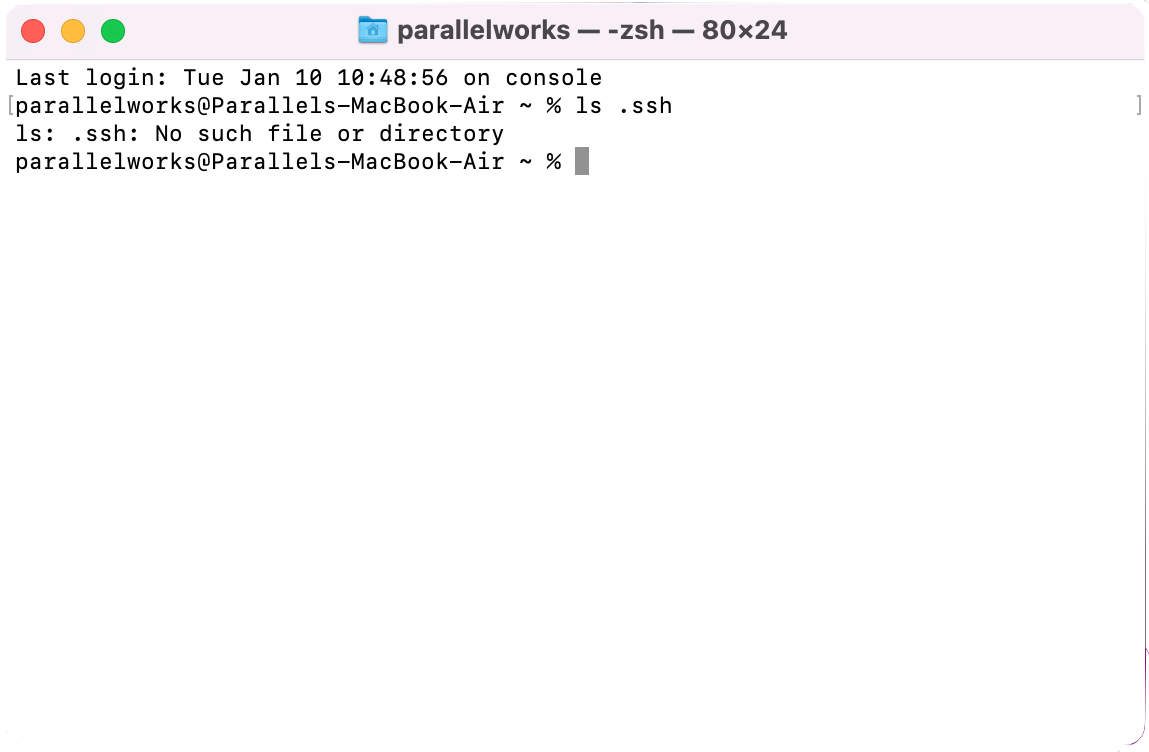
Open Terminal (macOS) or Command Prompt (Windows). Enter ls .ssh to check for SSH keys on your device. If you’ve never generated an SSH key, you’ll see the message ls: .ssh: No such file or directory.
If you do have SSH keys on your device, they’ll be listed. If you want to use one of your existing keys, see Get Your Public Key below.
Create an SSH Key
Enter ssh-keygen. You’ll see the following message:
Generating public/private rsa key pair.
Enter file in which to save the key (/Users/YourName/ .ssh/id_rsa):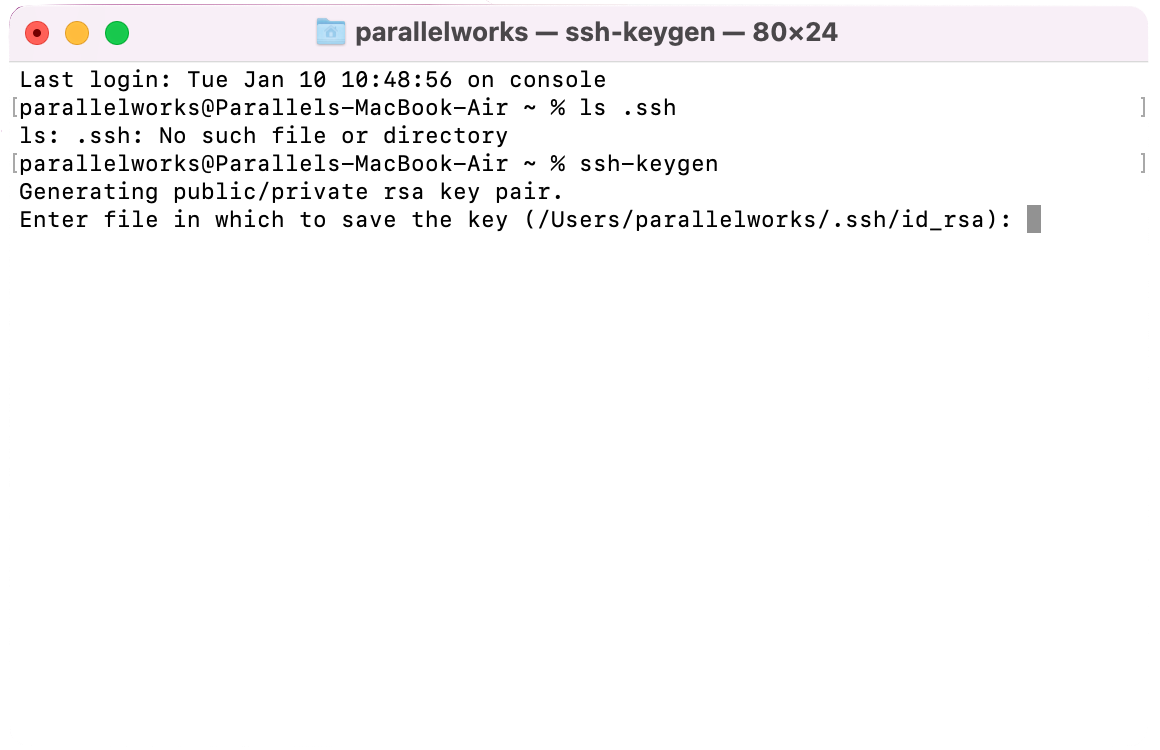
Type the name of the new location, or press return/enter if you want to keep the default location. If this is the first time you’ve generated an SSH key and you use the default location, you'll see Created directory ' /Users/YourName/ .ssh'..

You'll be prompted to enter a passphrase for your SSH key with the following message:
[Enter passphrase (empty for no passphrase):
[Enter same passphrase again:
Enter a passphrase, or press return/enter for both lines if you don’t want to use one. You'll see the following message, along with your key fingerprint and the key’s randomart image:
Your identification has been saved in /Users/YourName/ .ssh/id_rsa
Your public key has been saved in /Users/YourName/ .ssh/id_rsa.pub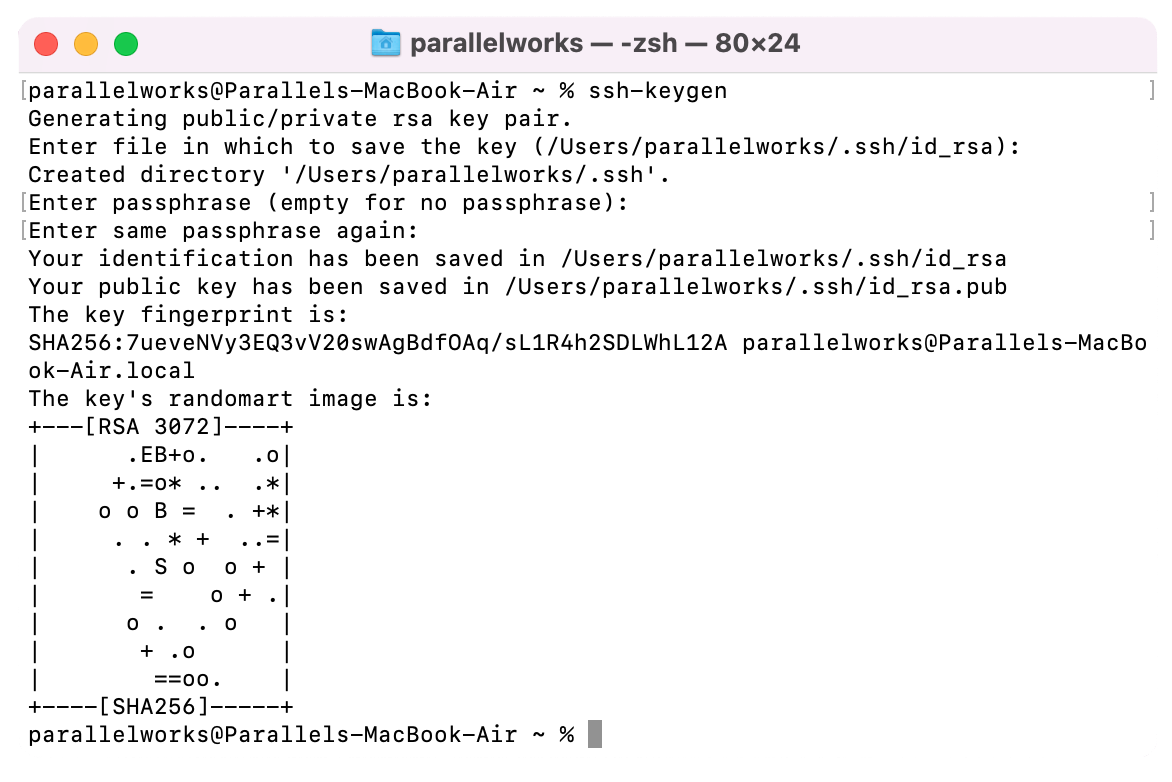
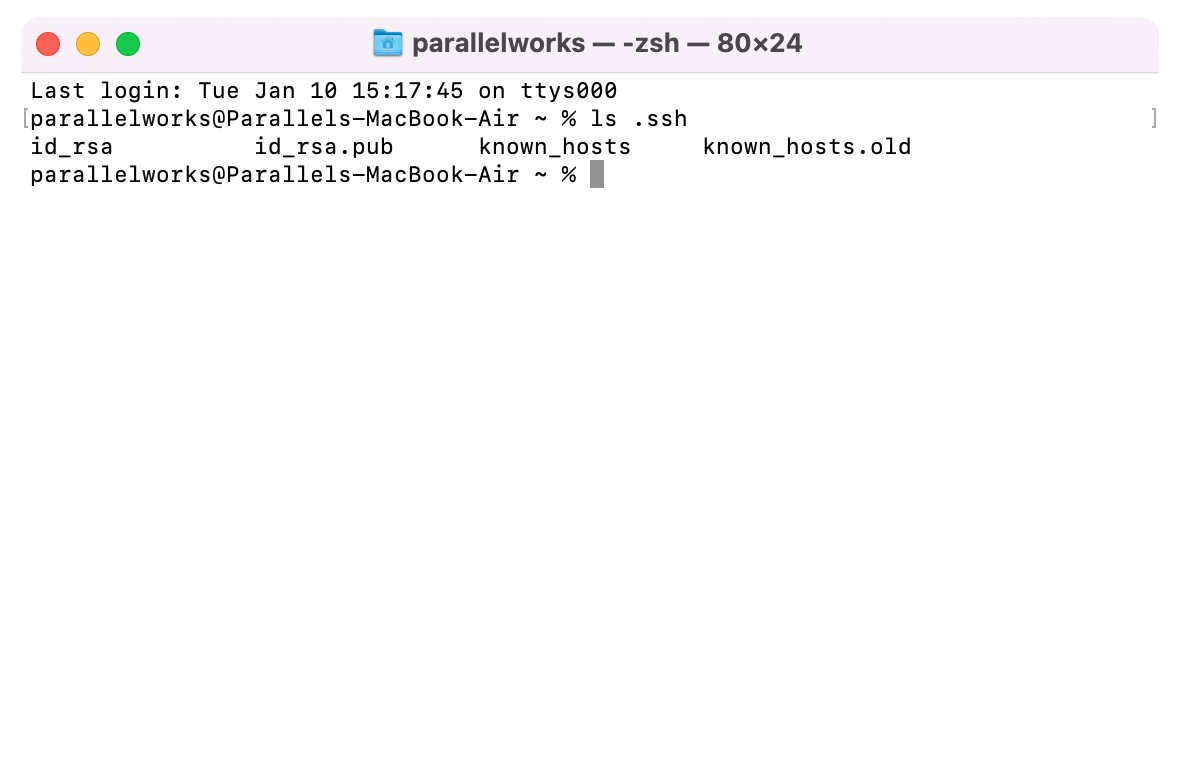
Enter ls .ssh again. Now you'll see your private and public SSH keys.
Get Your Public Key
Enter cat .ssh/id_rsa.pub. You’ll see the full contents of your public SSH key.
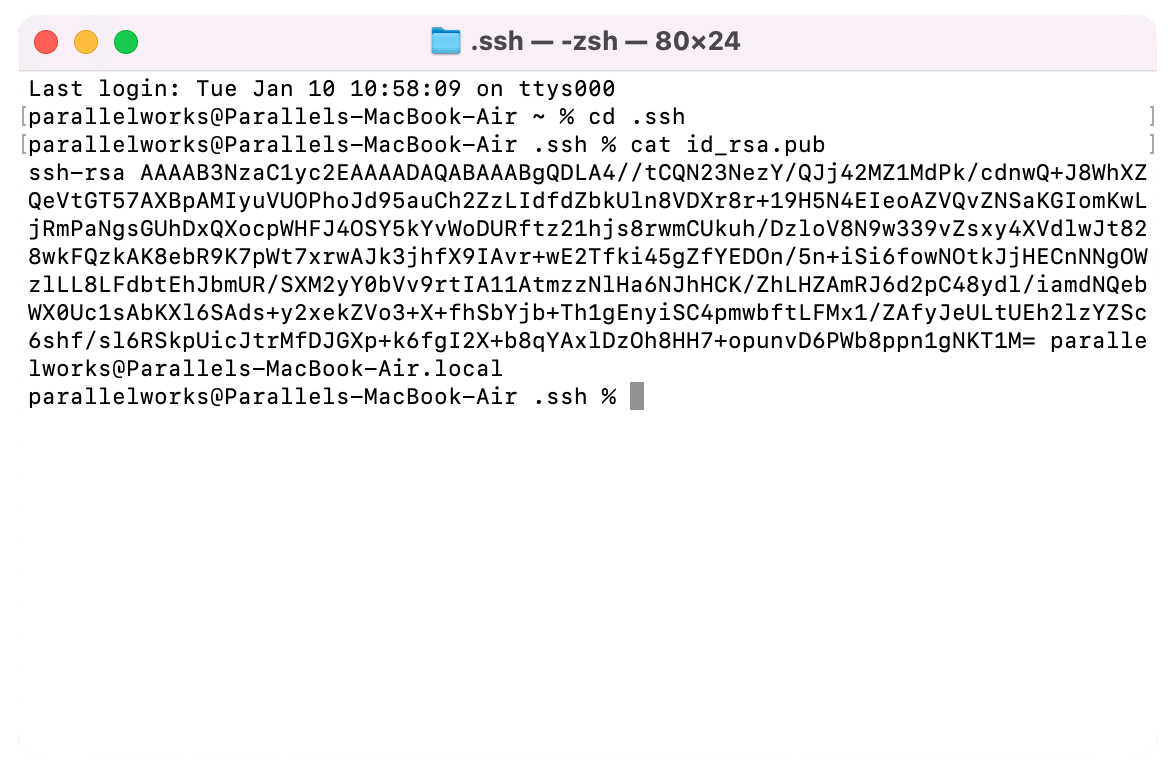
Copy all of the text from the beginning of ssh-rsa to the end of local. This is what you’ll paste into the Access Public Key text box in your cluster’s configuration settings or the Key text box in Account > Authentication > Key.
Important
For safety's sake, never store a private SSH key on a server. If someone gained access to your private key, they could use it to access any other device that key protects.
What if I use PuTTY?
Public SSH keys must be in OpenSSH format before you can use them on the ACTIVATE platform. If you use PuTTY, your SSH keys are likely saved in a PPK format like this:
PuTTY-User-Key-File-2: ssh-rsa
Encryption: none
Comment: rsa-key-20211005
Public-Lines: 6
AAAAB3NzaC1yc2EAAAABJQAAAQEAo7FYgire/SVeCEmN3CLxKgQhG5kCqt+eL4VU
X81/zO+lf1P8RjsjCNLrRd0o2zfquhaNFbYKA+DSo6Vpg18EYHiQA/HgEOgzUAF7
Tq4OaZl3yVyJKjzxQDXHnRhnJmCJ438PJD69crQh4apGtuPQuJOOKJe1PCpcp7Fy
P2+y2Hb0wM23K60tWsML9wf2P6gsY/vYxV+wNlohJa9LuY2dtk39kCs/5tmIOfHi
tOE+3ZjxzYTV0xlLNF+Gjxm1GV38YIa9R9fzdMXqm2HiHFbT5YbB6MaB/brDhVtO
dLha0y8OITQosmogA13mOcfYLlbgou65eHT+Nj9tALKEX3LgDw==
Before copying a PPK key, it must be converted to OpenSSH format. The easiest way to do this is with PuTTYgen, typically included with PuTTY installations. Below is a CLI example using PuTTYgen to convert a PPK key to OpenSSH format:
$ puttygen putty_key.ppk -L -o putty_key.pub
# Command explanation:
  * 'putty_key.ppk' -> the source key file
  * '-L' -> OpenSSH public key output type
  * '-o putty_key.pub' -> The output file name
The result is a single line public key file in OpenSSH format:
$ cat putty_key.pub
ssh-rsa AAAAB3NzaC1yc2EAAAABJQAAAQEAo7FYgire/SVeCEmN3CLxKgQhG5kCqt+eL4VUX81/zO+lf1P8RjsjCNLrRd0o2zfquhaNFbYKA+DSo6Vpg18EYHiQA/HgEOgzUAF7Tq4OaZl3yVyJKjzxQDXHnRhnJmCJ438PJD69crQh4apGtuPQuJOOKJe1PCpcp7FyP2+y2Hb0wM23K60tWsML9wf2P6gsY/vYxV+wNlohJa9LuY2dtk39kCs/5tmIOfHitOE+3ZjxzYTV0xlLNF+Gjxm1GV38YIa9R9fzdMXqm2HiHFbT5YbB6MaB/brDhVtOdLha0y8OITQosmogA13mOcfYLlbgou65eHT+Nj9tALKEX3LgDw== rsa-key-20211005
Now you can add this key to your ACTIVATE account. For more details on that process, please see Authentication.